Introduction to async/await in TypeScript
Imagine if your application were allowed to perform only one task at a time. For example, if users download their favourite music or scroll through the feed, delivering seamless navigation would have needed interdimensional sorcery!
However, thanks to asynchronous programming, such cases are easily avoidable during development. So, be it a mobile app or web application, the usability of asynchronous programming is inevitable.
Further, the advent of Typescript has made implementing multi-tasking features even easier. Typescript offers effective type-checking and empowers developers to type-safe their expected results.
For this, Typescript offers async/await syntax that helps developers to handle complex asynchronous programming.
With this blog, we will take an in-depth look into the async/await method in Typescript to assist you in making the best out of it. But before we dive into that, let's first look into some of the prerequisites of async/await that you must know beforehand.
Table of Content
async/await Prequistique: Promises
async/await method acts as a keyword wrapper for promises. Hence, making them an essential part of asynchronous functionality in typescript.
A promise in typescript denotes a guarantee for an occurrence of a future event based on which all your current tasks are carried out.
For example:
Let’s take a basic example of an auto PDF generator for a form. The function can help to generate a final PDF of the form after the user fills it up. In this, the function promises to create a PDF after the user fills out the form. Here’s a basic flow chart of the promises work.
The Syntax:
To use Typescript promise functionality, we will have to create the object of promise for this we can use the following syntax.
new Promise(function(resolve, reject){
	// our logic goes here ..
});
In the above syntax, we can see the following parameters:
- new: It declares the instance of the promise.
- reject, resolve: you can use these parameters to pass the callback function. Upon successful completion, it will return a resolve and upon failure, it will return a reject.
The promise function provides 3 states to provide updates on the function’s progress.
- Reject response indicates function failure.
- Pending indicates the absence of a response.
- Fulfilled indicates successful completion of the function promise.
Here is what your basic promise example would look like:
Example 1:
Let’s consider the example of product delivery. Suppose you placed an order on the promise from your eCommerce brand that it will deliver your product. Once delivered the user would fulfill their promise of paying for it
const onlineDelivery = new Promise<string>((resolve, reject) => {
    // a resolved promise after certain hours
    setTimeout(() => {
        resolve('Your order will be delivered)
    }, 100000)
 // resolves after 100,000ms
    reject("We couldn't deliver your order")
})

const cashOnDelivery = new Promise<Record<string, number | string>>((resolve, reject) => {
    setTimeout(() => {
        resolve({
            amount: 2000,
            note: 'Thank You',
        })
    }, 100000)
    reject({
        amount: 0,
        note: 'Sorry the product is defective'
    })
})
How to bind together promises for execution?
Usually, the promise functions execute themselves in the form they resolve, as we see in the above example. However, if you need to execute your promise functions sequentially, you’ll need the .then() method, which helps chain your promises effectively.
Here’s how you can effectively chain your promises together for effective execution:
Example 2:
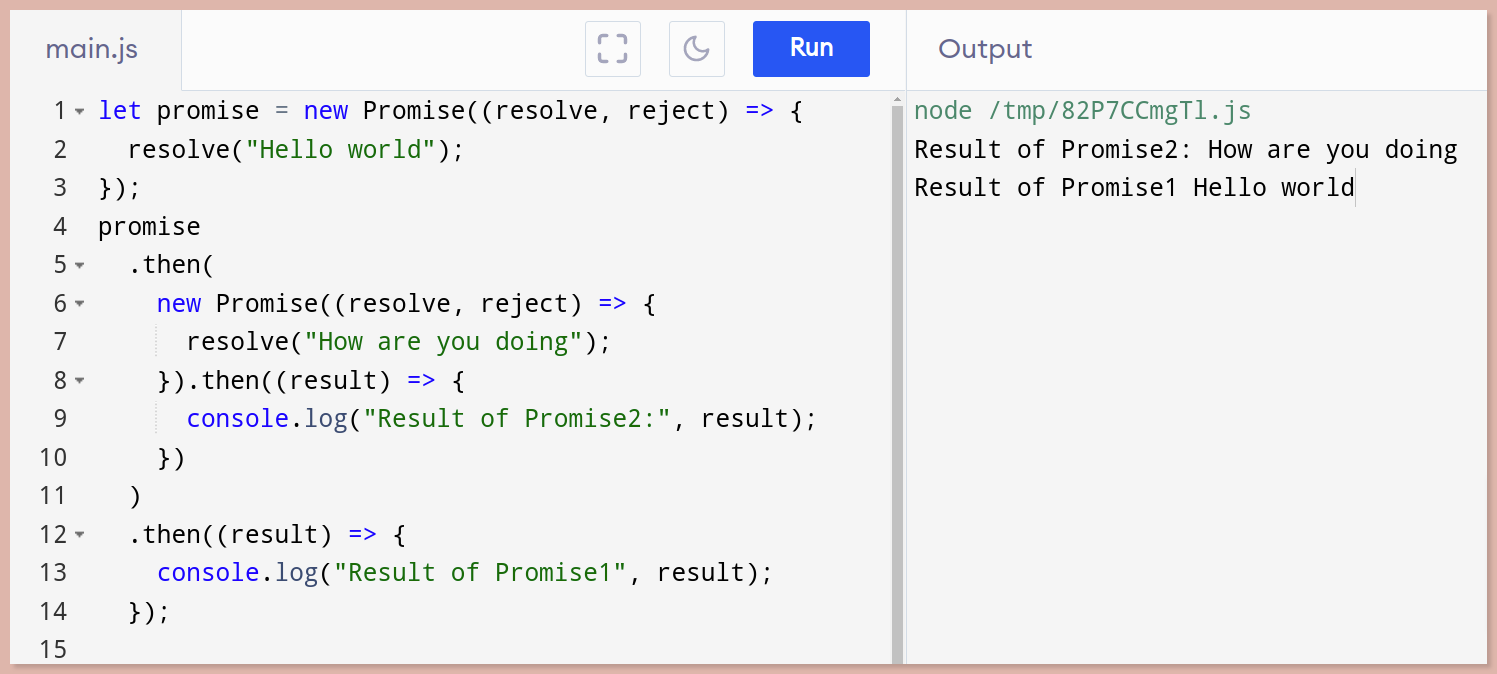
Let us consider two strings, "Hello user" and "How are you doing" we will use the .then() method to sequentially execute these two sentences in reverse order.
Note: Chaining promises are not limited to only two functions. We can chain multiple functions together according to our needs.
let promise = new Promise((resolve, reject) => {
  resolve("Hello world");
});
promise
  .then(
    new Promise((resolve, reject) => {
      resolve("How are you doing");
    }).then((result) => {
      console.log("Result of Promise2:", result);
    })
  )
  .then((result) => {
    console.log("Result of Promise1", result);
  });
Handling concurent promises (or) promise.all() method
Sometimes you need to handle an array of promises to achieve complex functionality. For example, to successfully mark an order fulfilled program must resolve.
- The promise of shipping.
- The promise of product delivery.
- The promise of payment received from the user’s end.
- The promise of no return.
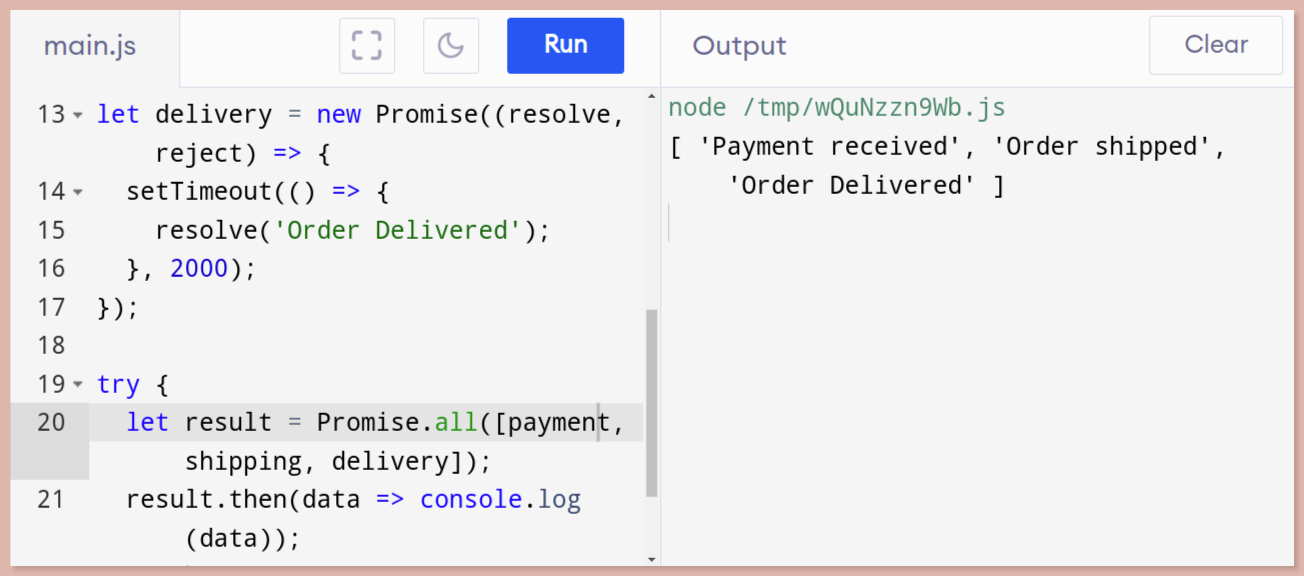
With promise.all() method, we can take all the individual methods in the form of an array and create product completion functionality that resolves after each of these promises is resolved. effectively.
Example 3:
Here’s how you can execute the online order delivery function mentioned above with promise.all() methods with ease. In this, after resolving each of the promises we will print out the steps for confirming the order completion.
let payment = new Promise((resolve, reject) => {
  setTimeout(() => {
    resolve('Payment received');
  }, 3000);
});

let shipping = new Promise((resolve, reject) => {
  setTimeout(() => {
    resolve('Order shipped');
  }, 1000);
});

let delivery = new Promise((resolve, reject) => {
  setTimeout(() => {
    resolve('Order Delivered');
  }, 2000);
});

try {
  let result = Promise.all([payment, shipping, delivery]);
  result.then(data => console.log(data));
} catch (error) {
  console.log(error);
}
There are multiple methods related to promises which you can explore to further advance your understanding. However, for the sake of this article’s scope, it’s safe to assume that now you’re well-versed in basics related to Typescript promises, and we can move ahead to our main theme of async/await functionality in TS.
Getting Started with async/await
async/await functionality adds a layer of ease in executing promises within typescript. The async keyword will help wrap up any function even if it doesn’t start with the promise keyword.
Once it is fulfilled, the await will return the value of the function. If the promise function fails to execute await section will catch the error and deliver it.
Using the async/await will help you with:
- Pausing your functions if needed.
- Throw exceptions for asynchronous functions.
- Pass value within the function.
These perks make asynchronous programming easier and much more efficient for developers. Here’s how async/await would look in real-time.
Example 4:
Let’s create a function that prints "Hi TS". But we need a plot twist here to further understand how async/await works, So we will wrap our function with async that ensures the function prints Hi and await to wait for 3 counts and print it before printing TS.
Essentially, it's like ordering takeout from a restaurant and completing the rest of your shopping nearby while you wait.
function del(milliseconds: number, count: number): Promise<number> {
    return new Promise<number>(resolve => {
            setTimeout(() => {
                resolve(count);
            }, milliseconds);
        });
}

async function wel(): Promise<void> {
    console.log("Start");

    for (let i = 0; i < 3; i++) {

        const count: number = await del(300, i);
        console.log(count);
    }

    console.log("Finish");
}

wel();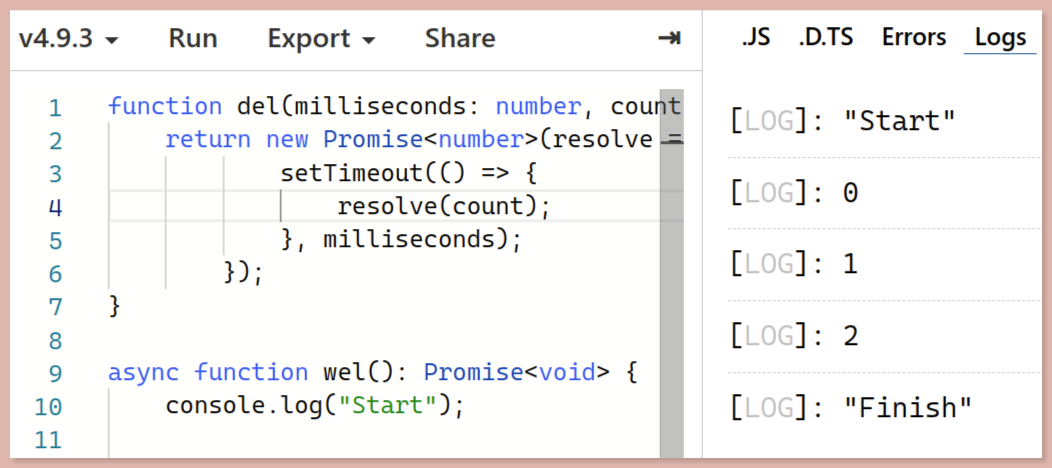
Example of rewriting a promise code using async/await
To understand the difference between promise and async code syntax, let's look at examples.
Example 5: Promise-based code execution
function getPromise() {
  var promise = new Promise((resolve) => {
    setTimeout(() => {
      console.log("Promise Executed...");
      resolve("Sample data");
    }, 1000); //execute in 1s
  });
}

function data() {
  var array = ["data1", "data2"];
  var promise = getPromise();
  console.log(array);
}

data();
According to the above code, we get the result first, followed by a promise execution message.
Output:

["data1", "data2"]
Promise Executed...
Example 5a: Here's how to rewrite the above code using async/await:
function getPromise() {
  return new Promise((resolve) => {
    setTimeout(() => {
      console.log("Promise Executed...");
      resolve("Sample Data");
    }, 1000);
  });
}

// declaring async function
async function data() {
  try {
    var array = ["data1", "data2"];
  	var promise = await getPromise();
  	console.log(array);
  } catch (err) {
  	console.error(err);
  }
}

data();
Here, the function getPromise(), returns a promise after 1s after being resolved, so it shows synchronous behavior owing to the fact that the thread is made to wait for 1s before executing it.
Output:

Promise Executed...
["data1", "data2"]
Error handling in async/await
In most likely situations, your promise functions will get fulfilled. However, just like in the real world, even in the world of TS, there’s no guarantee your promises would be executed.
Hence, having an error-handling system to know when things are going south is essential. One of the most basic ways to achieve this is to adapt to the go-to try & catch error handling system. To get an in-depth understanding, here’s an example that could help.
Example 6:
Let’s create a simple example that throws an error.
async function theError() {
    throw new Error("Its an error");
}

async function run() {
    try {
        await theError();
    } catch (e) {
        console.error(e);
    } finally {
        console.log('The final block');
    }
}

run();
As you can see above, this is a classic example where the block shows an error, we catch it, and finally before executing the code in the final block.
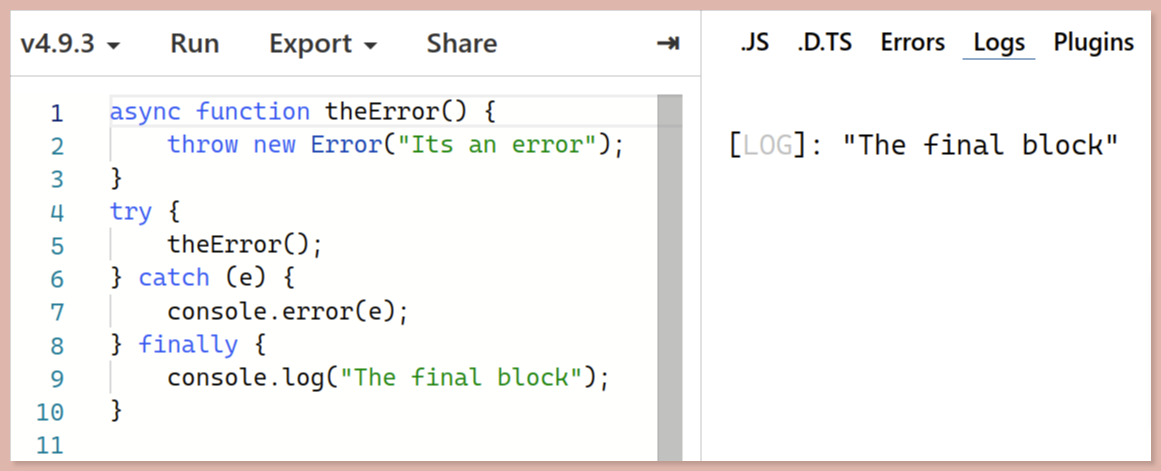
However, if we turn it into a rejected promise with the code below, it does not catches the error.
Example 6a:
async function theError() {
    throw new Error("Its an error");
}
try {
    theError();
} catch (e) {
    console.error(e);
} finally {
    console.log('The final block');
}
Example 6b:
async function makeSomeError() {
    throw new Error("Its an error()");
}
async function testCatch() {
    try {
        return await makeSomeError(); // <-- Notice we added here the "await" keyword.
    } catch (e) {
        console.error(e);
    } finally {
        console.log('The final block');
    }
    return "Nothing";
}
async function finalblock() {
    const myValue = await testCatch();
    console.log(myValue);
}
finalblock();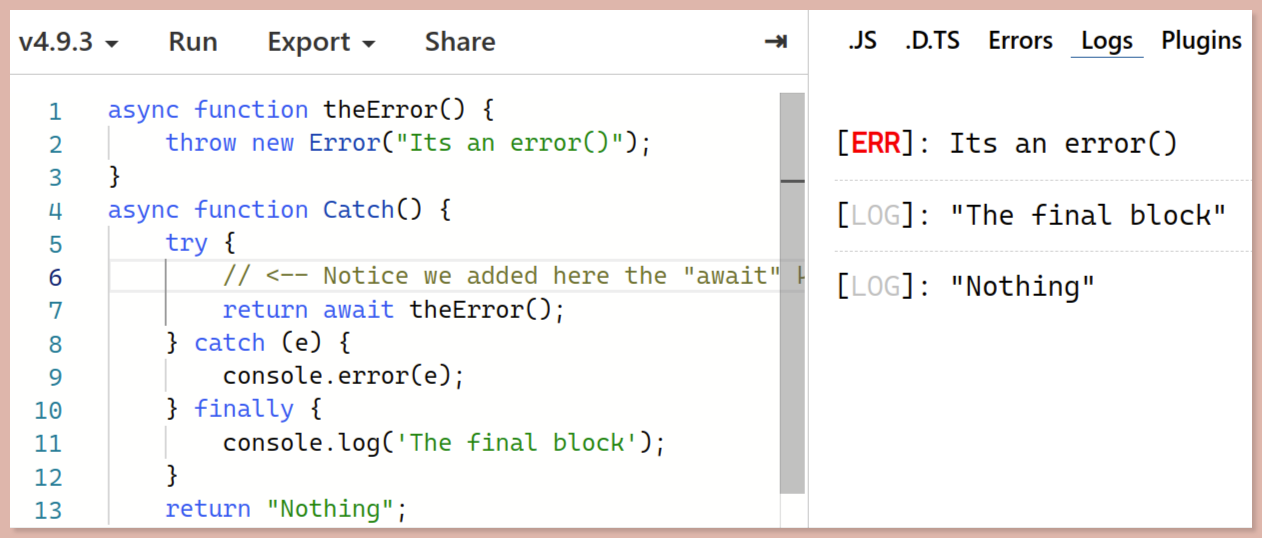
Here’s how this function above can catch our error effortlessly:
- We wrap the function throwing an error in async, which then returns a rejected promise.
- We now create another function that return our previous core function.
- The await helps us to discover that the promise has been rejected, and handle it further.
Final Words
In summary, Typescript’s async/await syntax is a great improvement to JavaScript. It makes writing asynchronous code more natural and less error-prone. Asynchronous functionality is essential for successful web application and website development processes.
However, if implemented using the traditional methods can lead to complexities. To solve this, using async/await functionality can be a great alternative.
The async keyword allows functions to be defined in a sequential, synchronous manner (although the execution will be asynchronous). The await keyword makes it easier to handle the asynchronous nature of code. Together, these two features make writing asynchronous code feel more like writing synchronous code.
async/await pair helps you control your promises providing real-time convenience for programmers in terms of controlling the execution timings and error handling. So, adapt to async/await functionality today for creating breezy asynchronous functions to attain complex functionalities.
Monitor Your Node.js Applications with Atatus
Atatus keeps track of your Node.js application to give you a complete picture of your clients' end-user experience. You can determine the source of delayed response times, database queries, and other issues by identifying backend performance bottlenecks for each API request.

Node.js performance monitoring made bug fixing easier, every Node.js error is captured with a full stack trace and the specific line of source code marked. To assist you in resolving the Node.js error, look at the user activities, console logs, and all Node.js requests that occurred at the moment. Error and exception alerts can be sent by email, Slack, PagerDuty, or webhooks.
#1 Solution for Logs, Traces & Metrics
![]() APM
APM
![]() Kubernetes
Kubernetes
![]() Logs
Logs
![]() Synthetics
Synthetics
![]() RUM
RUM
![]() Serverless
Serverless
![]() Security
Security
![]() More
More