Building CRUD REST API With Node.js, Express.js, and PostgreSQL
Knowing how to deal with APIs to allow communication between software systems is essential if you're a web developer. This article will show you how to develop a CRUD REST API in a Node.js environment using an Express.js server and a PostgreSQL database. We'll go over how to use node-postgres to connect an Express.js server to PostgreSQL.
The API will support HTTP request methods that correlate to the PostgreSQL database from which it gets its data. You'll also learn how to install PostgreSQL and use the command-line interface to interact with it.
This article aims to enable CRUD operations on the API (GET, POST, PUT, and DELETE), which will execute database commands. To accomplish this, we'll create a route for each endpoint and a query function.
We will go over the following:
- What is a CRUD?
- What is REST API?
- What is Express.js?
- What is PostgreSQL?
- Prerequisites
- Installation
- PostgreSQL Command Prompt
- Creating a Role in Postgres
- Creating a Database in Postgres
- Creating a Table in Postgres
- Setting Up an Express.js Server
- Using Node.js to Connect to a Postgres Database
- Creating Routes for CRUD Operations
- Exporting CRUD functions in a REST API
- Configuring CRUD Functions in a REST API
1. What is a CRUD?
CREATE, READ, UPDATE, and DELETE are the acronyms for CRUD. CRUD is built on the foundation of these four database commands. Although programmers are familiar with this acronym, many software developers regard it as more of a guide because CRUD was not designed as a modern technique to establish APIs. After all, it may be traced back to the database. It's more of a cycle than an architectural system, according to its definition.
Many programming protocols and languages have their CRUD version, with slightly different names and functions. SQL (structured query language) is a good example, as it employs Insert, Select, Update, and Delete. A dynamic website also has CRUD cycles, such as a buyer on an eCommerce website.
HTTP requests are most typically used by RESTful APIs. The ways by which a developer can design a CRUD system are GET, POST, PUT, and DELETE, which are four of the most frequent HTTP methods in a REST environment.
In a REST environment, here's how to use CRUD:
- Create
Use the HTTP POST method to build a resource in a REST environment. - Read
Use the GET method to read a resource. Reading data from a resource retrieves it without changing anything. - Update
To make changes to a resource, use the PUT method. - Delete
Use the DELETE method to remove a resource from the system.
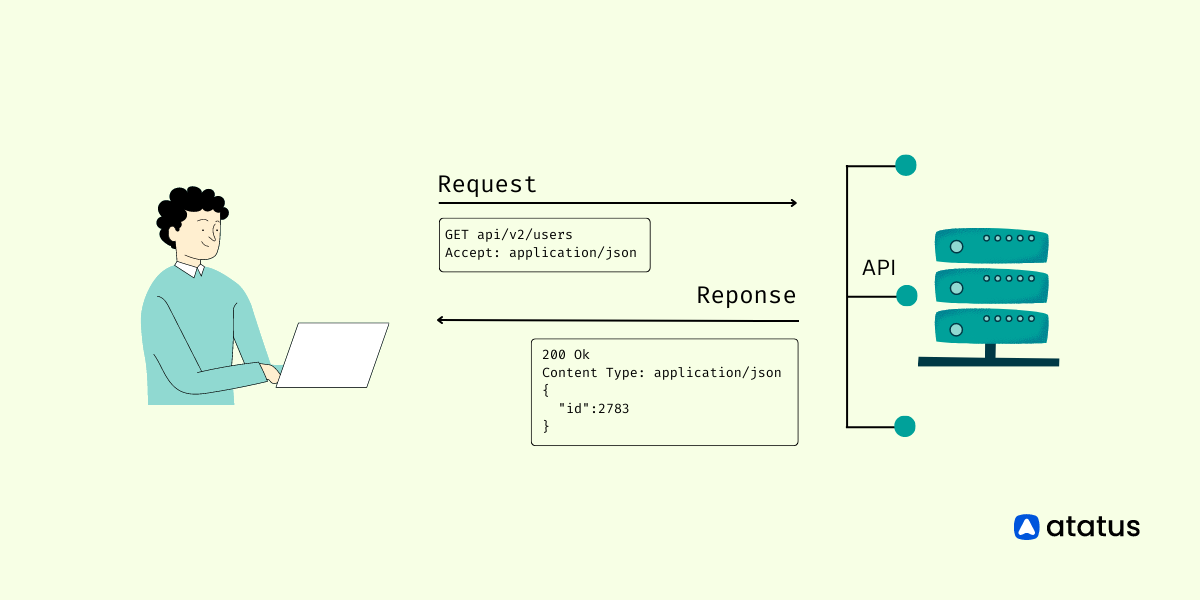
2. What is REST API?
Representational State Transfer is the acronym for REST. It's an architectural style that lays forth a set of guidelines for developing Web Services. REST suggests constructing an object of the data requested by the client and giving the object's contents to the user as a response in client-server communication.
For instance, if a user requests a movie in New York at a specific time and location, you can construct an object on the server. So, you've got an object here, and you're sending the state of an object.
Read Best Practices for Designing RESTful API.
The REST architectural style helps in leveraging less bandwidth usage to make an application more internet-friendly. It is sometimes referred to as the “language of the internet” because it is entirely dependent on resources.
REST API is a simple and flexible approach to accessing web services without having to go through any processing.
Since REST utilizes less bandwidth, is simple, and adaptable, it is recommended over the more robust Simple Object Access Protocol (SOAP) technology. It's used to get data from a web service and send it back. All REST API communication relies solely on HTTP requests.
3. What is Express.js?
The most popular Node.js web framework is Express.js. It's been called the "de facto standard server framework" for Node.js because it's designed for developing web applications and APIs.
Building a Node.js backend from the ground up for an application can be complex and time-consuming. The boilerplate code, which includes everything from port configuration to route handlers, takes time away from what matters most: creating the application's business logic. Developers can save time and focus on other vital activities by adopting web frameworks like Express.js.
4. What is PostgreSQL?
PostgreSQL, sometimes known as Postgres, is a relational database management system that is free and open-source. You may be familiar with a few other database systems that compete with PostgreSQL, such as MySQL, Microsoft SQL Server, or MariaDB.
Since 1997, PostgreSQL has been a reliable and stable relational database that runs on all major operating systems, including Linux, Windows, and macOS. PostgreSQL is a popular database choice among developers and businesses because of its stability, adaptability, and compliance with industry standards.
Sequelize can also be used to develop a Node.js RESTful CRUD API. For Postgres, MySQL, MariaDB, SQLite, and Microsoft SQL Server, Sequelize is a promise-based Node.js ORM.
5. Prerequisites
The following assumptions are made:
- You already know the basics of JavaScript
- On your system, you have a PostgreSQL database and NodeJS installed
6. Installation
This article will start with installing PostgreSQL, creating a new user, creating a database, and populating a table with schema and data.
Download the PostgreSQL Windows installer if you're using Windows.
To install Postgrs in Ubuntu, follow the below steps:
sudo apt install postgresql postgresql-contribWe'll want to start postgresql after the installation is finished, which we can do using services start.
sudo systemctl start postgresql.serviceNow that PostgreSQL has been installed, we can log in to the postgres command line and run SQL instructions.
7. PostgreSQL Command Prompt
The PostgreSQL interactive terminal is psql. Using the psql command, you can connect to a PostgreSQL server. psql --help will provide you with more information about the various connection options available with psql.
By default the installation procedure will create a user account called postgres. To switch over to the postgres account enter the below command in your terminal.
$ sudo -i -u postgresEnter the below command to access the postgres prompt:
$ psqlAlternatively, you may also run the psql command as the postgres account with sudo directly:
sudo -u postgres psqlYou'll notice that we've made a new connection. We're currently in the postgres database, using psql. The prompt concludes with a #, indicating that we're logged in as root, or superuser.
postgres=#psql commands begin with a backslash (\). Using the \conninfo command, we can verify the database, user, and port we've connected to for our first command.
postgres=# \conninfo

You are connected to database "postgres" as user "postgres" via socket in "/var/run/postgresql" at port "5432".
Here's a list of some of the most popular commands we'll be using in this session.
- \c dbname - Switch connection to a new database
- \dt - List all tables
- \du - List all users and thier assigned roles
- \list or /l - List databases
- \q - Exit psql connection
To avoid utilizing the default accounts, which have superuser access, let's create a new database and user.
8. Creating a New Role in Postgres
We'll start by creating a role called "johndoe" and assigning it the password of example1234. A role can be used as a user or a group, so we'll utilize it as a user in this example.
postgres=# CREATE ROLE johndoe WITH LOGIN PASSWORD 'example1234';To allow user to create database, you have to alter the role of the user "johndoe".
postgres=# ALTER ROLE johndoe CREATEDB;To get a list of all roles/users, type \du.
postgres=# \du

johndoe     | Create DB                           | {}
postgres    | Superuser, Create role, Create DB   | {}
With \q for quit, you can exit the default session.
postgres=# \qBy default, pSQL connects over Unix Domain Socket and uses peer authentication, which requires the current Unix user to have the same name as Postgres role johndoe. And so you will have to create the Unix user johndoe.
To create a Unix user,
sudo adduser --no-create-home --disabled-password --disabled-login johndoeWe'll now connect Postgres with the user johndoe.
sudo -u johndoe psql -d postgres9. Creating a Database in Postgres
The SQL command can be used to create a database.
postgres=> CREATE DATABASE user_db;To see the available databases, use the \list command.
postgres=> \list

Name       | Owner       | Encoding | Collate     | Ctype       |
user_db    | johndoe     | UTF8     | en_US.UTF-8 | en_US.UTF-8 |
Let's use the \c (connect) command to connect to the new User database with the johndoe.
postgres=> \c user_db

You have now connected to database "user_db" as user "johndoe".

user_db=>
10. Creating a Table in Postgres
Last but not least, we'll construct a table called users with three fields: two VARCHAR types and an auto-incrementing PRIMARY KEY ID in the psql command prompt.
user_db=>
CREATE TABLE users (
  ID SERIAL PRIMARY KEY,
  name VARCHAR(30),
  email VARCHAR(30)
);
To have some data to work with, we'll add two entries to users.
INSERT INTO users (name, email)
   VALUES ('Joe', 'joe@example.com'), ('Ruby', 'ruby@example.com');
Let's double-check that everything was entered accurately by going through all of the users.
user_db=> SELECT * FROM users;
id |  name  | email
----+--------+--------------------
1 | Joe  | joe@example.com
2 | Ruby | ruby@example.com
We now have a user, a database, a table, and some information. To connect to this data stored in a PostgreSQL database, we can start creating our Node.js RESTful API.
We've completed all of our PostgreSQL tasks and can now start setting up our Node.js application and Express server.
11. Setting Up an Express.js Server
Create a directory for the project to live in to set up a Node.js application and an Express.js server.
mkdir node-api-postgres
cd node-api-postgres
To create a package.json file, use npm init -y or copy the code below into a package.json file.
{
    "name": "node-api-postgres",
    "version": "1.0.0",
    "description": "RESTful API with Node.js, Express, and PostgreSQL",
    "main": "index.js",
    "license": "MIT"
}
For the server, we'll need Express.js and node-postgres (pg) to connect to PostgreSQL.
npm i express pgOur dependencies have now been loaded into node_modules and package.json.
Create an index.js file that will serve as the server's entry point. We'll start by requiring the express module and the built-in bodyParser middleware, as well as setting our application and port variables.
const express = require('express')
const bodyParser = require('body-parser')

const app = express()
const port = 3000
app.use(bodyParser.json())
app.use(
    bodyParser.urlencoded({
        extended: true,
    })
)
We'll tell a route to look for a GET request on the root (/) URL and return some JSON if it finds one.
app.get('/', (request, response) => {
    response.json({
        info: 'Node.js, Express, and Postgres API'
    })
})
Set the application to listen on the port you created earlier.
app.listen(port, () => {
    console.log(`App running on port ${port}.`)
})
We may start the server from the command line by typing index.js.
node index.js
App running on port 3000.
In your browser's URL bar, type http://localhost:3000 to see the JSON we created previously.
{
    info: "Node.js, Express, and Postgres API"
}
The Express server is now up and running, but it's simply transmitting static JSON data that we've prepared. The next step is to connect to PostgreSQL using Node.js so that dynamic queries may be run.
12. Using Node.js to Connect to a Postgres Database
To construct a pool of connections, we'll use the node-postgres module. We won't have to open and close a client every time we run a query this way.
Set up the configuration of your PostgreSQL connection in a file called queries.js.
const Pool = require('pg').Pool
const pool = new Pool({
    user: 'johndoe',
    host: 'localhost',
    database: 'user_db',
    password: 'example1234',
    port: 5432,
})
In a production environment, you'd maintain your configuration details in a separate file with restricted rights that isn't available through version control, but for the sake of simplicity, we'll save it alongside the queries in the same file.
This article aims to enable CRUD operations on the API (GET, POST, PUT, and DELETE), which will execute database commands. To accomplish this, we'll create a route for each endpoint and a function for each query.
13. Creating Routes for CRUD Operations
As indicated below, we'll develop six functions for six routes.
Create all of the functions for each route first. Then, to make the functions accessible, export them as follows:
- GET / - displayHome()
- GET /users - getUsers()
- GET /users/:id - getUserById()
- POST /users - createUser()
- PUT /users/:id - updateUser()
- DELETE /users/:id - deleteUser()
We created an app.get() with a function for the root endpoint in index.js. We'll now construct endpoints in queries.js to show all users, show a specific user, create a new user, update an existing user, and delete a user.
GET a List of All Users
A GET request will be our first endpoint. We can put raw SQL that will touch the API database inside the pool.query(). All users will be sorted by ID using SELECT.
const getUsers = (request, response) => {
    pool.query('SELECT * FROM users ORDER BY id ASC', (error, results) => {
        if (error) {
            throw error
        }
        response.status(200).json(results.rows)
    })
}
GET a Single User by ID
We'll get the custom id parameter from the URL and use a WHERE clause to display the result for our /users/:id request.
We're looking for id=$1 in the SQL query. $1 is a numbered placeholder in this case, which PostgreSQL utilizes naturally instead of the? placeholder you may be familiar with from other SQL variants.
const getUserById = (request, response) => {
    const id = parseInt(request.params.id)
    pool.query('SELECT * FROM users WHERE id = $1', [id], (error, results) => {
        if (error) {
            throw error
        }
        response.status(200).json(results.rows)
    })
}
POST a New User
A GET and POST request to the /users endpoint will be accepted by the API. We'll be creating a new user using the POST request. We're extracting the name and email attributes from the request body and INSERTing the values in this function.
const createUser = (request, response) => {
    const {
        name,
        email
    } = request.body
    pool.query('INSERT INTO users (name, email) VALUES ($1, $2)', [name, email], (error, results) => {
        if (error) {
            throw error
        }
        response.status(201).send(`User added with ID: ${result.insertId}`)
    })
}
PUT Updated Data into an Existing User
The /users/:id endpoint will additionally accept two HTTP requests: the GET for getUserById and a PUT for editing an existing user. To use the UPDATE clause in this query, we'll combine everything we learned in GET and POST.
It's worth mentioning that PUT is idempotent, which means that you can make the same call over and over and get the same result. This differs from POST, in which repeating the same call results in the creation of new users with the same data.
const updateUser = (request, response) => {
    const id = parseInt(request.params.id)
    const {
        name,
        email
    } = request.body
    pool.query(
        'UPDATE users SET name = $1, email = $2 WHERE id = $3',
        [name, email, id],
        (error, results) => {
            if (error) {
                throw error
            }
            response.status(200).send(`User modified with ID: ${id}`)
        }
    )
}
DELETE a User
Finally, we'll delete a specific user by id using the DELETE clause on /users/:id. Our getUserById() function is remarkably similar to this call.
const deleteUser = (request, response) => {
    const id = parseInt(request.params.id)
    pool.query('DELETE FROM users WHERE id = $1', [id], (error, results) => {
        if (error) {
            throw error
        }
        response.status(200).send(`User deleted with ID: ${id}`)
    })
}
14. Exporting CRUD functions in a REST API
We'll need to export these functions to use them from index.js. We may achieve this by using module.exports to create a function object. We can write getUsers instead of getUsers:getUsers, and so on because we're utilizing ES6 syntax.
module.exports = {
    getUsers,
    getUserById,
    createUser,
    updateUser,
    deleteUser,
}
Here is our complete queries.js file.
const Pool = require('pg').Pool
const pool = new Pool({
    user: 'johndoe',
    host: 'localhost',
    database: 'user_db',
    password: 'example1234',
    port: 5432,
})
const getUsers = (request, response) => {
    pool.query('SELECT * FROM users ORDER BY id ASC', (error, results) => {
        if (error) {
            throw error
        }
        response.status(200).json(results.rows)
    })
}
const getUserById = (request, response) => {
    const id = parseInt(request.params.id)
    pool.query('SELECT * FROM users WHERE id = $1', [id], (error, results) => {
        if (error) {
            throw error
        }
        response.status(200).json(results.rows)
    })
}
const createUser = (request, response) => {
    const {
        name,
        email
    } = request.body
    pool.query('INSERT INTO users (name, email) VALUES ($1, $2)', [name, email], (error, results) => {
        if (error) {
            throw error
        }
        response.status(201).send(`User added with ID: ${result.insertId}`)
    })
}
const updateUser = (request, response) => {
    const id = parseInt(request.params.id)
    const {
        name,
        email
    } = request.body
    pool.query(
        'UPDATE users SET name = $1, email = $2 WHERE id = $3',
        [name, email, id],
        (error, results) => {
            if (error) {
                throw error
            }
            response.status(200).send(`User modified with ID: ${id}`)
        }
    )
}
const deleteUser = (request, response) => {
    const id = parseInt(request.params.id)
    pool.query('DELETE FROM users WHERE id = $1', [id], (error, results) => {
        if (error) {
            throw error
        }
        response.status(200).send(`User deleted with ID: ${id}`)
    })
}
module.exports = {
    getUsers,
    getUserById,
    createUser,
    updateUser,
    deleteUser,
}
15. Configuring CRUD Functions in a REST API
Now that we have all of our queries, we need to add them to the index.js file and build endpoint routes for all of the query functions we established.
We'll need queries.js and pass it to a variable to access all of the exported functions.
const db = require('./queries')Now we'll set the HTTP request method, the endpoint URL path, and the relevant function for each endpoint.
app.get('/users', db.getUsers)
app.get('/users/:id', db.getUserById)
app.post('/users', db.createUser)
app.put('/users/:id', db.updateUser)
app.delete('/users/:id', db.deleteUser)
Here is our whole index.js, which serves as the API server's entry point.
const express = require('express')
const bodyParser = require('body-parser')
const app = express()
const db = require('./queries')
const port = 3000
app.use(bodyParser.json())
app.use(
    bodyParser.urlencoded({
        extended: true,
    })
)
app.get('/', (request, response) => {
    response.json({
        info: 'Node.js, Express, and Postgres API'
    })
})
app.get('/users', db.getUsers)
app.get('/users/:id', db.getUserById)
app.post('/users', db.createUser)
app.put('/users/:id', db.updateUser)
app.delete('/users/:id', db.deleteUser)
app.listen(port, () => {
    console.log(`App running on port ${port}.`)
})
We now have a server, database, and API fully set up with just these two files. You can restart the server by typing index.js once more.
node index.js
App running on port 3000.
You can now examine the JSON responses to the two GET calls by going to http://localhost:3000/users or http://localhost:3000/users/1. But how can we ensure that our POST, PUT, and DELETE requests are working properly?

Curl, a command-line tool already installed on your terminal, can be used to accomplish this. To test all of the protocols, execute the examples below on the command line.
POST
Create a user named Alex and send an email to alex@example.com.
curl --data "name=Alex&email=alex@example.com"
http://localhost:3000/users
PUT
Change the ID 1 user's name to Sara and send an email to sara@example.com.
curl -X PUT -d "name=Sara" -d "email=sara@example.com"
http://localhost:3000/users/1
DELETE
Remove the user with id 1 from the system.
curl -X "DELETE" http://localhost:3000/users/1Conclusion
We learned how to install and set up PostgreSQL on the command line, create users, databases, and tables, and run SQL queries in this tutorial. We also learned how to use the pg module to connect to PostgreSQL from Node and how to create an Express server that can handle multiple HTTP methods.
You should be able to build on this API and use it for your own personal or professional development projects now that you have this expertise.
Atatus API Monitoring and Observability
Atatus provides Powerful API Observability to help you debug and prevent API issues. It monitors the consumer experience and is notified when abnormalities or issues arise. You can deeply understand who is using your APIs, how they are used, and the payloads they are sending.
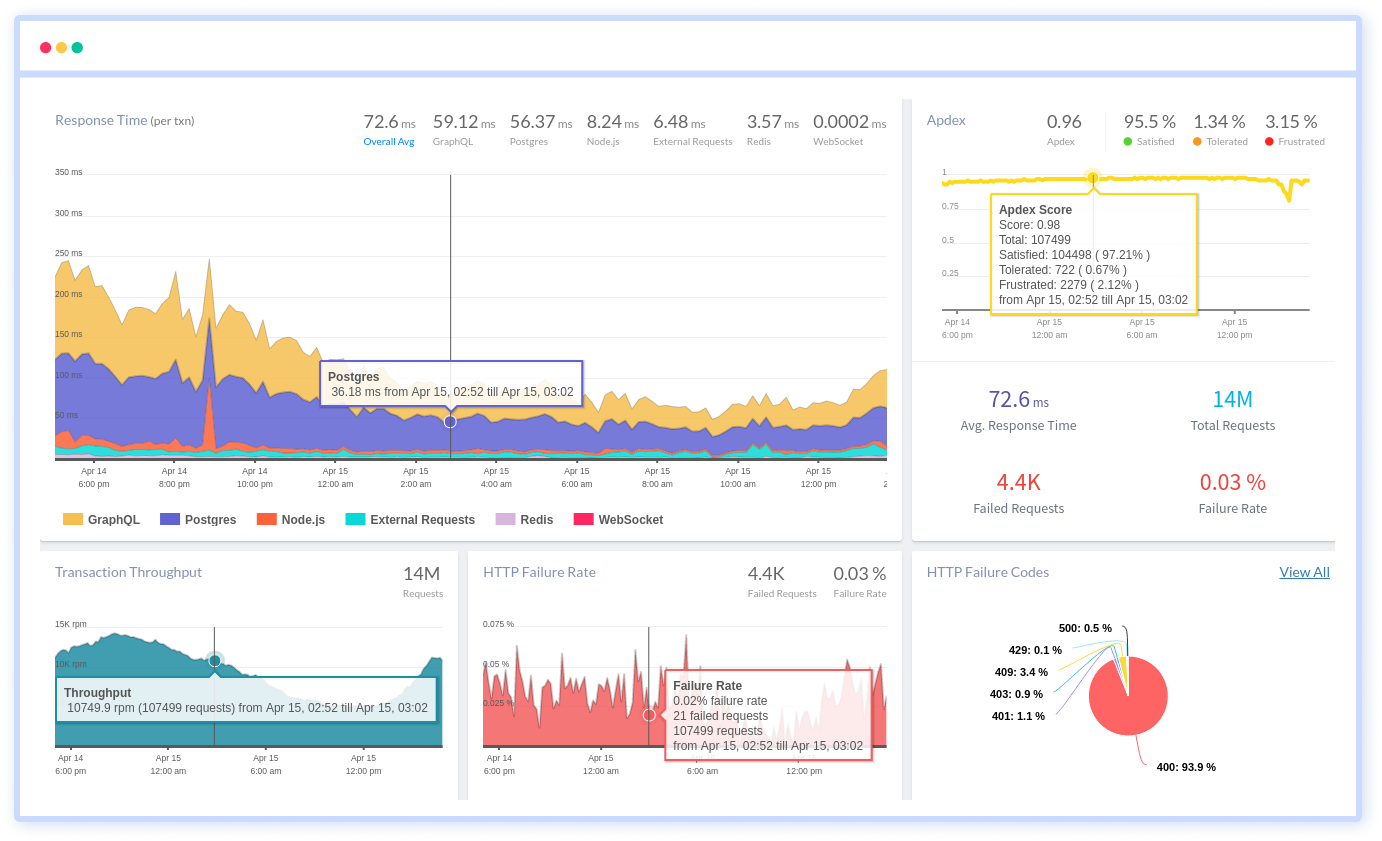
Atatus's user-centric API observability tracks how your actual customers experience your APIs and applications. Customers may easily get metrics on their quota usage, SLAs, and more.
It monitors the functionality, availability, and performance data of your internal, external, and third-party APIs to see how your actual users interact with the API in your application. It also validates rest APIs and keeps track of metrics like latency, response time, and other performance indicators to ensure your application runs smoothly.
#1 Solution for Logs, Traces & Metrics
![]() APM
APM
![]() Kubernetes
Kubernetes
![]() Logs
Logs
![]() Synthetics
Synthetics
![]() RUM
RUM
![]() Serverless
Serverless
![]() Security
Security
![]() More
More