A Guide to Email Testing using MailHog (in localhost)

It can be a real headache to test contact forms or other outgoing emails from your website or application locally. To permit mail, you ought to configure your nearby web server and waste plenty of time expecting the mail to reach your inbox if it does at all. Furthermore, if you test with your email account as the sender, you risk damaging your email address.
So, what should you do?
You can use tools like MailHog and others, which are great for sending transactional emails. Many of these providers also feature a free trial that allows you to send a limited number of emails, making them ideal for testing during development.
Today, we'll look at how to use MailHog to test mail on localhost.
- What is MailHog?
- Why do You Need MailHog?
- Features of MailHog
- MailHog Setup
- What is the Purpose of mhsendmail?
- How does MailHog Work?
- Email Testing with MailHog
- Challenges in MailHog
- Alternatives for MailHog
#1 What is MailHog?
MailHog is an email-testing tool that hides behind a fake SMTP server. MailHog wraps the SMTP protocol with extensions and doesn't need any special backend implementations.
MailHog is a very basic SMTP server that takes all outgoing emails given to it. An online interface is available to view hacked emails. MailHog is a Golang-based portable tool. MailHog runs on every supported platform, and Golang binary files make installation a breeze - just copy and run. 🏃♂️
MailHog was created with application developers in mind. They can use this tool to better effectively test the application's email sending. A fake SMTP server, unlike a real one, avoids complications such as server configuration and the like.
MailHog simply allows you to send emails to any recipient and saves them for later viewing. You can also use the web UI to view the hacked emails, or use an API to obtain them for automated testing.
#2 Why do You Need MailHog?
Many of the key issues with email testing are addressed by MailHog.
Assume you're working on a WordPress website in a local environment. It can be a difficult task to test a contact form or any other outgoing email from it. This is usually handled by the web application's default SMTP server. It nearly never works in a local development environment for a variety of reasons.
- To enable emails in a local environment, you must first configure your operating system, web server, and web application. Then you'll have to make sure the emails make it to your recipient's inbox, which can take a long time and waste your time (and inbox space). 🤦
- Then the testing is difficult with an actual email address. It may harm the authenticity of your private email. 😩
All of the above problems are solved with MailHog. MailHog creates a fake SMTP server on which your web application can send and receive emails. MailHog even keeps track of sent and received emails on a user-friendly web interface, allowing you to browse them just like you would with a genuine email account.
To learn about SMTP port - SMTP Ports (25, 587, 465, or 2525) – What is SMTP Port? How to Choose the Best and Right SMTP Port?
#3 Features of MailHog
MailHog comes with a lot of features right out of the box. Here are a few of the features of MailHog:
- API Support
You can retrieve, list, and delete emails using MailHog's built-in HTTP API (or JSON API). - Authentication
Both the Web UI and the API of MailHog enable HTTP basic authentication. - Download Attachments
Individual MIME parts can be downloaded using MailHog. - Emails Capture and Storage
The in-memory message storage and persistence in a MongoDB database and file-based storage system are both options for storing recorded emails. - Failure Testing
You can invite Jim (MailHog's Chaos Monkey) to test the email deliverability of your web application. It accomplishes this by causing common email deliverability issues like refused connections/authentications and rate-limited connections at random. - Lightweight and Portable
It is not necessary to install MailHog to utilize it. It's one of MailHog's main benefits. Because of this, MailHog can be operated on nearly any operating system or web server. - Real-time Updates
Instantaneous updates are provided by MailHog via the EventSource web interface. - Release Captured Emails
You can tell MailHog to send collected emails to actual SMTP servers so they can be delivered. - Support for SMTP Extended
Not simplest can MailHog be used to create a faux SMTP server, however it could additionally be used to create an ESMTP server (Extended SMTP). It also contains SMTP AUTH and PIPELINING functionality. - Web UI
You can view emails as plain text, HTML, or source using MailHog's Web UI. Multipart MIME and encoded headers are also supported.
Apart from the capabilities indexed above, MailHog now consists of client libraries for PHP and NodeJS environments that make it easy to communicate with the MailHog API.
#4 MailHog Setup
We mentioned earlier that MailHog is a tool that does not require installation. At the same time, you must download and configure it. There are some options for carrying out this.
Download from GitHub
Download the MailHog release that corresponds to your platform from GitHub. MailHog can now be executed without any external dependencies. This is how MailHog appears on Windows, for example.
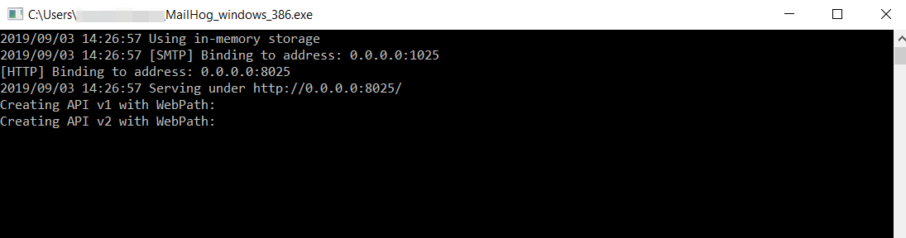
MailHog operates on localhost and listens on SMTP port 1025 and HTTP port 8025, according to the documentation.
Where is the online interface?
In your browser, type 127.0.0.1:8025 or localhost:8025, and you're done!
Using Docker
This is the most platform-agnostic method of installing MailHog. You must first download and install Docker on your machine and then run the following command:
docker run -d -p 1025:1025 -p 8025:8025 mailhog/mailhogYou must do the following in response to this command:
- In the background, run a MailHog Docker container (-d)
- Locally expose MailHog's SMTP interface (-p 1025:1025)
- Locally expose MailHog's web interface and API (-p 8025:8025)
- To access the web interface, type 127.0.0.1:8025 or localhost:8025 into your browser once more
Docker Compose
MailHog Docker Compose is a tool for running Docker applications in many containers. To configure services for your application, you'll use a YAML file. To use compose tool to set up MailHog, generate docker-compose.yml and paste the following lines:
version: "3"
services:
  mailhog:
    image: mailhog/mailhog:latest
    restart: always
    ports:
      -1025:1025
      -8025:8025
Docker Compose up -d mailhog is the command to use. This will start the MailHog Docker container and construct it. Docker will automatically download the MailHog image if it does not already exist.
Using Homebrew
MailHog can be installed on a macOS using Homebrew. In the terminal, kind the subsequent command:
brew install mailhogThen launch MailHog by typing:
brew services start mailhogThis will start MailHog and then restart it when you log in. If you don't require a background service, simply run:
mailhogUsing a Golang package
You must first download and install Golang. Depending on your platform, you may now install MailHog using the following commands:
go get github.com/mailhog/MailHogAfter that, use the following command to launch the tool:
mailhog -api-bind-addr 127.0.0.1:8025 -ui-bind-addr 127.0.0.1:8025 -smtp-bind-addr 127.0.0.1:1025#5 What is the Purpose of mhsendmail?
mhsendmail is a MailHog sendmail substitute. It guarantees that emails are sent through the SMTP server localhost:1025, which is supposed to be handled by MailHog. This feature may come in handy during your testing. The only advantage of using mhsendmail is that you won't mistakenly send stuff outside your machine if you mess up your SMTP server settings. As a result, make certain to install it as well:
Download the file from Github and place it in your system path. This is how it appears in Ubuntu, for example:
wget https://github.com/mailhog/mhsendmail/releases/download/v0.2.0/mhsendmail_linux_amd64

sudo chmod +x mhsendmail_linux_amd64
sudo mv mhsendmail_linux_amd64 /usr/local/bin/mhsendmail
In the case of Golang:
go get github.com/mailhog/mhsendmailFor Docker and Homebrew:
To begin, you must first download and install Go with the Docker/Homebrew command below to get started.
brew install goYou may now start installing mhsendmail.
go get github.com/mailhog/mhsendmailAfter you've installed it, connect your application to MailHog and configure it to utilize mhsendmail rather than sendmail. This is how it appears in the php.ini file, for example.
sendmail_path=/usr/local/bin/mhsendmailYou can try sending a message using the CLI in the following way:
mhsendmail testinbox@mailhog.local << EOF
From:App <sender@mailhog.local>
To:Test <receiverinbox@mailhog.local>


Subject: MailHog Docker Test message
Content !
EOF
Additional Configuration Options for MailHog
MailHog can be configured using a variety of environment variables and command-line parameters.
The MH_HOSTNAME environment variable or the -hostname command-line option, for example, can be used to alter the default hostname from mailhog.example to a custom name.
#6 How does MailHog Work?
We've installed MailHog and are ready to test it out. To do so, use your application, terminal, or even Windows PowerShell to send an email.
Sending an Email from an Application
Using the present PHP configuration, the following CL script will send an email. It is necessary to override the path for sendmail in the php.ini config file (sendmail path = "/Users/joe/go/bin/mhsendmail") as follows:
php -r "\$from = 'sender@test.com'; \$to = 'recipient@test.com'; \$x = mail(\$to, 'subject'.time(), 'Test email', 'From: '. \$from); Sending an Email with Mail
That's how you can put MailHog to the test on your macOS:
date | mail -s "Test email" recipient@test.comInitially, we utilized the Postfix configuration as follows:
myhostname=localhost
relayhost=[localhost]:1025
Undelivered Mail Returned to Sender was indicated as an error by the mail command. It's possible that the Postfix service isn't operating or that the relayhost and myhostname configurations are missing. When we used the mailq command, it first displayed the following error:
Host or domain name not found.Name service error
for name = localhost
type = AAAA:Host not found
MailHog operated without a hitch once we changed the localhost to an equivalent ip address: 127.0.0.1. Here's how to set up Postfix to work:
myhostname=localhost
relayhost=[127.0 .0 .1]:1025
Sending an Email Using Windows PowerShell
Another method is to use Windows PowerShell to send an email:
Send - MailMessage - To "recipient@test.com" - From "sender@test.com" -
  Subject "Test email" - SmtpServer "localhost" - Port 1025
And here's what we've got so far:
You can also utilize the MailHog API. It allows you to verify whether or not an email has been sent, as well as to list, retrieve, and delete emails.
#7 Email Testing with MailHog
Finally, let's put our MailHog setup to the test to check if it's working properly.
The following mhsendmail directives can be used with Mailhog's CLI to send an email:
mhsendmail testinbox@mailhog.local << EOF
From:Justin < atatus@mailhog.local>
To:Test <testinbox@mailhog.local>

Subject:Hello, MailHog !

Hey,
Busy ? ? ?

Love & Respect,
Justin
EOF
The EOF directive in the previous code creates a custom delimiter, allowing you to enter the test email details interactively in the terminal. When you type in the delimiter again, it executes all of the input. It uses the mhsendmail command to send a message.
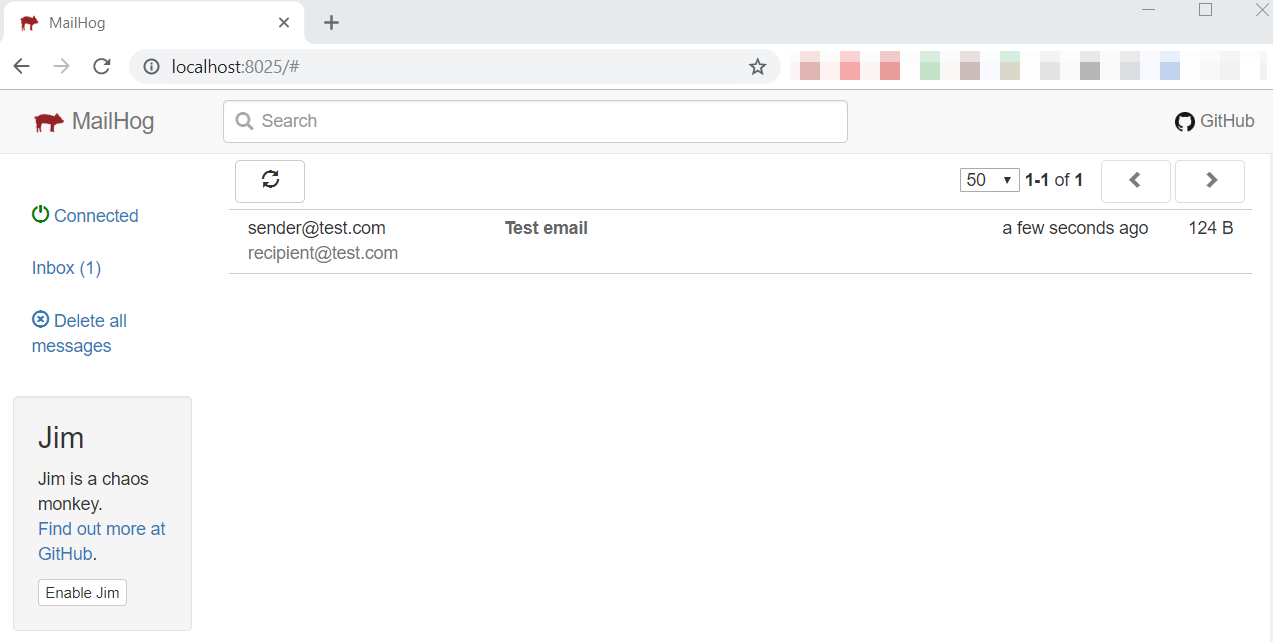
By visiting the MailHog Web UI, you can see if the email was delivered successfully. You can also check the body text of the test email by clicking on it.
That's all there is to it! We can now say that MailHog has been successfully configured.

There are other ways to send a test email in addition to the one described above. For example, on macOS, use the following command in your terminal to send a test email:
date | mail - s "Hello, MailHog!" testinbox@mailhog.localYou can send an email with PowerShell on Windows by running the following code:
Send -MailMessage -To "recipient@test.com " -From "sender@test.
  com" -Subject "Test email" -SmtpServer "localhost" -Port 1025
You can also create a PHP script with all of the mail data and send a test email using PHP's mail() function. To do so, create a PHP script as shown below and run it from the terminal:
<?php
$to = "testinbox@mailhog.local";
$subject = "Hey, I’m Justin!";
$body = "Hello, MailHog!";
$headers = "From: justin@atatus.com" . "\r\n";
mail($to, $subject, $body, $headers);
?>
Finally, the MailHog API can be used to determine whether an email has been delivered successfully. If you only work in a non-GUI environment (for example, a Linux terminal or Windows PowerShell), the MailHog API comes in handy for listing, retrieving, and deleting emails.
#8 Challenges in MailHog
Overall, MailHog is a really useful tool for testing your application's email sending. It has a small but growing following among developers. This is primarily due to MailHog's lack of sophistication. MailHog doesn't have a lot of features. You can only hoard your emails and use the API to get them. Furthermore, MailHog isn't a ready-to-use tool. MailHog doesn't require any installation, but it does need some configuration. MailHog is not a choice if you require a professional solution.
#9 Alternatives for MailHog
- Postfix – It is a mail transfer agent (MTA) that handles electronic mail routing and delivery. It aims to be quick, simple to use, and secure.
- Ethereal Email – It's a fake SMTP service aimed at Nodemailer users. It's an open source anti-transactional email service that never delivers messages.
- Mailtrap – It's a lot more easy and practical solution with a fake SMTP server. There is no need to struggle with any kind of installation or setup. All you have to do is configure your SMTP server using the credentials provided.
- FakeSMTP – It's an open source fake SMTP server with a graphical user interface, written in the Java programming language for quickly testing emails in applications.
- testmail.app – Automated end-to-end email testing tool. Test new user signups, transactional emails and drip campaigns, deliverability and spam scores, and more with an infinite number of private email addresses and inboxes. Integrates with your Continuous Integration and Continuous Delivery(CI/CD) process. This includes anti-spam testing
Summary
In order to ensure a good user experience, it is important to test email flows, especially because these flows may sometimes be the basis for general functions such as login confirmation. MailHog makes email testing a breeze. This is a very practical way to test your website or web application’s email. In addition, MailHog can be easily set up on almost all popular platforms and has a user-friendly Web interface.
Monitor Your Entire Application with Atatus
Atatus provides a set of performance measurement tools to monitor and improve the performance of your frontend, backends, logs and infrastructure applications in real-time. Our platform can capture millions of performance data points from your applications, allowing you to quickly resolve issues and ensure digital customer experiences.
Atatus can be beneficial to your business, which provides a comprehensive view of your application, including how it works, where performance bottlenecks exist, which users are most impacted, and which errors break your code for your frontend, backend, and infrastructure.
#1 Solution for Logs, Traces & Metrics
![]() APM
APM
![]() Kubernetes
Kubernetes
![]() Logs
Logs
![]() Synthetics
Synthetics
![]() RUM
RUM
![]() Serverless
Serverless
![]() Security
Security
![]() More
More