How to Set Up a Reverse Proxy in Nginx and Apache
To work efficiently, the client and server exchange information regularly. A webserver typically employs reverse proxies. A client sees a reverse proxy or gateway as if it were a regular web server, and no extra configurations are required. The client sends standard requests to the reverse proxy, which then determines where to send the data, providing the final result to the client as if it were the origin.
The most common web server, Apache, is capable of running on a wide range of operating systems, including UNIX/Linux, Microsoft Windows, and OpenVMS.
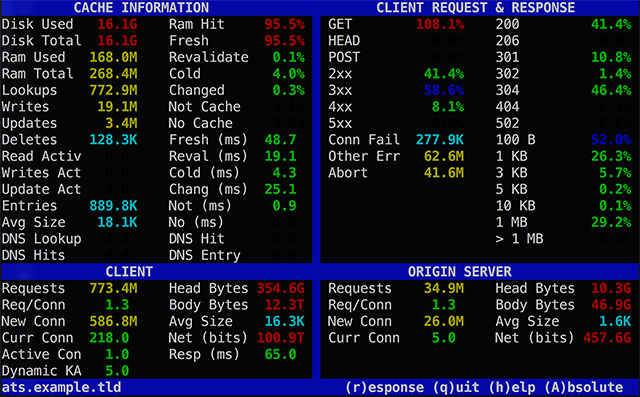
NGINX is a high-performance web server that is primarily used for static files and as a reverse proxy, but it may be used in any context due to its adaptability.
This guide will walk you through installing and configuring an Nginx and Apache reverse proxy server on your machine, as well as teach you the fundamentals of reverse proxy servers, such as how they function and what their main benefits are.
- What is a Reverse Proxy?
- Benefits of Reverse Proxy
- The Popular Reverse Proxies
- How to Set Up an Nginx Reverse Proxy?
- How to Set Up an Apache Reverse Proxy?
- Limitations of Reverse Proxy
What is a Reverse Proxy?
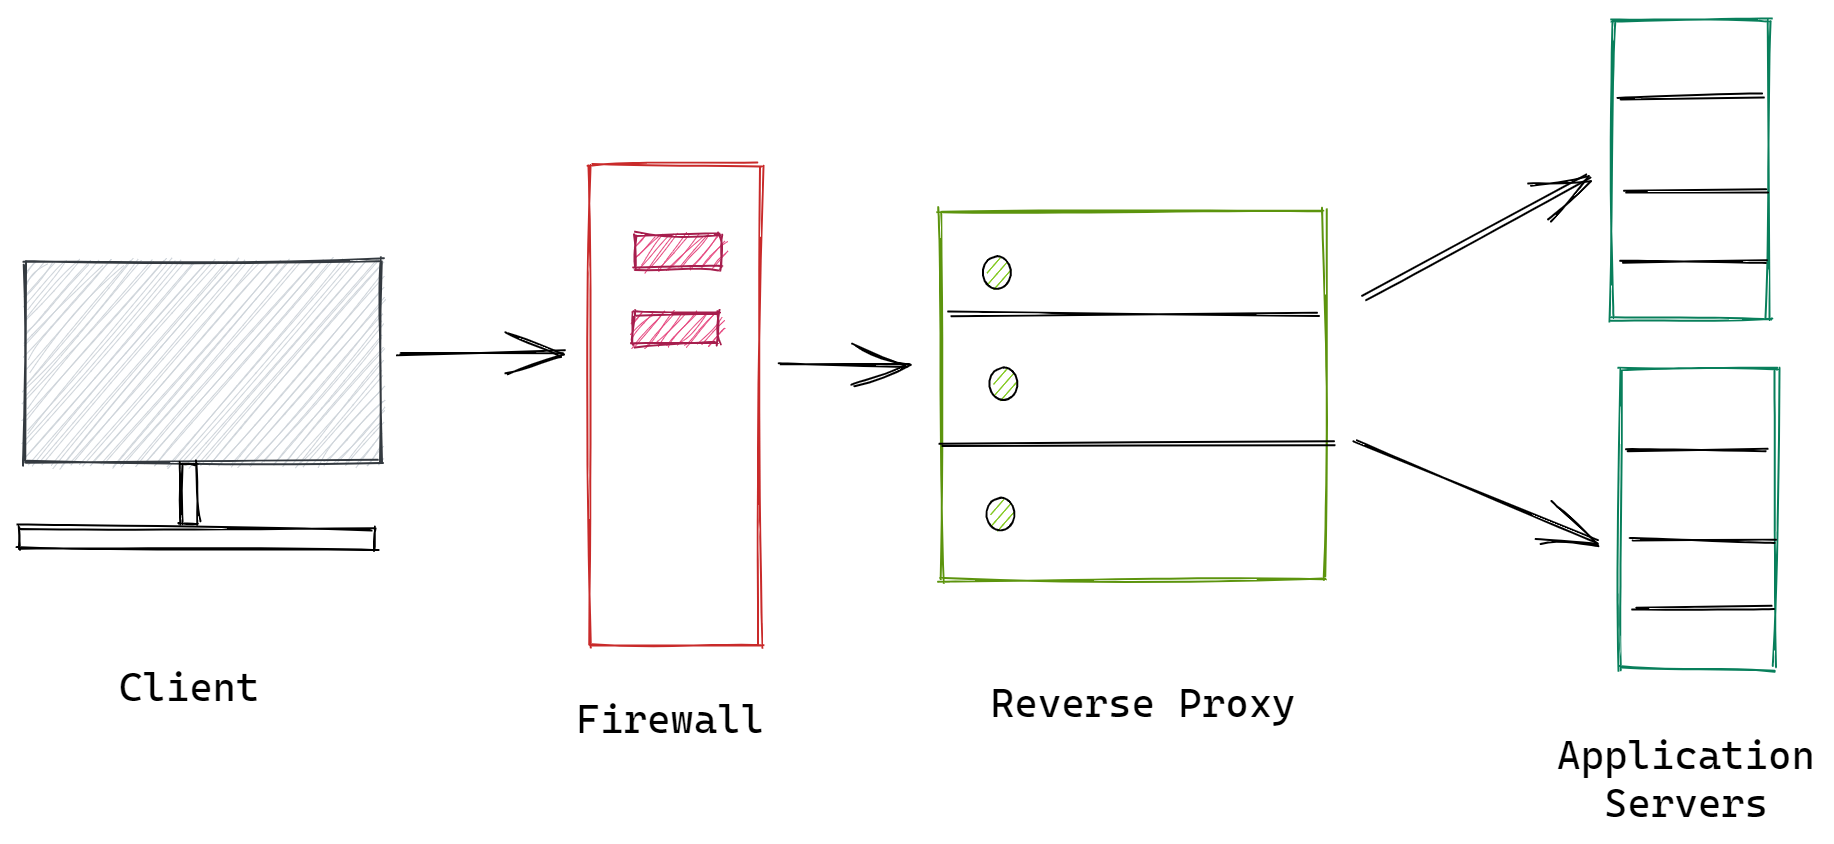
A reverse proxy server lies between internal applications and external clients, relaying client requests to the appropriate server. The reverse proxy service serves as a front-end, handling all client requests and forwarding them to the back-end web, database, or other servers and then the client receives the response.
A standard proxy server acts on behalf of clients, typically by offering privacy or screening content. A reverse proxy intercepts traffic on behalf of a server and routes it to a different server.
For a variety of reasons, you might want to set up a reverse proxy. One of the most important reasons is privacy.
A reverse proxy can assist balance loads between servers and enhance speed if you have numerous servers. A reverse proxy helps centralize logging and reporting across numerous servers since it provides a single point of contact for clients.
To know what a reverse proxy server is, you must first grasp its purpose and become familiar with all of the terms that go with it.
Your browser/device connects directly to the website's server and begins downloading its resources when you browse the web normally by entering a domain name or clicking a link.
You can use a proxy server to forward all of your requests to it first if you wish to hide your IP address from the websites you visit. Your requests will be forwarded to the DNS resolver, which will subsequently retrieve the website's resources from the origin server.
It will then send those resources to your device. A forward proxy is what this is called. Because the website believes your request is coming from the forward proxy, you are invisible to it.
Note: According to the classification in the preceding sections, when NGINX is used as an HTTPS proxy, it acts as a transparent transmission (tunnel) proxy, meaning that it does not decode or sense upper layer communication.
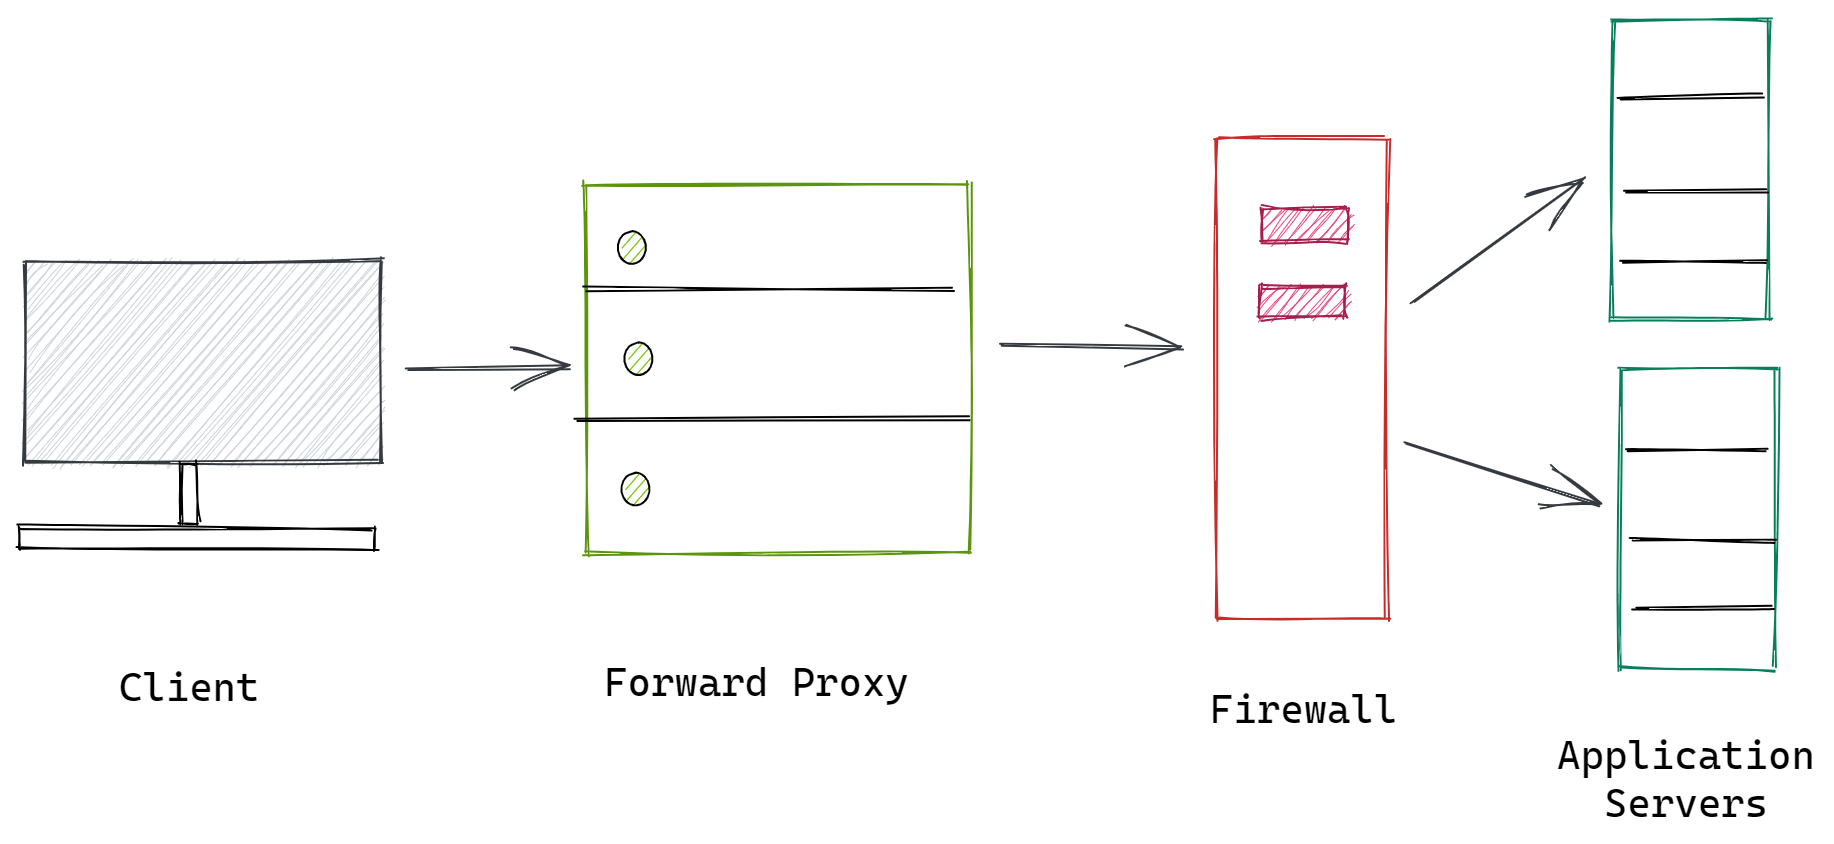
A forward proxy is primarily used to evade geographical content limitations, in addition to enhancing user privacy. If you wish to watch a movie that is blocked in your region, for example, you can use a forward proxy with an IP address where the video is available.
Reverse Proxy Server vs Forward Proxy Server
A reverse proxy server, similar to how a user or client might utilize a forward proxy to maintain anonymity and boost security, functions as a front for the origin server. It ensures that no user or client interacts with the origin server directly.
Although the distinction between a forward proxy and a reverse proxy is slight, they function differently.
Because there is no overlap in their functions, they can work together. Users/clients typically use a forward proxy, while origin servers typically use a reverse proxy.
Since the reverse proxy is controlled by the server administrator, you can utilize it to enable a variety of helpful functionalities.
Benefits of Reverse Proxy
Some of their significant benefits are discussed in the section below.
1. Global Server Load Balancing (GSLB)
GSLB is a sophisticated load balancing method for dividing website traffic among a large number of servers strategically located around the world. It's usually accomplished through anycast routing, in which the reverse proxy selects the server node with the shortest travel time between the client and the server.
GSLB not only increases the website's dependability and security but also improves SEO and the user experience by reducing latency and load times. You can use GSLB with other network optimization techniques like Spoon Feeding to further free up the processing resources of the origin servers.
2. Improve Security
The IP address and other attributes of origin servers can be hidden via reverse proxies. As a result, the origin server of your website can better retain its anonymity, considerably boosting its security.
Since the reverse proxy receives all traffic before it reaches the main server, any attackers or hackers who want to target your website with security concerns like DDoS attacks would have a difficult time doing so.
3. Load Balancing
A website with millions of daily unique users cannot handle all of the incoming traffic on a single origin server. You can intelligently spread traffic among a pool of multiple servers in these instances. To remove a single point of failure, all servers usually host the same content, making the website more stable.
A reverse proxy can receive incoming traffic before it reaches the origin server, which is a perfect method to put this up. If the origin server becomes overburdened or dies entirely, the traffic can be distributed to other servers without compromising site operation.
4. Monitoring and Logging Traffic
Any requests that pass through a reverse proxy are captured. As a result, you can utilize them to monitor and log traffic as a central center. Even if you use numerous web servers to house all of your website's components, a reverse proxy will make monitoring all of your site's incoming and departing data much easier.
5. Powerful Caching
A reverse proxy can be used to accelerate web pages by caching both static and dynamic content. This can lessen the burden on the origin server, making the website load faster.
6. Optimized SSL Encryption
The origin server may be overburdened by encrypting and decrypting SSL/TLS requests for each client. A reverse proxy can do this operation, freeing up resources on the origin server for other critical duties like providing the content.
Another benefit of offloading SSL/TSL encryption and decryption is that it lowers latency for clients who are far away from the origin server.
7. Superior Compression
Server responses consume a significant amount of bandwidth. Server replies can be compressed before being sent to the client, reducing the amount of bandwidth needed and speeding up server responses over the network.
Since it resides between the origin servers and the client, a reverse proxy is great for compressing server responses.
The Popular Reverse Proxies
The most popular reverse proxies in use now, according to our research and experience, are:
#1 Nginx
Nginx is an open-source web server that may also act as a reverse proxy. It is one of the most extensively used reverse proxy and load balancing solutions in addition to hosting websites. Nginx was utilized by over 479 million web servers in December 2019, according to Netcraft, making it the webserver market leader.
Nginx offers all of the advantages of a reverse proxy, plus more. It boosts web speed, security, dependability, and scalability. You can configure Nginx using its configuration file, which is also reloadable on the fly.
However, you can pay for Nginx Plus to have access to API-based configuration options and other capabilities designed for large enterprise websites.
It's easy to set up Nginx as a basic reverse proxy. Nginx also offers several directives for customizing the reverse proxy on your server to meet your specific needs.
#2 Varnish

Varnish is an open-source HTTP reverse proxy that includes a caching engine. It's primarily intended for high-traffic websites with dynamic content. It can also function as a load balancer, a web application firewall (WAF), and an edge authentication and authorization server.
It runs on all recent versions of Linux and FreeBSD and is mostly used as a front end for web servers such as Nginx or Apache. Varnish's sophisticated and flexible Varnish Configuration Language (VCL) allows you to define features including HTTP request handling, caching, and connecting to one or more web servers.
As a result, many CDNs rely on Varnish as their primary content delivery platform.
Varnish now supports ESI, a language that lets you reuse portions of one web page on another. If your website contains a lot of duplicate content across multiple pages, ESI can help you reduce page load times by caching frequently used areas.
#3 Apache Traffic Server
Apache Traffic Server is a caching proxy server that is available as open-source. It's well-known for its scalability and speed. Yahoo built it as a commercial product many years ago, but they made it open source and donated it to the Apache Foundation for upkeep.
Apache Traffic Server is used by several major content networks and CDNs, including Comcast, Akamai, LinkedIn, Yahoo, and Apple.
To set up a reverse proxy on your web server, you can utilize Apache HTTP Server (Apache httpd), an HTTP server daemon. It allows you to provide static and dynamic content to users in addition to operating as a basic web server.
#4 Spike

Spike Proxy is a free HTTP proxy that can be used to detect security issues in websites. It is a ReactPHP-based fast reverse proxy that enables you to expose your local services to the internet.
SPIKE Proxy is part of the Spike Application Testing Suite and can identify automated SQL injection, website crawling, login form brute force, overflow detection, and directory traversal.
How to Set Up an Nginx Reverse Proxy?
Nginx is one of the most widely used web server suites on the internet. It can function as a reverse proxy server, routing web traffic to certain servers.
Step 1: Installation
Let me demonstrate how to set up Nginx on several Linux systems.
Run the following instructions to install Nginx on Debian, Linux Mint, Kali, Ubuntu, and other derivatives:
sudo apt update
sudo apt install nginx
Run the following commands on Fedora, CentOS, Red Hat, and other Fedora or Red Hat derivatives:
sudo dnf upgrade
sudo dnf install nginx
To install Nginx on Manjaro, Arch Linux, and other Arch derivatives, follow these instructions:
sudo pacman -Syu
sudo pacman -S nginx
After the installation is complete, you can check the software version to see if Nginx was installed correctly.
nginx -v
nginx version: nginx/1.18.0 (Ubuntu)
Step 2: Start and Configure Nginx to Launch on Reboot
To start Nginx:
sudo systemctl start nginxTo enable Nginx:
sudo systemctl enable nginxTo see if Nginx is up and running, do the following:
sudo systemctl status nginxThe result should indicate that the service is active (running).
Step 3: Unlink Default Configuration File
Enter the following in the terminal:
sudo unlink /etc/nginx/sites-enabled/defaultStep 4: Create New Configuration File
Enter the following to make a new configuration file:
cd /etc/nginx/sites-available/
sudo vi custom_server.conf
Replace a custom server with a suitable name for you by adding the following to the new file:
server {
  listen 80;

  location / {
    proxy_pass http://my_server;
  }
}
This is a very simple Nginx reverse proxy demonstration. Configure Nginx to listen for all traffic on port 80.
All traffic on port 80 is forwarded to http://my_server using the proxy pass command. Simply substitute the desired site for http://my_server, and Nginx will intercept client requests and transmit them to the provided location. Save the file and quit when you're done.
Step 5: Test and Restart Nginx
To put Nginx to the test, do the following:
sudo service nginx configtestTo re-start Nginx, follow these steps.
sudo service nginx restartAdditional Nginx Configuration Options (Optional)
#1 Proxy Buffers
Nginx buffers traffic for servers that it proxies by default. Buffers increase server performance by deferring transmitting a server response until the client has completed submitting a complete response.
Open the configuration file from Step 5 to disable the buffer. Add the following to the location/section:
proxy_buffering off;#2 Request Headers
Headers send information to the server about the requests made or the client.
Two header fields are redefined by Nginx: host is set to $proxy_host, and the connection is set to shut. Make sure to alter the behavior in the configuration file if you utilize such headers.
location / {
  proxy_set_header Host $host;
}
Nginx is told to set host to the $host variable in this example.
Use an empty string to prevent a header field from being transmitted to the proxied server:
location / {
  proxy_set_header header-variable "";
}
#3 Load Balancing
The configuration file can be used to send traffic to many servers. To utilize this configuration, create a configuration file that looks like this:
http {
  server {
    proxy_pass http://my_server
  }
}
To put it another way, the HTTP configuration is separate from the server configuration set up in Step 5.
Use the upstream command to give a group of servers a name:
http {
  upstream server_group {
  server my.server1.com weight=3;
  server my.server2.com;
}

server {
  location / {
    proxy_pass http://server_group;
  }
}
This designation combines two servers – my.server1.com and my.server2.com – into one. Under the name http://server_group, Nginx proxies that group of servers. You have complete freedom to rename them.
The weight command is used in this example to send three requests to my.server1.com and one request to my.server2.com. One way to manually balance client load between servers is to use this method. Another option is to leave any designation blank, in which case Nginx will evenly distribute requests among the listed servers.
There are various advantages to using Nginx as a reverse proxy:
- It's simple to set up and provide high-level protection against Web server threats like DDoS and DoS.
- The Nginx Reverse Proxy assists in the distribution of load over multiple back-end servers and provides caching for slower back-end servers.
- For each web request from the client, Nginx does not require the creation of a new process. Rather, the default configuration is for each CPU to have one work process.
- It can work as a reverse proxy server for HTTP, HTTPS, TCP, UDP, SMTP, IMAP, and POP3 protocols.
- It has a minimal memory footprint and can support over 10,000 connections. Nginx can manage several web servers from a single IP address and route requests to the appropriate server inside a LAN.
- Nginx is one of the top web servers for enhancing static content performance. To reduce the burden on the web server, it's also a good idea to deliver cached material and use SSL encryption.
- It can also be beneficial when compressing information to speed up loading times.
- Nginx can run randomized experiments or A/B tests without requiring the use of JavaScript.
How to Set Up an Apache Reverse Proxy?
Step 1: Installation
You can use Apache as a reverse proxy and backend server, but other applications or webservers, such as wildfly or Nginx, can also be used as backend servers. However, for this tutorial, only the Apache server will be used.
As a result, both servers must have the Apache server installed. Use the following command to set up Apache:
$ sudo yum install httpdTo use Apache as a reverse proxy, you'll need the following modules.
Following the installation and activation of apache on the system that will be used as a reverse proxy, we must ensure that the following modules are installed and activated on the apache machine.
- mod_proxy – It is the major module in charge of redirecting connections
- mod_proxy_http – adds support for HTTP proxying
Use the following command to see if the following modules are installed and working:
$ httpd -MThis command will generate a list of currently running modules. If these modules aren't in the list, we'll need to enable them in httpd.conf by adding the following line:
$ sudo vim /etc/httpd/conf/httpd.conf
LoadModule proxy_module modules/mod_proxy.so
LoadModule proxy_http_module modules/mod_proxy_http.so
Step 2: Save & Restart
Now save and exit the file, and then restart the apache service to apply the modifications.
sudo systemctl httpd restartStep 3: Configuring Backend Test Server
On the backend server, we've also installed Apache, and we'll now add a simple HTML page for testing:
$ sudo vim /var/www/html/index.html
<html>
  <head>
    <title>Test page for Apache server</title>
  </head>
  <body>
    On the backend server, there is a simple test page.
  </body>
</html>
Exit and save the file. To make the modifications take effect, restart the apache service. Next, use the following URL in a browser on a local or remote system to test the page:
http://192.168.1.50The IP address of the backend server is 192.168.1.50.
Step 4: Configuring a Basic Reverse Proxy
After the backend server is up and running, the next step is to set up our front end, or reverse proxy. To do so, add the following line to the httpd.conf file in the Apache configuration file:
$ sudo vim /etc/httpd/conf/httpd.conf
<VirtualHost *:80>
ProxyPreserveHost On
ProxyPass / http://192.168.1.50/
ProxyPassReverse / http://192.168.1.50/
</VirtualHost>
With the 'ProxyPass' argument, we're telling the server to redirect any requests received at '/' to 'http://192.168.1.50/'. To apply the modifications, restart the apache services:
$ sudo systemctl restart httpdWe can also add port numbers here; for example, if we're using tomcat as a backend server, we can use this frontend server as a reverse proxy for apache tomcat using the following entries in httpd.conf:
<VirtualHost *:80>
ProxyPreserveHost On
ProxyPass / http://192.168.1.50:8080/test/
ProxyPassReverse / http://192.168.1.50:8080/test/
</VirtualHost>
Step 5: Testing the Reverse Proxy
Open the following URL in a web browser to test the reverse proxy:
http://192.168.1.100/The reverse proxy server's IP address is 192.168.1.100 in this case. We can see the page that was hosted on the backend server as soon as the URL loads. This demonstrates that our reverse proxy is properly configured and active.
There are various advantages to using Apache as a reverse proxy:
- A web server always allows you to communicate with your hosting provider. For example, if a user wants to learn about the web server's mechanism, they will be able to communicate and obtain information.
- The configuration of log files on a web server is made simple. They can be customized in the user's chosen order. The ability to analyze the operating system and web traffic operations begins with the configuration of web files.
- When compared to clustered web hosting, hosting through a web server is significantly more versatile. When choosing a dedicated web hosting server, the versatility is even greater. In other words, services are better controlled.
- Web servers are the greatest solution if you have a website with a lot of download links. A website that uses a web server has fewer bandwidth limits. Users may also easily track the speed and performance of web applications running on a web server.
- When there are new requests, a web server does not allow sharing of resources such as processor, hard drive, or bandwidth because it is not a shared host. Even if a virtual internet hosting account is obtained.
Limitations of Reverse Proxy
- If you or your users are unable to connect directly to your main server, using a reverse proxy can result in a single point of failure. If you're utilizing a reverse proxy as a front end to serve numerous domains, for example, its failure could bring all of them down at the same time.
- Since it can read and manipulate all traffic flowing through it, a reverse proxy offers a severe security risk. If you're sending HTTPS traffic through a reverse proxy, the data must be decrypted and re-encrypted. This means it must have access to the SSL/TLS certificate's private keys. As a result, if a hostile party gains access to your reverse proxy, they can log credentials and infect your websites with malware.
- If you use a third-party reverse proxy (such as Cloudflare), you're giving them access to your site's sensitive data. You can't foresee what will happen if you believe them.
- On websites that load using a reverse proxy, restoring backups or pushing staging sites live can cause the proxied site to cease loading properly.
Conclusion
Now that all of the setup information has been thoroughly presented in the previous step, it is advised that you configure all of the directives if you have a good understanding of the subject and are working on stable servers. It should also be noted that there are several methods for setting up a reverse proxy on Nginx and Apache, the above-mentioned being the simplest. However, if you are a tech geek and want to try all of them, you can do so.
Please do leave us a comment about the article in the below section.
Atatus Log Monitoring and Management
To assist enterprises with their logging difficulties, Atatus provides cloud-based log management. It gathers key HAProxy metrics from the underlying proxies and servers' HAProxy load balancer. Atatus accepts logs from a variety of servers, operating systems, applications, and languages in addition to HAProxy logs. It's easier to correlate different logs and get to the underlying cause of application and infrastructure issues when you have all of your logs in one location.
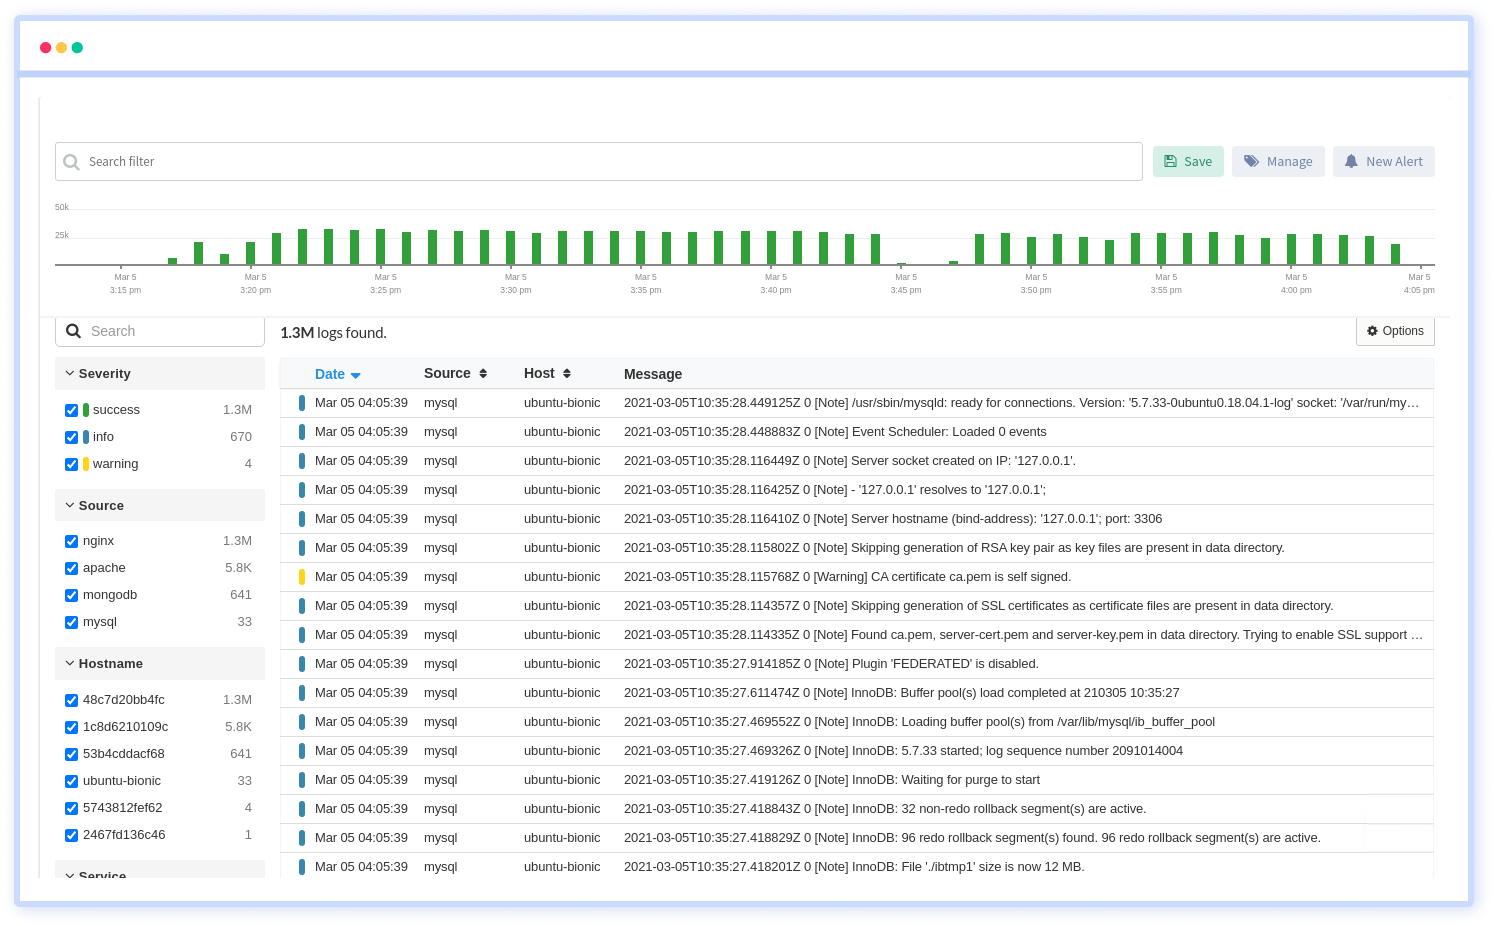
We give a cost-effective, scalable method to centralized logging, so you can obtain total insight across your complex architecture. To cut through the noise and focus on the key events that matter, you can search the logs by hostname, service, source, messages, and more. When you can correlate log events with APM slow traces and errors, troubleshooting becomes easy.
#1 Solution for Logs, Traces & Metrics
![]() APM
APM
![]() Kubernetes
Kubernetes
![]() Logs
Logs
![]() Synthetics
Synthetics
![]() RUM
RUM
![]() Serverless
Serverless
![]() Security
Security
![]() More
More