Building a Docker Swarm on AWS EC2: A Step-by-Step Guide

In today's tutorial, we're diving into the world of container orchestration by setting up a Docker Swarm on AWS EC2 instances. Docker Swarm allows you to manage a cluster of Docker hosts as a single virtual system, making it easier to deploy and scale your containerized applications. By leveraging the power of AWS EC2, we'll walk through each step to get your Swarm up and running smoothly.
Table Of Contents:-
- Step 1: How to Set up a Security Group?
- Step 2: Launching three EC2 Instances
- Step 3: SSH into Instances and Install Docker
- Step 4: Initializing Docker Swarm
- Step 5: Verifying Swarm Status
- Step 6: How to deploy services on this swarm?
Prerequisites:
Before we begin, make sure you have the following:
- An AWS account.
- Basic knowledge of AWS services.
- Familiarity with Docker and containerization concepts.
Objectives:
Before you start using Docker Swarm, we will have to first set up several ports relevant to it, including an SSH port. In the same way, we will also have to create two different security groups - one for the manager instance and another one for the worker instance.
Let's start with setting up a security group first.
Step 1: How to Set up a Security Group?
(A Security group acts as a virtual firewall for incoming and outgoing requests on your EC2 instance.)
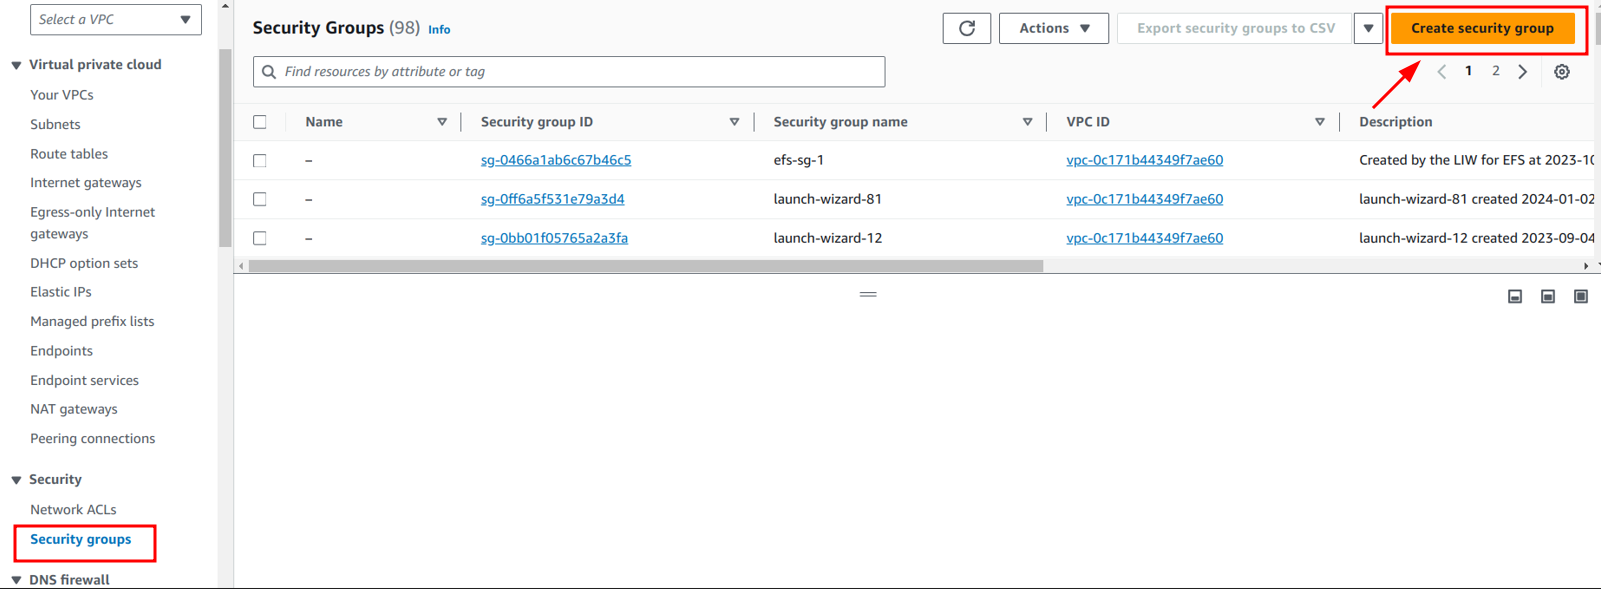
i.) In the AWS VPC Console, go to Networks and security and click on Security Groups.
ii.) On the top right corner you can click on Create Security Group, add name and description separately for each manager group and the worker group. Then choose the VPC ID (generally, it assigns the default VPC but if you want to change it to some other connection, you can custom set the new VPC ID).
iii.) After this, there are two sections - Inbound rules and Outbound rules. In the inbound rules, you can add the type of incoming connections which will have access to your EC2 instance, while Outbound rules allows you to control the types of connections that go outside from your EC2 Instance.
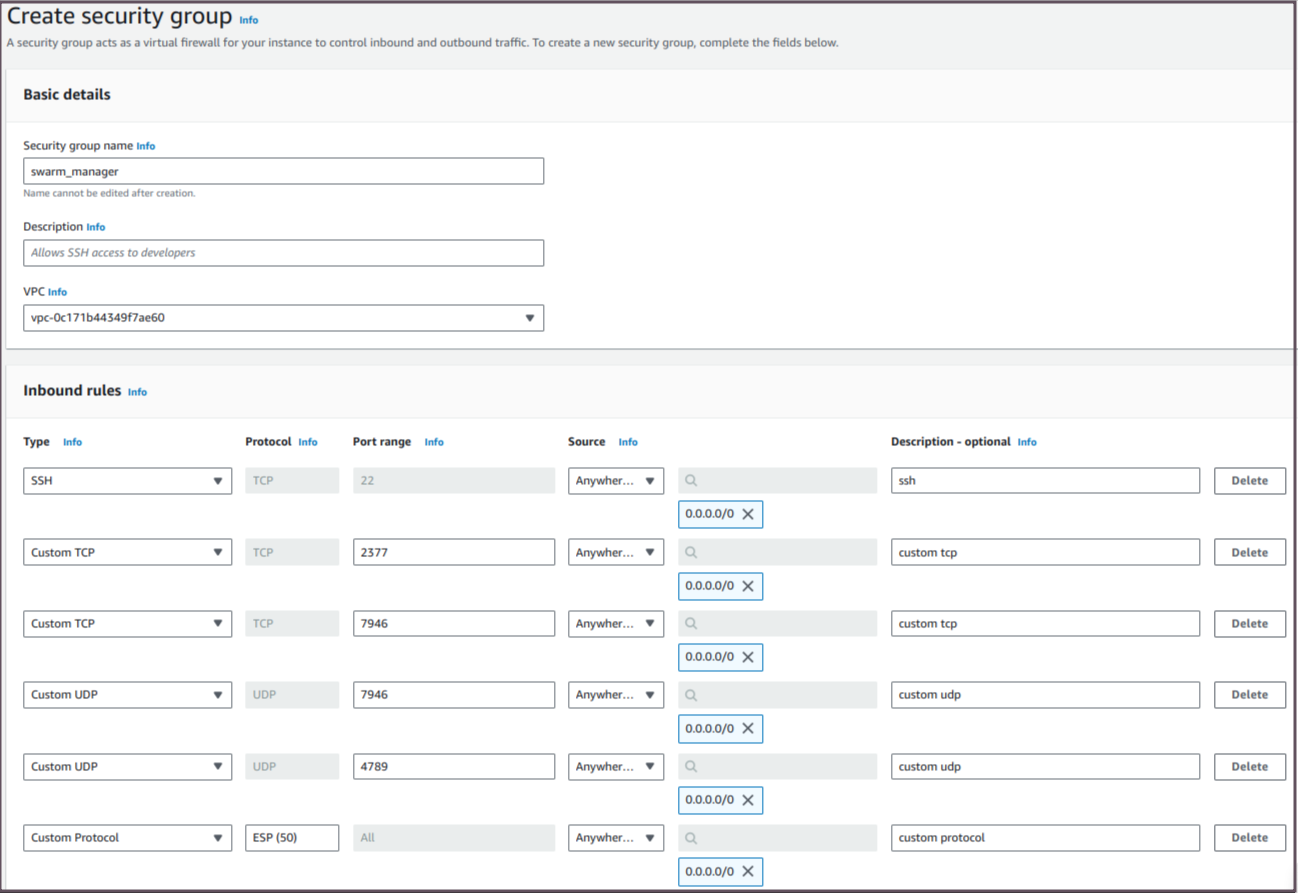
iv.) As a first step, to create a security group for Manager Node, set up SSH on port 22 and then add other TCPs.
- TCP 2377
- TCP 7946
- UDP 7946
- UDP 4789
- Custom Protocol ESP(50).
v.) Set the source to anywhere or if you have any particular IP range, you can custom set it.
(TCP or IP is a set of rules based on which all communications over the internet takes place.) You can access this references by Bret Fisher for setting up TCPs with the right ports.
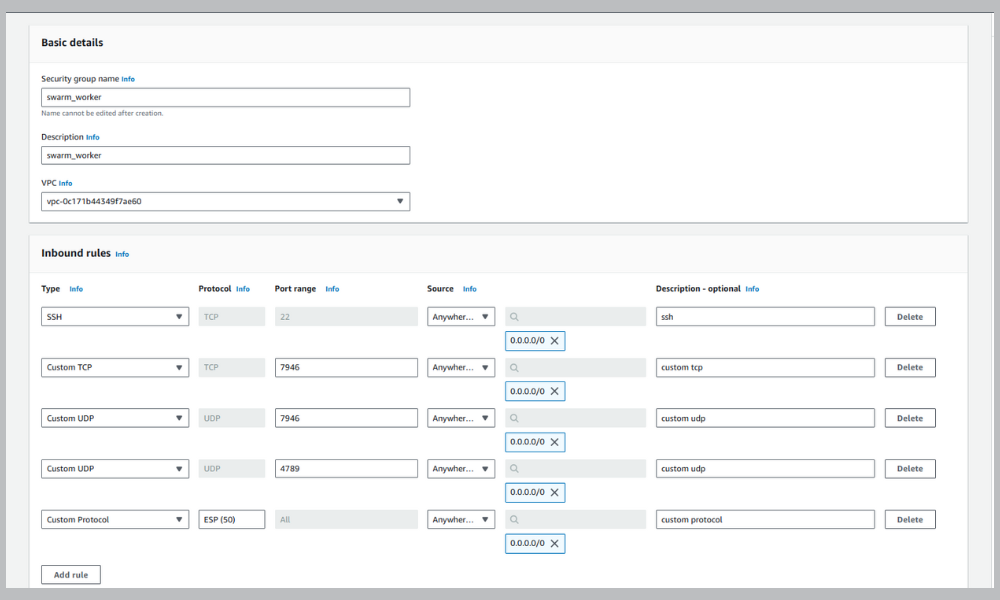
vi.) You will have to create two security groups - one for the manager node and another one for the worker nodes. Create a security group for the worker nodes the same way we did it for the manager node. Make sure to set the ports rightly.
Worker Node Ports are -
- SSH 22,
- TCP 7946
- UDP 7946
- UDP 4789
- Custom Protocol ESP(50).
Step 2: Launching three EC2 Instances
Once we are done with setting up Security Groups, we can move on to creating instances.
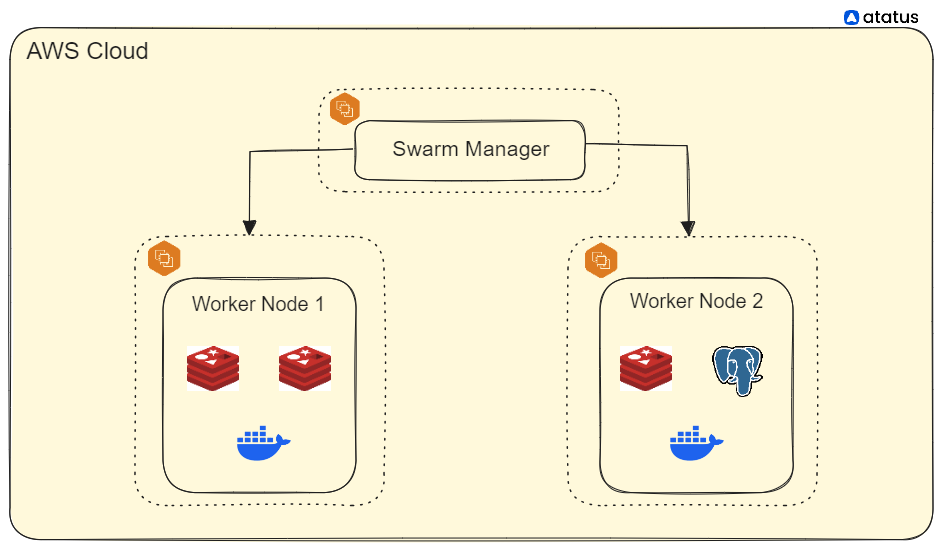
For this project, we will need three EC2 instances - one for swarm manager and two others for the worker nodes respectively.
i.) First, log in to your AWS Management Console and navigate to the EC2 Dashboard from the dropdown. Give a name tag, and select Amazon Linux AWS for AMI.
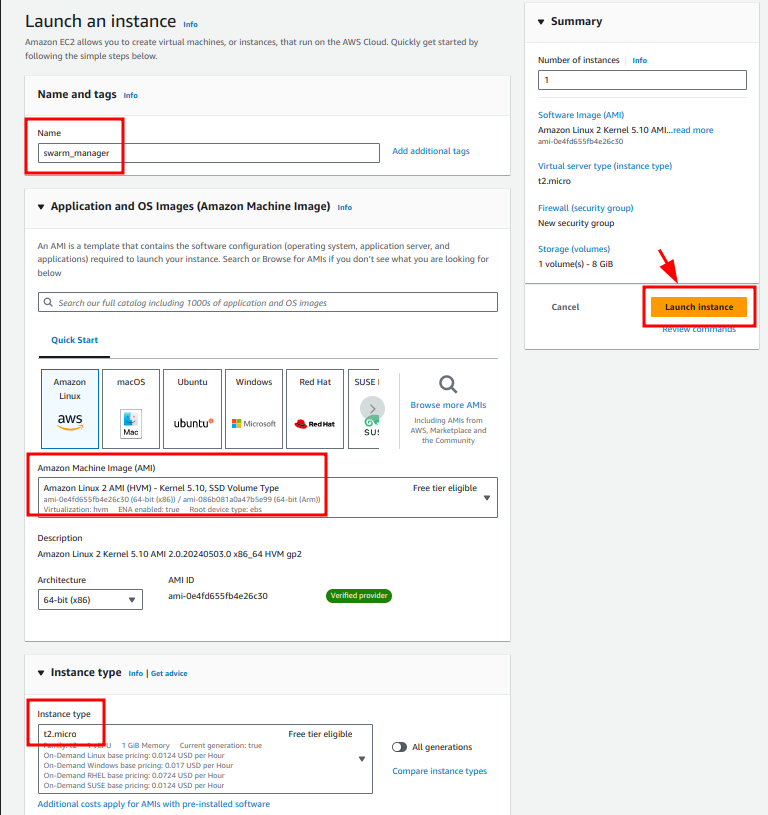
ii.) Then, you can choose an instance type (t2 nano, t2 micro,etc) according to your load, configure instance details (you can set the size of the instance here), and create or select an existing key pair for SSH access.
Here, we are choosing t2. micro instance with 1 GiB memory storage and naming it as swarm_manager. For AMI, choose Amazon Linux 2 AMI.
iii.) To connect instance to the Linux machine, you will have to add key pair value. If you have an existing key pair, you can choose that, otherwise you will have to create a new key pair. You can check out AWS Docs if you have any doubts about it.
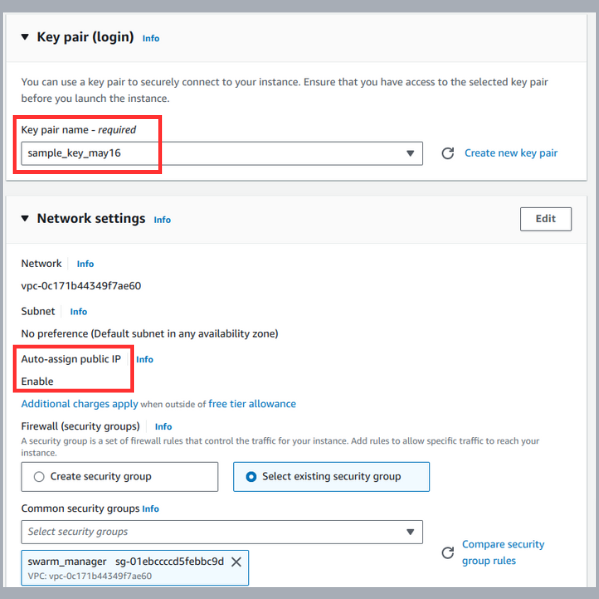
iv.) Enable Auto-assign public IP (so that you can SSH later) and set the desired VPC. Under Firewall section, select the existing security group option which will opt for the Swarm manager security group that you just created. And finally click on "Launch Instance".
v.) Once you have created an instance for the manager node, follow the same procedure to create two more instances for each worker nodes in our project. Make sure to label them correctly (eg., swarm_worker_node_1 and swarm_worker_node_2). Also, make sure you are adding the worker security group for worker nodes.
Once instances are launched, you can view them in your dashboard.

Step 3: SSH into Instances and Install Docker
Click on the first instance, i.e., the Swarm Manager node, and click connect.

In the CLI, navigate to the folder containing your keypair. Under the SSH client tab in the connect menu, copy the example of the connect command, paste it into your CLI, and press enter.
If you get a pop-up asking to connect, type 'YES' and return.
(You can connect the other two instances to a terminal window in the same way.)
Output:
ssh -i "sample_key_may16.pem" ec2-user@ec2-65-2-178-73.ap-south-1.compute.amazonaws.com
The authenticity of host 'ec2-65-2-178-73.ap-south-1.compute.amazonaws.com (65.2.178.73)' can't be established.
ED25519 key fingerprint is SHA256:DE/MMkHfCI/1YzC1c90kqPyvkBxaxBGEmlE4ORJTBKM.
This key is not known by any other names
Are you sure you want to continue connecting (yes/no/[fingerprint])? yes
Warning: Permanently added 'ec2-65-2-178-73.ap-south-1.compute.amazonaws.com' (ED25519) to the list of known hosts.
   ,     #_
   ~\_  ####_        Amazon Linux 2
  ~~  \_#####\
  ~~     \###|       AL2 End of Life is 2025-06-30.
  ~~       \#/ ___
   ~~       V~' '->
    ~~~         /    A newer version of Amazon Linux is available!
      ~~._.   _/
         _/ _/       Amazon Linux 2023, GA and supported until 2028-03-15.
       _/m/'           https://aws.amazon.com/linux/amazon-linux-2023/
In the same way, open two more terminals and connect to each worker node instances. Then we should update all packages for all these instances.
Update Package using the below command:
sudo yum update -yThe next step is to install Docker. We need to install Docker on all three of our instances.
sudo yum install docker -y

sudo systemctl enable docker

sudo systemctl start docker

sudo docker version
(Depending on your AMI, you'll use either sudo yum install Docker for Amazon Linux or sudo apt install docker.io for Ubuntu.)
This will be the output once you have installed Docker.
[ec2-user@ip-172-31-39-148 ~]$ sudo docker version
Client:
 Version:           20.10.25
 API version:       1.41
 Go version:        go1.20.12
 Git commit:        b82b9f3
 Built:             Fri Dec 29 20:37:18 2023
 OS/Arch:           linux/amd64
 Context:           default
 Experimental:      true

Server:
 Engine:
  Version:          20.10.25
  API version:      1.41 (minimum version 1.12)
  Go version:       go1.20.12
  Git commit:       5df983c
  Built:            Fri Dec 29 20:38:05 2023
  OS/Arch:          linux/amd64
  Experimental:     false
 containerd:
  Version:          1.7.11
  GitCommit:        64b8a811b07ba6288238eefc14d898ee0b5b99ba
 runc:
  Version:          1.1.11
  GitCommit:        4bccb38cc9cf198d52bebf2b3a90cd14e7af8c06
 docker-init:
  Version:          0.19.0
GitCommit: de40ad0The next step is to install Docker compose for all the instances.
sudo yum install curl

sudo curl -L "https://github.com/docker/compose/releases/latest/download/docker-compose-$(uname -s)-$(uname -m)" -o /usr/local/bin/docker-compose

sudo chmod +x /usr/local/bin/docker-compose

docker-compose --version
Docker Compose is a powerful tool that allows you to define and manage multi-container applications. It uses a YAML file for this purpose. Docker compose will help you define and share multi-container applications. You can either build them or tear them all down.
Docker compose is ideal for local development and defining multi-container applications. But Docker swarm is more efficient in orchestrating and managing containerized applications at scale.
Step 4: Initializing Docker Swarm
Run docker swarm init command to identify the manager instance as manager node. You should be running this command within the manager instance.
docker swarm initOutput:
[root@manager ec2-user]# docker swarm init
Swarm initialized: current node (zfly9by3ni4tmgywzfd8hjs38) is now a manager.

To add a worker to this swarm, run the following command:

    docker swarm join --token SWMTKN-1-1431rhqt6h2hg61ugcp1q1e82vbqs5n9pe9y6fwmj7yeez0mev-8wvohdt0br7m9jqrejx2x4n3l 172.31.37.174:2377

To add a manager to this swarm, run 'docker swarm join-token manager' and follow the instructions.In this output, it should be given that your current node is the manager node.
Take note of the join token displayed after initialization. In order to add the two worker nodes with this manager node, open two other terminals and SSH into each of the worker node instance separately.
And to do this, you have to copy and paste the join token given in the first output (initializing message of swarm manager).
Paste this token in the first terminal (where you SSH'd swarm_worker_node_1 ) and click Enter.
[ec2-user@worker_1 ~]$ sudo su
[root@worker_1 ec2-user]# docker swarm join --token SWMTKN-1-1431rhqt6h2hg61ugcp1q1e82vbqs5n9pe9y6fwmj7yeez0mev-8wvohdt0br7m9jqrejx2x4n3l 172.31.37.174:2377
This node joined a swarm as a worker.You can see that now your first worker node (swarm_worker_node_1) has joined the swarm.
Repeat this step for the other worker node as well.
[ec2-user@worker_2 ~]$ sudo su
[root@worker_2 ec2-user]# docker swarm join --token SWMTKN-1-1431rhqt6h2hg61ugcp1q1e82vbqs5n9pe9y6fwmj7yeez0mev-8wvohdt0br7m9jqrejx2x4n3l 172.31.37.174:2377
This node joined a swarm as a worker.Now, both the worker nodes, along with the manager have joined Docker Swarm.
Step 5: Verifying Swarm Status
Go back to the manager node CLI and enter the following command.
docker node lsOutput:
[root@manager ec2-user]# docker node ls
ID                            HOSTNAME   STATUS    AVAILABILITY   MANAGER STATUS   ENGINE VERSION
zfly9by3ni4tmgywzfd8hjs38 *   manager    Ready     Active         Leader           20.10.25
wfdqfc6gbc5fwipz9gymwarys     worker_1   Ready     Active                          20.10.25
igikbrytkndykcb7xcapd8mdo worker_2 Ready Active 20.10.25This will verify your docker swarm setup. Ensure that all nodes (manager and workers) are listed, indicating that your Swarm is set up correctly.
Step 6: How to deploy services on this swarm?
With your Docker Swarm ready, you can now deploy services or applications.
You have the flexibility to deploy services to your Docker Swarm directly from Docker Hub or define them using docker stack or docker compose. While you can pull a pre-built service like Redis from Docker Hub and deploy it in your Swarm, using Docker Stack or Docker Compose offers a more structured and manageable approach.
With Docker Stack or Docker Compose, you can define your services, networks, and volumes in a clear and organized manner. This allows for easier management and scalability, especially when dealing with complex application architectures.
Once your services are defined, deploying them to your Swarm is straightforward using the docker stack deploy command. This command orchestrates the deployment process, ensuring that your services are distributed across the Swarm properly.
Here, we will take two examples - one of a Redis service having four replicas, and the other one, a PostgreSQL service with only a single replica.
a) We are taking the example of a Redis service with four replicas.

Use the following command to create the Redis service.
docker service create --name my-redis --replicas 4 redisOutput:
[root@manager ec2-user]# docker service create --name redis --replicas 4 redis:latest
xb4d20a01jx50lqazztwnbxdn
overall progress: 4 out of 4 tasks
1/4: running   [==================================================>]
2/4: running   [==================================================>]
3/4: running   [==================================================>]
4/4: running   [==================================================>]
verify: Service converged To confirm that all these Redis services are deployed properly, try running the below command:
docker service ps <service_name>Output:
[root@manager ec2-user]# docker service ps redis
ID             NAME      IMAGE          NODE       DESIRED STATE   CURRENT STATE            ERROR     PORTS
9kjtjmhti406   redis.1   redis:latest   manager    Running         Running 28 seconds ago
b96wrgg625xz   redis.2   redis:latest   worker_1   Running         Running 29 seconds ago
i6dgw3zpd1jf   redis.3   redis:latest   worker_2   Running         Running 29 seconds ago
zmr3leddo3bi redis.4 redis:latest manager Running Running 28 seconds ago b) Next we are going to create a Postgres service with one replica.
To define the PostgreSQL service, you need to create a docker-compose.yml file. This file specifies the configuration for the PostgreSQL service, including the image, environment variables, volumes, and deployment constraints.
Postgres has a special environment variable requirement of POSTGRES_PASSWORD=<password>. You can set this password according to your choice.
As a first step, we create a new project directory using mkdir
mkdir postgres_swarm
cd postgres_swarm
Next, we create the YAML file using touch command. Enter vim docker-compose.yml and click enter.
touch docker-compose.yml
vim docker-compose.yml
In vim, enter insert mode (press i) and add the docker compose file:
version: '3.1'
services:
  db:
    image: postgres
    restart: always
    environment:
      POSTGRES_PASSWORD: my_password
Save and exit vim.
Next, we are going to deploy this Postgres file across the swarm we just created previously.
docker-compose up -d
Output:
[root@manager docker_compose]# docker-compose up -d
[+] Running 15/15
 ⠿ db Pulled                                                                                                                                12.9s
   ⠿ 09f376ebb190 Already exists                                                                                                             0.0s
   ⠿ 119215dfb3e3 Pull complete                                                                                                              0.8s
   ⠿ e02bbc8c8252 Pull complete                                                                                                              1.1s
   ⠿ 061f31803c55 Pull complete                                                                                                              1.3s
   ⠿ accd4903f49a Pull complete                                                                                                              2.2s
   ⠿ 2016ff8e6e3a Pull complete                                                                                                              2.9s
   ⠿ 088e651df7e9 Pull complete                                                                                                              3.1s
   ⠿ ed155773e5e0 Pull complete                                                                                                              3.3s
   ⠿ ffebb35d2904 Pull complete                                                                                                              9.4s
   ⠿ 293f0bec643a Pull complete                                                                                                              9.5s
   ⠿ 1655a257a5b5 Pull complete                                                                                                              9.5s
   ⠿ 4ddba458499d Pull complete                                                                                                              9.6s
   ⠿ 90e48ae03559 Pull complete                                                                                                              9.7s
   ⠿ 822c1a513e6a Pull complete                                                                                                              9.7s
[+] Running 2/2
 ⠿ Network docker_compose_default  Created                                                                                                   0.1s
 ⠿ Container docker_compose-db-1   Started                                                                                                   0.7s
Once you get this output, move onto the next command, which is used for deploying the stack:
docker stack deploy -c docker-compose.yml postgres
If you get the following output, it is to say that you're Postgres service has been successfully deployed in the stack.
[root@manager docker_compose]# docker stack deploy -c docker-compose.yml postgres
Ignoring unsupported options: restart

Creating network postgres_default
Creating service postgres_db
Next, we will verify if all the services are running properly using the docker service ls command:
[root@manager docker_compose]# docker service ls
ID             NAME          MODE         REPLICAS   IMAGE             PORTS
w6fho1n97ozt   postgres_db   replicated   0/1        postgres:latest   *:5432->5432/tcp
xb4d20a01jx5   redis         replicated   4/4        redis:latest
To list all the tasks for Postgres Service, run the following command docker service ps postgres_db:
[root@manager docker_swarm]# docker service ps postgres_db
ID             NAME            IMAGE             NODE      DESIRED STATE   CURRENT STATE            ERROR     PORTS
ybsa70wj9wow   postgres_db.1   postgres:latest   manager   Running         Running 30 seconds ago
With this, you have now set up a PostgreSQL service and a Redis service and can easily practice container orchestration and service management in AWS.
By using the --force command, you can easily remove the manager from a swarm.
The last thing you must do before exiting the program wholly, is to use the docker swarm leave --force command and leave the storm, stop and delete all the EC2 instances we started in the AWS Management Console.
Conclusion
Setting up a Docker Swarm on AWS EC2 instances is a powerful way to manage your containerized applications at scale.
With your Swarm in place, you can easily deploy and manage containerized applications, scale them as needed, and ensure high availability for your services.
Leveraging AWS EC2 for your Docker Swarm cluster brings additional benefits, including the flexibility to choose different instance types, the ability to scale up or down based on demand, and the security features AWS offers. With this setup you can easily use advanced Docker Swarm facilities such as service discovery, load balancing, rolling updates and more.
End Note: Experiment with different configurations and explore additional features to unlock the full potential of Docker Swarm in your AWS environment.
Monitor Containers with Atatus
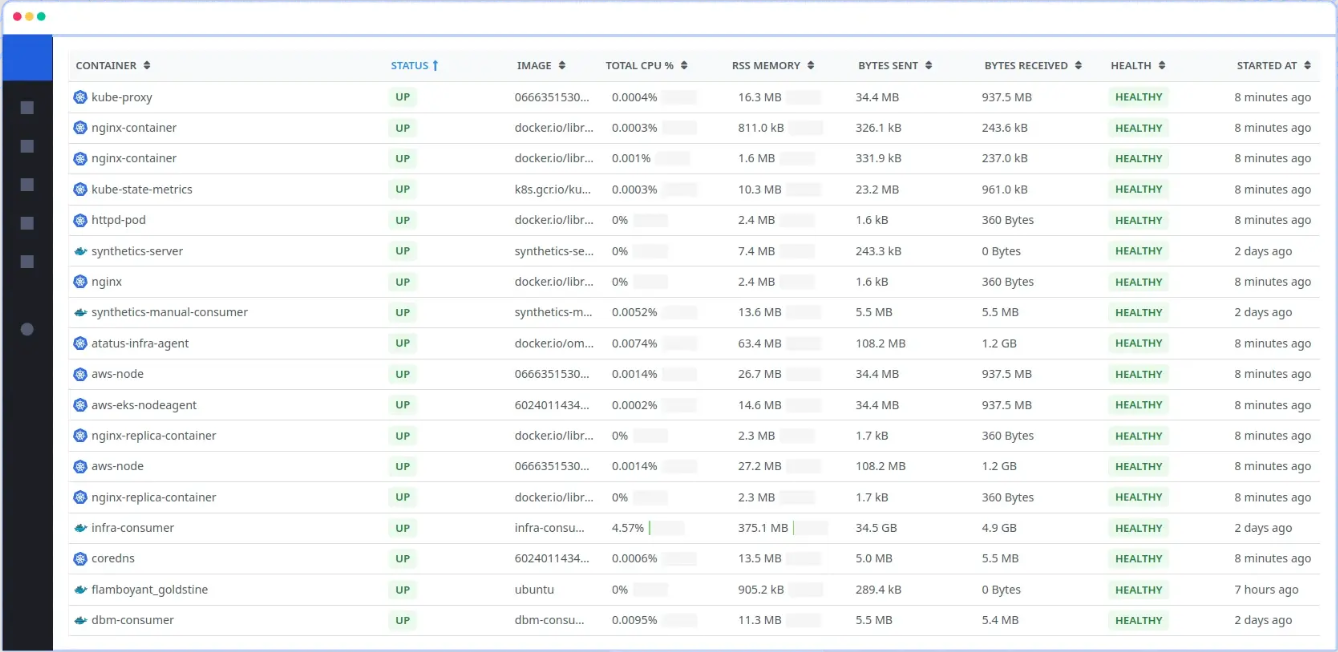
With real-time docker container metrics, traces, and log events, Atatus allows you to monitor container health, track resource usage, and quickly identify and resolve issues.
The platform collects and analyzes metrics on CPU and memory uasage, inbound and outbound traffic, I/O utilization, swap memory state, and more from your container environments, allowing users to detect errors, and optimize application performance thereon.
Beyond just Docker, Atatus can monitor a variety of container platforms, including Kubernetes, giving you a unified view of your entire container ecosystem. You can easily track the performance of individual Kubernetes containers and pods. By analyzing resource usage patterns, Atatus ensures that containers utilize resources efficiently, leading to cost savings and improved overall efficiency.
This detailed level of monitoring enables the identification of resource-heavy containers or problematic pods that may be negatively impacting the overall performance of the cluster. This in turn allows for targeted improvements to be made to optimize the cluster's performance and stability.
Try our 14-day free trial and let us know your thoughts on it.
#1 Solution for Logs, Traces & Metrics
![]() APM
APM
![]() Kubernetes
Kubernetes
![]() Logs
Logs
![]() Synthetics
Synthetics
![]() RUM
RUM
![]() Serverless
Serverless
![]() Security
Security
![]() More
More