Svelte - A Beginner's Guide

Today’s users expect stunning visuals and lightning-fast load times, and to deliver on this expectation, many web applications are starting to look more and more like mobile apps.
This puts many developers in the unenviable position of having to choose between delivering cutting-edge UI and blazingly fast performance or sacrificing one for the other.
Svelte can help you make this choice: it’s a new approach to web application development with performance baked in from the start.
Table of Contents
What is Svelte?
Svelte is a front-end JavaScript framework created by Rich Haris which provides a strongly typed functional programming environment that makes it easy to build fast and scalable user interfaces.
It seeks to enhance the developer experience by redefining how you work with HTML. One of the main goals of svelte is to help developers create a reactive application.
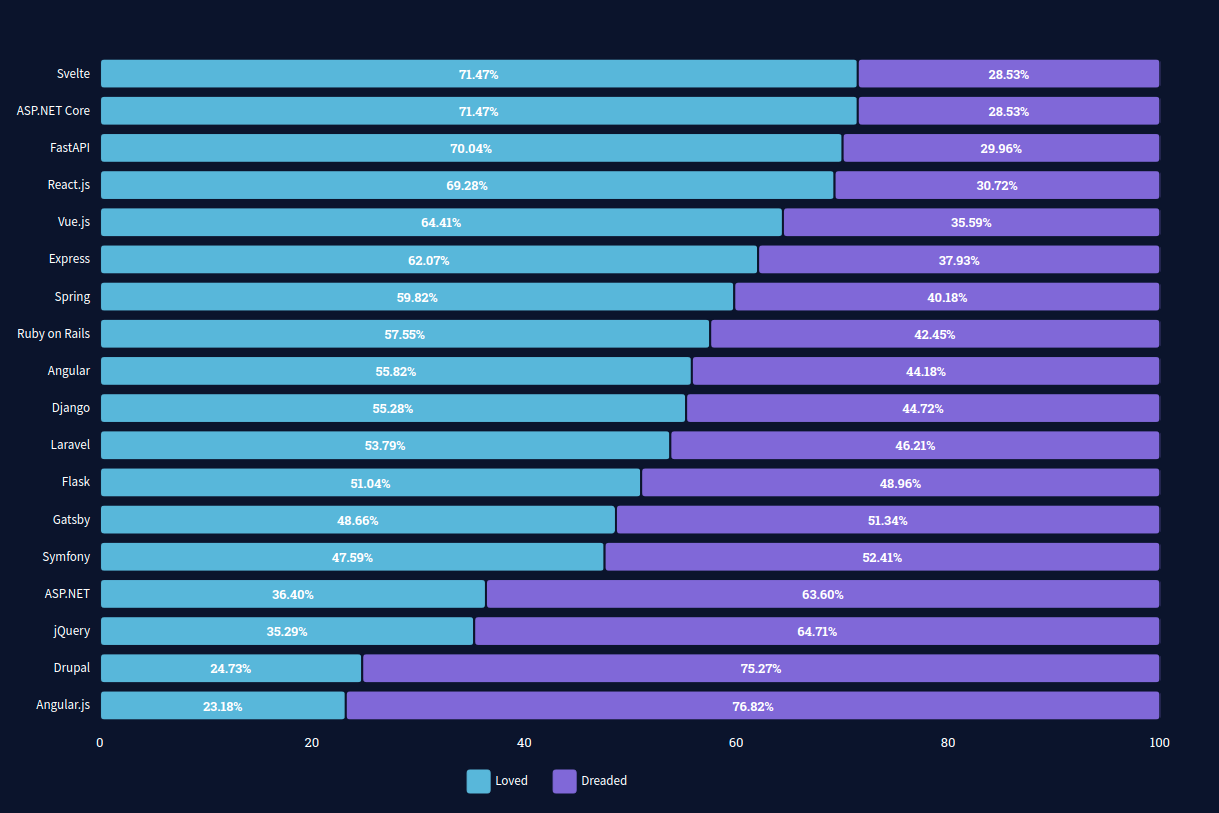
As the most loved framework, Svelte takes the top spot in the 2021 survey taken by Stack Overflow.
It is an innovative approach to building user interfaces. Due to this framework's unique compiling and serving of code at build time rather than runtime, it is significantly faster than React and Vue. You can use Svelte libraries with any frameworks. The Svelte libraries are framework agnostic.
Svelte Example:
<script>
  let name = 'world';
</script>

<h1> Hello {name}! </h1>
As a result of its framework capabilities and the fact that it is compiled into vanilla Js, Svelte is classified both as a compiler and as a framework.
To develop a Svelte application, you will need:
- Node.js Javascript runtime
- A text editor or IDE
To create a Svelte application, you will need is Node.js since the Svelte compiler itself is written in Javascript.
Install the Node.js framework on your machine before starting using svelte. Check the node.js version before running svelte because it requires the latest Node.js version.
How to create a Svelte project?
Every time you build an application, ensure everything you need is installed and ready to use.
Svelte can be used by 2 methods.
- Using REPL
- Using degit
1. Using REPL
When learning Svelte, using the Read-Eval-Print Loop (REPL) is the most effective approach. By using this method, you can view the result immediately after modifying the code.
Eventually, your app will grow beyond the REPL. At this point, you can download the svelte file using the download button and uncompress it to work further.
To set up the project:
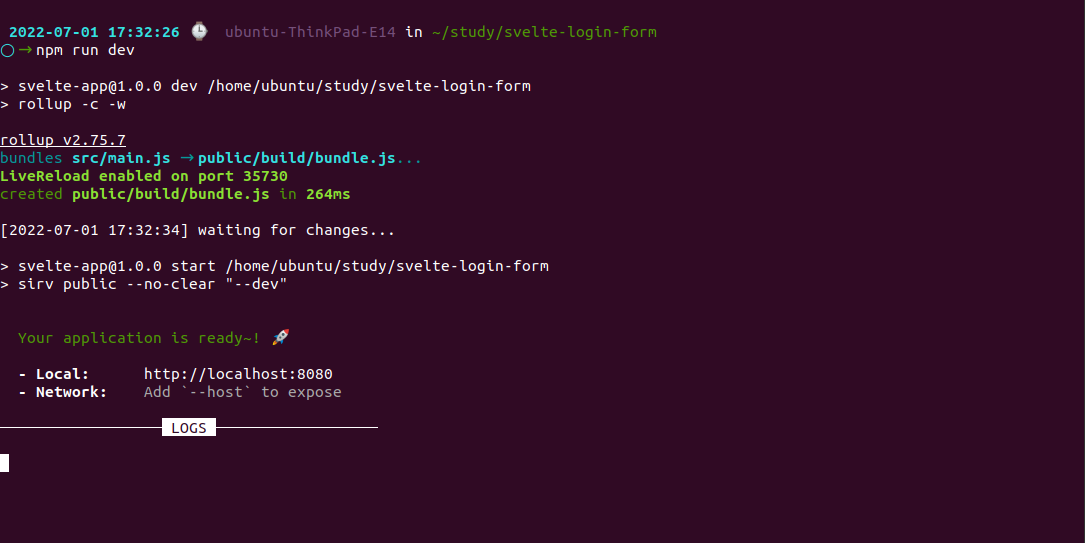
Step:1 Open the terminal and navigate to the path where Svelte template is located using the cd command.
cd /path/to/svelte-app
npm install
Step:2 Start the dev server by running the below command.
npm run devYour app will be served in the URL localhost:8080 and RollUp will automatically rebuild your app whenever you make a change to the files in svelte-app/src.
2. Using degit
Installation and usage are very straightforward, making it ideal for users of all levels of experience.
You can use the below command to install degit if it is already not installed in your system.
npm install -g degitBy using the following command, clone Svelte's project app template.
npx degit sveltejs/template svelte-login-form
An empty Svelte project template will be created and to use it you will have to install the required NPM packages.
To install the npm packages:
cd svelte-login-form
npm install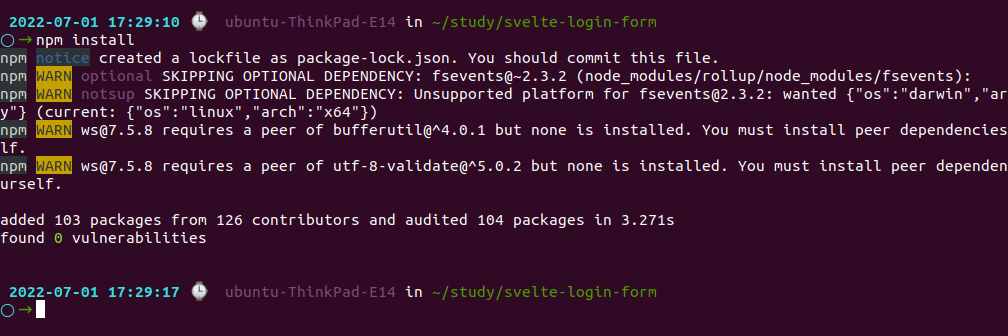
Using the following command, the application will now be ready to run:
npm run devWhen you use npm version below 8 you will experience the following error.
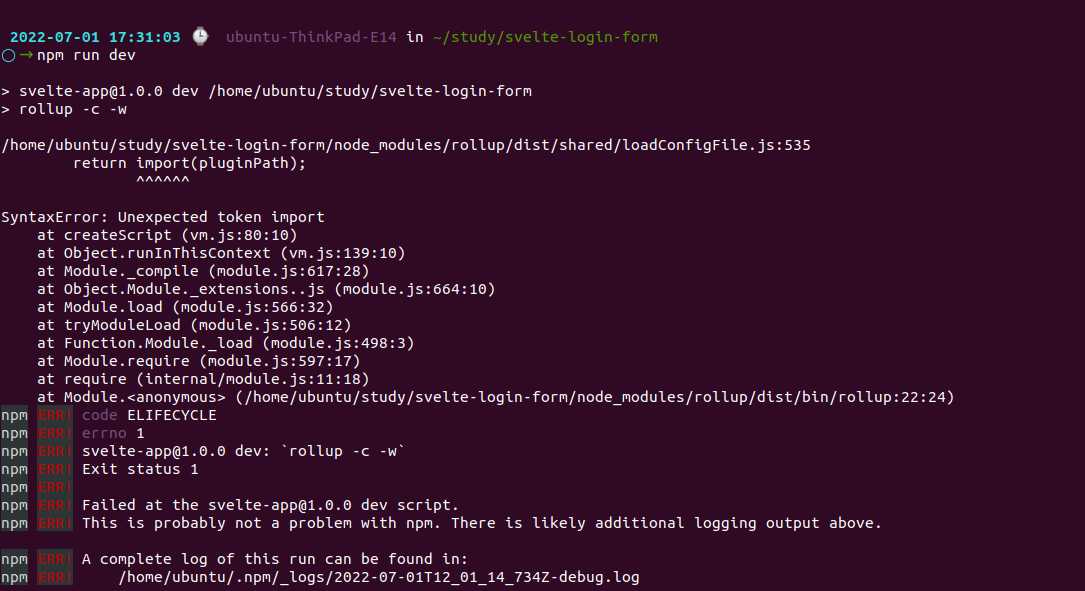
Update to the Node.js latest version and start running the command npm run dev in your terminal.
Your application will be compiled and built by Svelte, and a local server will be started at localhost:8080.
By browsing to the local server with your browser, you'll view the output.
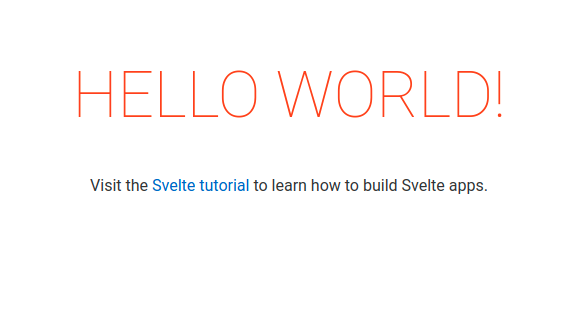
It will automatically detect all updates, recompile and refresh the app when you make changes to the source code.
Now we can create our first component and create our employee details app using Svelte.
Getting started with Svelte
Create an Employee-svelte template and install the required packages. Open the Editor like Sublime or VS code IDE in your system and follow the below steps to create an Employee form.
1. Creating a Svelte Container
Once the default svelte template is cloned in your machine you can create your own container in it. Navigate to the src/App.svelte file in your Svelte template and copy the below code in the file.
<script>

    // Add your logic here...

</script>

<style>

    // Add your styles here...

</style>

<section>

    // Add your html here...

</section>
It is an empty container where we can write the JavaScript code inside the <script></script> tag, the CSS section inside the <style></style> tag and the remaining part in the file contains the HTML structure of the component.
2. Building a form to enter the employee details
To show the Employee form on the web page follow the below steps:
To create the employee form where you can enter the employee information such as name, age and role, we will need to add the following code inside the <script> tag.
<script>

let employeeName = '';
let employeeAge = 0;
let employeeRole = '';

function setEmployeeName(event) {
  employeeName = event.target.value;
}

</script>
In the above code, we have defined empty variables employee name, age and role. These values will get updated automatically.
<section>

  <h1> Employee Information </h1>

  <div>
    <label for="employeeName"> Employee Name </label>
    <input type="text" id="employeeName" value={employeeName} on:input={setEmployeeName}/>
  </div>

  <div>
    <label for="employeeAge"> Age </label>
    <input type="number" id="employeeAge" bind:value={employeeAge}/>
  </div>

  <div>
    <label for="employeeRole"> Role </label>
    <textarea rows="3" id="employeeRole" bind:value={employeeRole}/>
  </div>

  <button> Add Employee </button>

</section>
<div> tag defines a section in the HTML document.
<label> used to define the name of the element.
<input> tag allows user to enter the characters into the box.
<textarea> tag accepts multi-line input such as comment, reviews etc..
In the above example, we have used two input bindings to store the value of input fields.
i.) on:input - Every time an input event occurs, this event listener is called.
<script>
   function setEmployeeName(event) {
      employeeName = event.target.value;
    }
</script>

<input type="text" id="employeeName value={employeeName} on:input={setEmployeeName}/>
We have defined a setEmployeeName function and passed it to the employeeName input field. The variable gets updated whenever the user types in the input field.
ii.) bind:value - Whenever the user fills in the input, the variable gets updated automatically instead of having to set event.target.value.
<input type="number" id="employeeAge" bind:value={employeeAge}/>The entire code is as follows:
// src/App.svelte
<script>
let employeeName = '';
let employeeAge = 0;
let employeeRole = '';
let employees =[];
function setEmployeeName(event){
employeeName = event.target.value;
}
</script>
<style>
h1 {
color: #1F4690;
margin-top: 10px auto 40px;
text-align: center;
}
section {
margin: auto;
width :30rem;
}
label,
input,
textarea {
width: 100%
}
</style>
<section>
<h1> Employee Information </h1>
<div>
<label for="employeeName"> Employee Name </label>
<input type="text" id="employeeName" value={employeeName} on:input={setEmployeeName}/>
</div>
<div>
<label for="employeeAge"> Age </label>
<input type="number" id="employeeAge" value={employeeAge} bind:value={employeeAge}/>
</div>
<div>
<label for="employeeRole"> Role </label>
<textarea rows="3" id="employeeRole" bind:value={employeeRole}/>
</div>
<button> Add Employee </button>
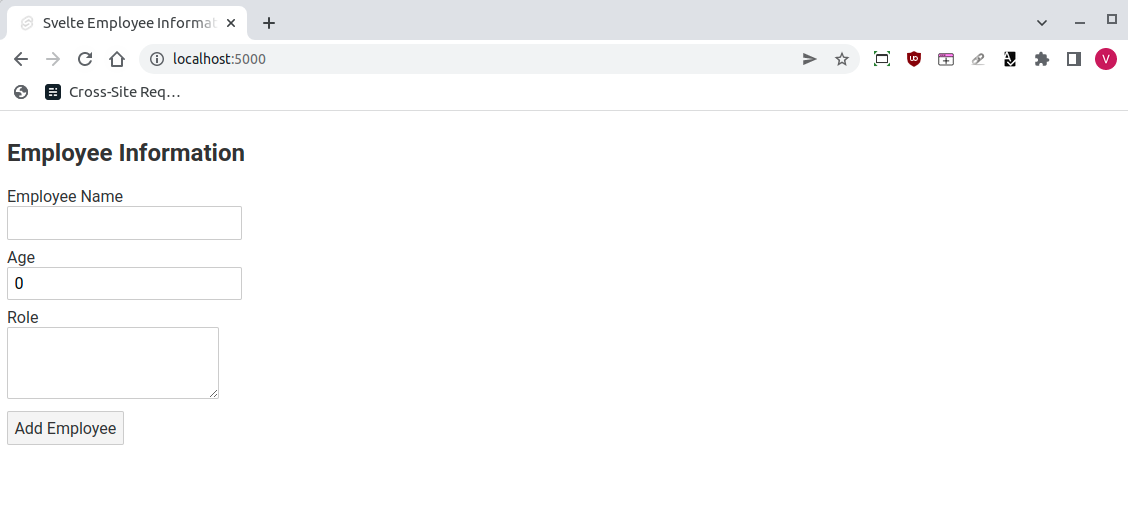
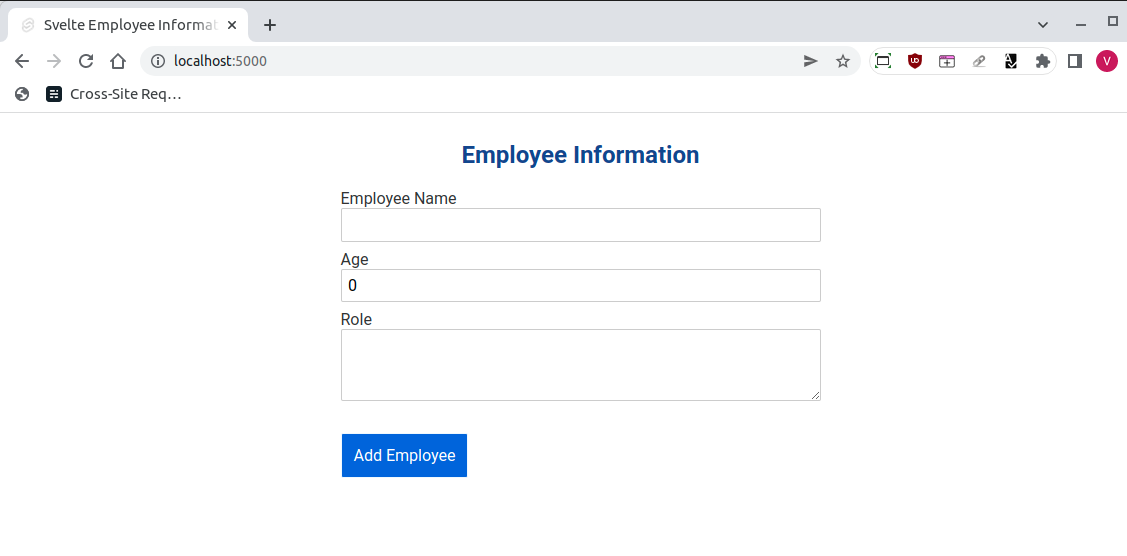
</section>After entering the above code your employee information UI should look like this.
It executes a JavaScript event when the form is submitted.
2. Adding style to the form
We can improve our form's appearance by adding some CSS styles to it.
Add the below code under the <style> tag in the App.svelte file.
// src/App.svelte
<style>
h1 {
color: #1F4690;
margin-top: 10px auto 40px;
text-align: center;
}
section {
margin: auto;
width :30rem;
}
label,input,textarea {
width: 100%
}
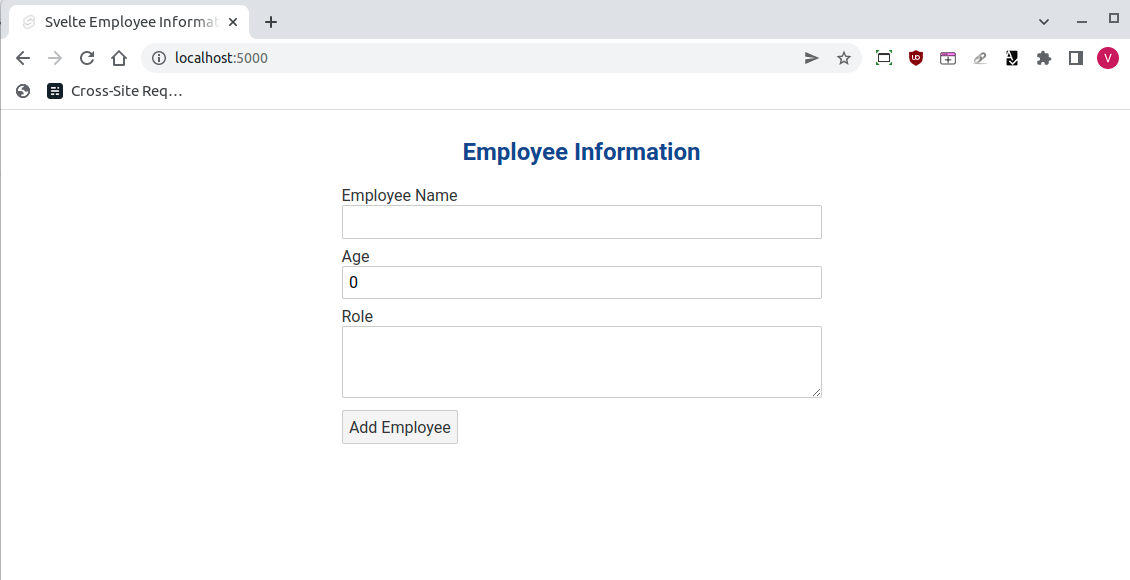
</style>Once you have added the style your UI will look like this:
3. Styling form button by creating a reusable button component
To add style for the button we will create a new component called Button.svelte in the src folder. Add the following code in the component.
// src/Button.svelte

<style>

button {
  padding: 0.15rem 0.5rem;
  background-color: #000000;
  border: 1px solid  aliceblue ;
  cursor: pointer;
  color: white;
  margin-bottom: 20px;
  margin-top: 20px;
}

</style>

<button on:click >
  <slot/>
</button>
The slot tag inside the button is used for communication between parent and the child component and thereby making it reusable. This tag tells the Svelte engine that this can accept any other HTML tags or other Svelte component.
Add this component inside the App.svelte file:
// src/App.svelte

<script>

import ButtonComponent from './button.svelte'

</script>

<!-- Form to enter the employee name, age and role -->

<section>

    <ButtonComponent on:click={addEmployee}> Add Employee </ButtonComponent>

</section>
We have added the component using the import keyword inside the script tag and change the button tag to ButtonComponent inside the section.
After being added, your button will look like the screenshot below.
You can easily import and use this button component anywhere you want inside the svelte application.
4. Building a form to store the employee information in an array
To store the employee information in an array while clicking on the "Add Employee" add the following code inside the <script> tag.
// src/App.svelte

<script>

function addEmployee() {
  const newEmployee = {
    employeeName : employeeName,
    employeeAge : employeeAge,
    employeeRole : employeeRole
  };
  employees = employees.concat(newEmployee)
}

</script>

<section>

  <button on:click={addEmployee}> Add Employee </button>

</section>
Add the addEmployee function inside the script tag and update the on:click event inside the button tag.
The JavaScript function that you add inside the <script> tag is called every time a user interacts with the submit (Add Employee) button which triggers the on:click event that we have created.
It will then trigger the addEmployee function and appends the name, age and role in an object and add the new employee information to the array.
5. Creating a custom component in Svelte
Now let's create a new custom component to show the employee information as a list.
The first thing with custom component is that styles are scoped within components, so styles applied to one div will not affect another div in a different component. Additionally, we can define functions that are dynamically linked together.
Using Svelte, we will create a dynamic event, link the app.svelte component with the EmployeeForm.svelte component, and pass props.
// src/EmployeeForm.svelte

<script>

import ButtonComponent from './button.svelte'

export let employeeName;
export let employeeAge;
export let employeeRole;

function deleteEmployee() {
    //add your logic here...
}

</script>

<style>
div {
  padding: 16px;
  background-color: #FFFFDE;
}

h1 {
  font-size: 1.25rem;
  margin: 0.25rem 0;
}

h2 {
  font-size: 1rem;
  margin: 0.25rem 0;
  color: aqua;
}

p {
  margin: 0.25rem 0;
}
</style>

<div>
  <h1> {employeeName} </h1>
  <h2> {employeeAge} </h2>
  <p> {employeeRole} </p>
  <ButtonComponent on:click={deleteEmployee}> Delete Employee </ButtonComponent>
</div>
Using the export keyword, we have passed data from our parent component app.svelte to the child component Employee form.
export let employeeName;A function can be exported as shown below:
export function deleteEmployee() {
      //...add your logic here...
  }
Finally, in the app.svelte file, import the EmployeeForm component:
// src/App.svelte

<script>

import Employee from './EmployeeForm.svelte'

</script>

<style>
  ...
</style>

<section>
  ...
</section>

<section>
  {#each employees as employee}
    <Employee
      employeeName = {employee.employeeName}
      employeeAge = {employee.employeeAge}
      employeeRole = {employee.employeeRole}
    />
  {/each}
</section>
In the above code, we have imported the child component and its function as shown below:
import Employee, { deleteEmployee } from './EmployeeForm.svelte'To loop over the list of data in employees, we have used the #each tag to show the employee information.
Here we have passed the variables employeeName, employeeAge and employeeRole as props to the Employee component using {} braces.
If you have been following the entire steps you will have the UI something like this:
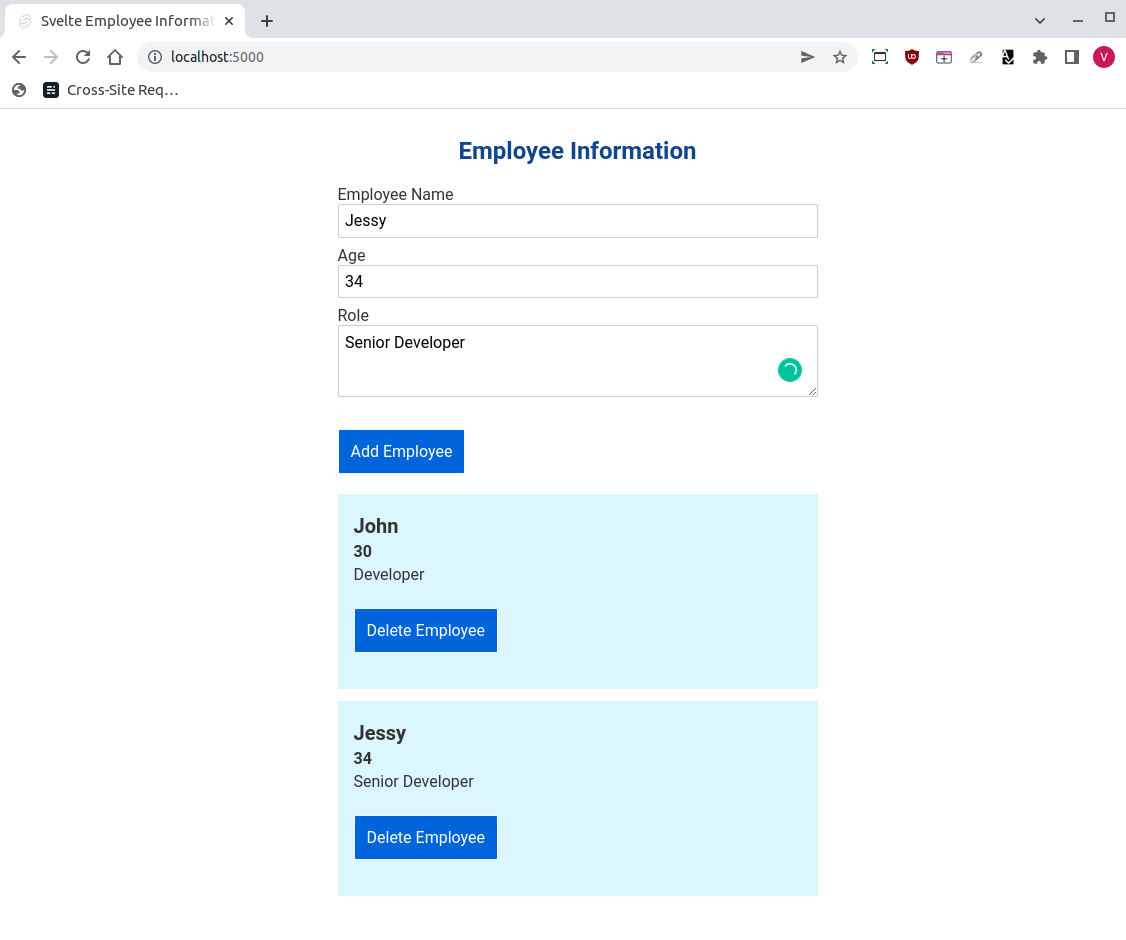
On Svelte, the employee information list has been successfully created.
The complete Svelte code for App.svelte:
<script>
import Employee from './EmployeeForm.svelte'
import ButtonComponent from './button.svelte'

let employeeName = '';
let employeeAge = 0;
let employeeRole = '';

let employees =[];

function setEmployeeName(event){
  employeeName = event.target.value;
}

function addEmployee(){
  const newEmployee = {
    employeeName : employeeName,
    employeeAge : employeeAge,
    employeeRole: employeeRole
  };
  employees = employees.concat(newEmployee)
}
</script>

<style>

h1 {
  color: #1F4690;
  margin-top: 10px auto 40px;
  text-align: center;
}

section {
  margin: auto;
  width :30rem;
}

label,
input,
textarea {
  width: 100%
}

</style>

<section>

  <h1> Employee Information </h1>
  <div>
    <label for="employeeName"> Employee Name </label>
    <input type="text" id="employeeName" value={employeeName} on:input={setEmployeeName}/>
  </div>
  <div>
    <label for="employeeAge"> Age </label>
    <input type="number" id="employeeAge" value={employeeAge} bind:value={employeeAge}/>
  </div>
  <div>
    <label for="employeeRole"> Role </label>
    <textarea rows="3" id="employeeRole" bind:value={employeeRole}/>
  </div>

  <ButtonComponent on:click={addEmployee}> Add Employee </ButtonComponent>

</section>

<section>
  {#each employees as employee}
    <Employee
      employeeName = {employee.employeeName}
      employeeAge = {employee.employeeAge}
      employeeRole = {employee.employeeRole}
    />
  {/each}
</section>
The complete code for Button.svelte:
// src/Button.svelte

<style>
button{
  font : larger;
  padding: 0.15rem 0.5rem;
  background-color: #000000;
  border: 1px solid  aliceblue ;
  cursor: pointer;
  color: white;
  margin-bottom: 20px;
  margin-top: 20px;
  }
</style>

<button on:click >
<slot/>
</button>
The complete code for EmployeeForm.svelte:
// src/EmployeeForm.svelte

<script>
import ButtonComponent from './button.svelte'

export let employeeName;
export let employeeAge;
export let employeeRole;

let index;

function deleteEmployee(index) {
    // add your logic here
}

</script>

<style>
div {
    padding: 16px;
    background-color: #DFF6FF;
    margin-bottom: 12px;
}

h1 {
    font-size: 1.25rem;
    margin: 0.25rem 0;
}

h2 {
    font-size: 1rem;
    margin: 0.25rem 0;
}

p {
    margin: 0.25rem 0;
}
</style>

<div>
    <h1> {employeeName} </h1>
    <h2> {employeeAge} </h2>
    <p> {employeeRole} </p>
    <BuButtonComponenttton on:click={deleteEmployee(index)}> Delete Employee </ButtonComponent>
</div>
Advantages of Svelte
There are three major advantages in using Svelte.
a.) Less code - To save time, reduce errors and increase the readability you should write fewer lines of code. This is where Svelte comes in. It introduces a TypeScript format designed to enforce this.
<script>
    let tool = "Atatus"
</script>

<h1> {tool} is one of the best performance monitoring tool. </h1>
In the above code, the <script> tag contains the JavaScript code and followed by that in the end there is a HTML tag <h1> that writes "Hello" and templates the name of the variable.
The above code would be 30-50 times bigger in React and Vue.
You can also update the local state of the variable with the help of the assignment operator (=). In React, users must use the usestate hook which is very ,much heavier.
b.) No virtual DOM - The Virtual DOM compares a snapshot of a previous tree to the current tree to update the state. This is implemented in React.
Since Svelte is a compiler the user does not need to load the library to the browser instead a simple .js file is loaded and on the page to render the application. All the objects are updated in the compile time which helps Svelte reduce the overhead that is caused by the virtual DOM.
c.) Reactivity - One of the major advantages of Svelte is its reactivity. It keeps your application in sync with the state.
To update or modify the state in React or Vue you need to use hooks. Here is a piece of code to update the counter in React vs Svelte.
const { count } = this.state;
this.setState({
    count: count + 1
});
You can write the above code in just a single line with Svelte.
count += 1;Conclusion
In conclusion, Svelte is a lightweight, fast and performant framework made for building user interfaces. It is a declarative language that makes it easy to build fast, maintainable, and reliable websites.
It is MVVM-based, making it work well with React, Angular, Vue, and other frameworks. It also provides data binding, performance, and easy integration.
In this blog, we've taken you through the basics of Svelte with the step-by-step instructions. We've built up an "Employee List" app and added in some basic interactivity. Svelte empowers developers to write expressive code that works great on any device.
Monitor poor front-end performance with Real User Monitoring
Atatus is a scalable end-user experience monitoring system that allows you to see which areas of your website are underperforming and affecting your users. Understand the causes of your front-end performance issues and how to improve the user experience.
By understanding the complicated frontend performance issues that develop due to slow page loads, route modifications, delayed static assets, poor XMLHttpRequest, JS errors, and more, you can discover and fix poor end-user performance with Real User Monitoring (RUM)
You can get a detailed view of each page-load event to quickly detect and fix front-end performance issues affecting actual users. With filterable data by URL, connection type, device, country, and more, you examine a detailed complete resource waterfall view to see which assets are slowing down your pages.
#1 Solution for Logs, Traces & Metrics
![]() APM
APM
![]() Kubernetes
Kubernetes
![]() Logs
Logs
![]() Synthetics
Synthetics
![]() RUM
RUM
![]() Serverless
Serverless
![]() Security
Security
![]() More
More