How to Use Laravel to Create a GraphQL API
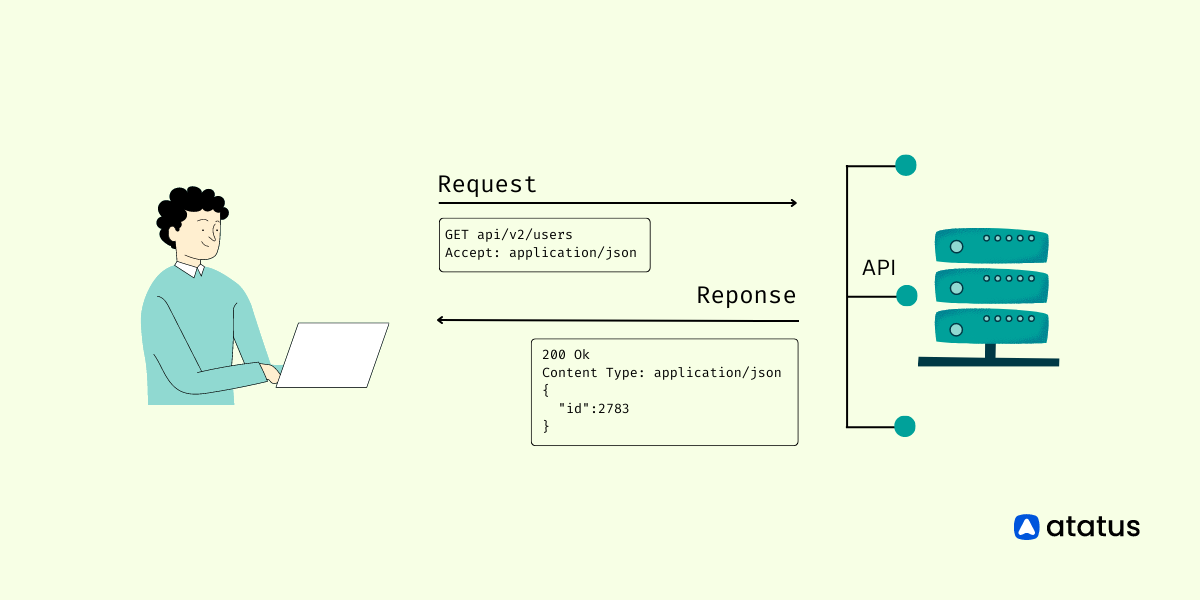
GraphQL is a comprehensive approach to guiding software developers in constructing data-driven applications. It is sometimes referred to be a platform or programming language agnostic query language. It is, in our opinion, the new API standard, allowing client applications to request particular data from the database rather than a full record.
This article will teach you some of the core ideas needed to create a GraphQL API that uses Laravel. We will take a novel way to construct REST APIs in this lesson, which departs from traditional architecture. We'll create a theatre (movie list) API that can do CRUD (Create, Read, Update, Delete) actions on data in your database to help us learn more about GraphQL.
If you're new to this technology and want some simple technical knowledge to help you get started, you've come to the perfect place.
Here’s how it’s done:
- Prerequisites
- Getting Started with Laravel
- Install GraphQL Laravel library
- Creating a Movie Model
- Creating a Seeder File for the Movies Table
- Create and Set Up a Database Connection
- Constructing a GraphQL Server
- Creating a GraphQL Type for the Application
- GraphQL Queries: How to Create Them
- Creating the Mutation
- Create and Set Up a Database Connection
- Registering the Schema and Type
- Run the Application
Prerequisites
Before we begin, make sure you have the following programs installed on your computer:
- PHP 7+
- Composer 2.0
- Docker 20.10.6 (Any other version is fine)
- Docker-Compose 1.29.1 (Any other version is fine)
I'm also assuming you've got:
- Basic knowledge of Laravel (Eloquent, Migrations, MVC, Routes, and more)
- Basic knowledge of GraphQL (in theory)
- Some knowledge of PHP (Syntax, OOP, and more)
Getting Started with Laravel
To begin, run the following command from the terminal to create a new Laravel application using composer:
$ composer create-project --prefer-dist laravel/laravel moviesThe preceding command will build a Laravel project in a new directory named movies in your local development folder, or wherever you typed it. To interact with the default functionality, go to the project folder and run the Laravel project with the following command:
// Move into the project
$ cd movies

// Run the application
$ php artisan serve
Install GraphQL Laravel Library
Developers have written several GraphQL libraries to make dealing with GraphQL in a Laravel project simple. The Laravel GraphQL library (rebing/graphql-laravel) will be used here.
Use CTRL + C to stop the application from running, then enter the following command to tell the composer to install the library:
// Install library
$ composer require rebing/graphql-laravel
Once the installation is complete, use the following command to publish a copy of the configuration file from the vendor folder:
$ php artisan vendor:publish --provider="Rebing\GraphQL\GraphQLServiceProvider"The following output will appear:
Copied File [/vendor/rebing/graphql-laravel/config/config.php] To [/config/graphql.php]
Publishing complete.
The configuration file will be copied to config.graphql.php. We'll come back to it later in the tutorial to change the content.
Creating a Movie Model
In this step, we'll design a Movie model while also generating a migration file.
$ php artisan make:model Movie -mThe migration file will then be utilized to generate the movie table and the fields that go with it. Replace the content of the newly generated migration file with the following:
<?php
use Illuminate\Database\Migrations\Migration;
use Illuminate\Database\Schema\Blueprint;
use Illuminate\Support\Facades\Schema;
class CreateMoviesTable extends Migration
{
    /**
     * Run the migrations.
     *
     * @return void
     */
    public function up()
    {
        Schema::create(movies, function (Blueprint $table) {
            $table->id();
            $table->string("title");
            $table->text(director);
            $table->string("language");
            $table->string("year_released");
            $table->timestamps();
        });
    }
    /**
     * Reverse the migrations.
     *
     * @return void
     */
    public function down()
    {
        Schema::dropIfExists(‘movies’);
    }
}
The Movies table will include fields such as title, director, language, and year_released.
Add these fields to the Movie model as $fillable properties. Replace the content of app/Movie.php with:
<?php
namespace App;
use Illuminate\Database\Eloquent\Model;
class Movie extends Model
{
    protected $fillable = ["title", "director", "language", "year_released"];
}
Creating a Seeder File for the Movies Table
Let's use the Seeder class in Laravel to generate some basic data to populate our database tables. Type the following command to create a seeder file, particularly for the Movie table:
$ php artisan make:seeder MovieSeederWithin the database/seeds folder, a new file named MovieSeeder.php will be created. Fill in the following information in the newly formed file:
<?php
use Illuminate\Database\Seeder;
use App\Movie;
class MovieSeeder extends Seeder
{
    /**
     * Run the database seeds.
     *
     * @return void
     */
    public function run()
    {
        Movie::insert([
            [
                "title" => "The Dark Knight",
                "director" => "Christopher Nolan",
                "language" => "English",
                "year_released" => "2008",
            ],
            [
                "title" => "The Godfather",
                "director" => "Francis Ford Coppola",
                "language" => "English",
                "year_released" => "1972",
            ],
            [
                "title" => "It's a Wonderful Life",
                "director" => "Frank Capra",
                "language" => "English",
                "year_released" => "1946",
            ],
            [
                "title" => "Parasite",
                "director" => "Bong Joon Ho",
                "language" => "English",
                "year_released" => "2019",
            ],
            [
                "title" => "Gladiator",
                "director" => "Ridley Scott",
                "language" => "English",
                "year_released" => "2000",
            ],
            [
                "title" => "Joker",
                "director" => "Todd Phillips",
                "language" => "English",
                "year_released" => "2019",
            ],
        ]);
    }
}
Here, we established a Movie model instance and inserted an array of data comprising a list of movies, each having a title, director, language, and year_released.
The MovieSeeder from the default DatabaseSeeder class is required to seed these columns with data. Open the database/seed/DatabaseSeeder.php file and make the following changes:
<?php
use Illuminate\Database\Seeder;
class DatabaseSeeder extends Seeder
{
    /**
     * Seed the application's database.
     *
     * @return void
     */
    public function run()
    {
        $this->call(MovieSeeder::class); // add this line
    }
}
Create and Set Up a Database Connection
We're ready to construct a database table and populate it with dummy data. Before you begin, make sure you have a database locally setup and that you have updated the .env file with your database credentials, as seen below:
DB_CONNECTION=mysql
DB_HOST=127.0.0.1
DB_PORT=3306
DB_DATABASE=YOUR_DB_NAME
DB_USERNAME=YOUR_DB_USER
DB_PASSWORD=YOUR_DB_PASSWORD
Replace the placeholders YOUR_DB_NAME, YOUR_DB_USER, and YOUR_DB_PASSWORD with the necessary database details.
To create the database schema, run the migration now:
$ php artisan migrate --seedThe database seeder will be performed after the database schema has been constructed, due to the provided --seed flag.
We'll set up the GraphQL server now that we have an application with the necessary data for evaluating our API's functionality.
Constructing a GraphQL Server
The Laravel GraphQL library, which will be utilized in this application, was installed earlier. We'll begin by defining the GraphQL schema in this section. The schema outlines how the created data will be retrieved using GraphQL and provides an exact description of the fields in the database.
Create a GraphQL folder in your project's application folder to get started. Create three new subfolders within this folder:
- Mutations
The classes that will be used to perform the insert, update, and delete operations will be stored in this folder. - Queries
To get data from the database, GraphQL queries will be utilized, and the classes for that functionality will be written here. - Types
Types are objects that represent the many types of data that can be accessed from a database. This is where the MovieType class will be stored.
We'll begin developing the necessary classes within the folders above in the next phase.
Creating a GraphQL Type for the Application
In the app/GraphQL/Types folder, create a new file MovieType.php and paste the following code into it:
<?php
namespace App\GraphQL\Types;
use App\Movie;
use GraphQL\Type\Definition\Type;
use Rebing\GraphQL\Support\Type as GraphQLType;
class MovieType extends GraphQLType
{
    protected $attributes = [
        "name" => "Movie",
        "description" => "Collection of movies and details of director",
        "model" => Movie::class,
    ];
    public function fields(): array
    {
        return [
            "id" => [
                "type" => Type::nonNull(Type::int()),
                "description" => "Id of a particular movie",
            ],
            "title" => [
                "type" => Type::nonNull(Type::string()),
                "description" => "The title of the movie",
            ],
            "director" => [
                "type" => Type::nonNull(Type::string()),
                "description" => "Name of the director",
            ],
            "language" => [
                "type" => Type::nonNull(Type::string()),
                "description" => "The language which the movie was taken",
            ],
            "year_released" => [
                "type" => Type::nonNull(Type::string()),
                "description" => "The year the movie was released",
            ],
        ];
    }
}
You'll see that we generated a $attributes array that has the name, a brief description, and the model linked, all of which are associated with the type defined above. Finally, we defined a function that returns an array of field properties.
GraphQL Queries: How to Create Them
Queries will be used to retrieve data from the database, as previously described. In this scenario, we'll write queries to get the details of a certain movie and to get the details of all the movies in the database.
The Movie Query
Create a file called MovieQuery.php in the app/GraphQL/Queries folder and add the following code within it:
<?php
namespace App\GraphQL\Queries;
use App\Movie;
use GraphQL\Type\Definition\Type;
use Rebing\GraphQL\Support\Facades\GraphQL;
use Rebing\GraphQL\Support\Query;
class MovieQuery extends Query
{
    protected $attributes = [
        "name" => "movie",
    ];
    public function type(): Type
    {
        return GraphQL::type("Movie");
    }
    public function args(): array
    {
        return [
            "id" => [
                "name" => "id",
                "type" => Type::int(),
                "rules" => ["required"],
            ],
        ];
    }
    public function resolve($root, $args)
    {
        return Movie::findOrFail($args["id"]);
    }
}
The query name is defined here, and the GraphQL type to be utilized is the Movie type that was generated before. The function args() returns the unique identification that will be used for a specific movie, in this example an id. The query will then look for the movie using the identification and return its data after it has been resolved.
The Movies Query
In contrast to the class defined in the previous section, we will define a query to obtain a collection of movies in this section. Create a file called MoviesQuery.php in the app/GraphQL/Queries folder. Use the following content:
<?php
namespace App\graphql\Queries;
use App\Movie;
use GraphQL\Type\Definition\Type;
use Rebing\GraphQL\Support\Facades\GraphQL;
use Rebing\GraphQL\Support\Query;
class MoviesQuery extends Query
{
    protected $attributes = [
        "name" => "movies",
    ];
    public function type(): Type
    {
        return Type::listOf(GraphQL::type("Movie"));
    }
    public function resolve($root, $args)
    {
        return Movie::all();
    }
}
Creating the Mutation
Any query that requires data to be written or altered is frequently delivered through mutation. To insert, update, or delete a record in the database, mutations can be produced. Let's begin by defining one to make a new record for a movie.
Create a Movie
Create a new file called CreateMovieMutation.php in the app/GraphQL/Mutations folder. Use the following content:
<?php
namespace App\graphql\Mutations;
use App\Movie;
use Rebing\GraphQL\Support\Mutation;
use GraphQL\Type\Definition\Type;
use Rebing\GraphQL\Support\Facades\GraphQL;
class CreateMovieMutation extends Mutation
{
    protected $attributes = [
        "name" => "createMovie",
    ];
    public function type(): Type
    {
        return GraphQL::type("Movie");
    }
    public function args(): array
    {
        return [
            "title" => [
                "name" => "title",
                "type" => Type::nonNull(Type::string()),
            ],
            "director" => [
                "name" => "director",
                "type" => Type::nonNull(Type::string()),
            ],
            "language" => [
                "name" => "language",
                "type" => Type::nonNull(Type::string()),
            ],
            "year_released" => [
                "name" => "year_released",
                "type" => Type::nonNull(Type::string()),
            ],
        ];
    }
    public function resolve($root, $args)
    {
        $movie = new Movie();
        $movie->fill($args);
        $movie->save();
        return $movie;
    }
}
It's important to keep track of the mutation's name so that you can refer to it afterward. We returned the attributes of each field before constructing an instance of the Movie model and populating it with the arguments supplied along with the query, in addition to specifying the GraphQL type.
Update a Particular Movie
Create a new file named UpdateMovieMutation.php in the app/GraphQL/Mutations folder to define a mutation to update the records of a specific movie. Use the following content:
<?php
namespace App\graphql\Mutations;
use App\Movie;
use Rebing\GraphQL\Support\Facades\GraphQL;
use GraphQL\Type\Definition\Type;
use Rebing\GraphQL\Support\Mutation;
class UpdateMovieMutation extends Mutation
{
    protected $attributes = [
        "name" => "updateMovie",
    ];
    public function type(): Type
    {
        return GraphQL::type("Movie");
    }
    public function args(): array
    {
        return [
            "id" => [
                "name" => "id",
                "type" => Type::nonNull(Type::int()),
            ],
            "title" => [
                "name" => "title",
                "type" => Type::nonNull(Type::string()),
            ],
            "director" => [
                "name" => "director",
                "type" => Type::nonNull(Type::string()),
            ],
            "language" => [
                "name" => "language",
                "type" => Type::nonNull(Type::string()),
            ],
            "year_released" => [
                "name" => "year_released",
                "type" => Type::nonNull(Type::string()),
            ],
        ];
    }
    public function resolve($root, $args)
    {
        $movie = Movie::findOrFail($args["id"]);
        $movie->fill($args);
        $movie->save();
        return $movie;
    }
}
We built an attribute that specified the query name and field properties for the query arguments, similar to what we did in the previous section. Finally, we used the unique id to retrieve and update the details of the movie of interest.
Delete a Movie
The final mutation is for the deletion of a specific movie. Make a new file called DeleteMovieMutation.php in the app/GraphQL/Mutations folder. Use the following content:
<?php
namespace App\graphql\Mutations;
use App\Movie;
use GraphQL\Type\Definition\Type;
use Rebing\GraphQL\Support\Mutation;
class DeleteMovieMutation extends Mutation
{
    protected $attributes = [
        "name" => "deleteMovie",
        "description" => "Delete a movie",
    ];
    public function type(): Type
    {
        return Type::boolean();
    }
    public function args(): array
    {
        return [
            "id" => [
                "name" => "id",
                "type" => Type::int(),
                "rules" => ["required"],
            ],
        ];
    }
    public function resolve($root, $args)
    {
        $movie = Movie::findOrFail($args["id"]);
        return $movie->delete() ? true : false;
    }
}
Registering the Schema and Type
After you've finished constructing all of the schemas, you'll need to register them in the GraphQL library's configuration file. To do so, enter the config/graphql.php file, look for the schemas, and make the necessary changes as described here. Apply the same logic to the types property:
return [
...
'schemas' => [
	'default' => [
		'query' => [
			'movie' => App\GraphQL\Queries\MovieQuery::class,
			'movies' => App\GraphQL\Queries\MoviesQuery::class,
		],
		'mutation' => [
			// Create a movie
			'createMovie' => App\GraphQL\Mutations\CreateMovieMutation::class,
			// update movie
			'updateMovie' => App\GraphQL\Mutations\UpdateMovieMutation::class,
			// delete a movie
			'deleteMovie' => App\GraphQL\Mutations\DeleteMovieMutation::class,
		],
		'middleware' => [],
		'method' => ['get', 'post'],
	],
],
'types' => [
	'Movie' => App\GraphQL\Types\MovieType::class,
],
...
]
Run the Application
PHP artisan serve is used to start the application. The local PHP server will be started, and the Laravel application will be accessible at http://localhost:8000.
GraphiQL IDE Installation
To test the application, we'll need to download and install a tool that can test GraphQL endpoints. GraphiQL is a popular tool in the IT world that was built for this reason. It's a graphical user interface for creating, revising, and testing GraphQL queries and mutations. To get a version that works with your operating system, go here.
When you're finished, open it up and utilize the GraphQL Endpoint http://localhost:8000/graphql.
Testing the Endpoints
Return All Movies
Run the following query in the query window to get the list of movies:
{
  movies {
	id,
	title,
	director
  }
}
This will bring up the collection of movies that were previously seeded into the database.
Return a Specific Movie
Then, to get the details of a certain movie, use the following query:
{
  movie(id: 4) {
	title,
	director
  }
}
It's worth noting that we had to pass an argument that represented the movie's unique identity.
Create a Movie
We'll start with mutations and make a movie using the following steps:
mutation createMovie {
createMovie(
    title: "Gone Girl",
    director: "David Fincher",
    language: "English",
    year_released: "2014")
	{
        id
	    title
	    director
	}
}
Update a Movie
And to update the details of a movie:
mutation updateMovie {
updateMovie(
  id: 2,
  title: "Stand by Me",
  director: "Rob Reiner",
  language: "English",
  year_published: "1986")
  {
 	id
	title
	director
  }
}
Conclusion
GraphQL is a game-changer and a fantastic addition to the community of software developers. It is becoming more popular as a result of its ability to withstand any application, regardless of size.
In this article, we were able to quickly create a GraphQL API using Laravel. We also set everything up from the ground up and created a full CRUD process, comparable to what is available for any web resource.
Atatus API Monitoring and Observability
Atatus provides Powerful API Observability to help you debug and prevent API issues. It monitors the consumer experience and is notified when abnormalities or issues arise. You can deeply understand who is using your APIs, how they are used, and the payloads they are sending.
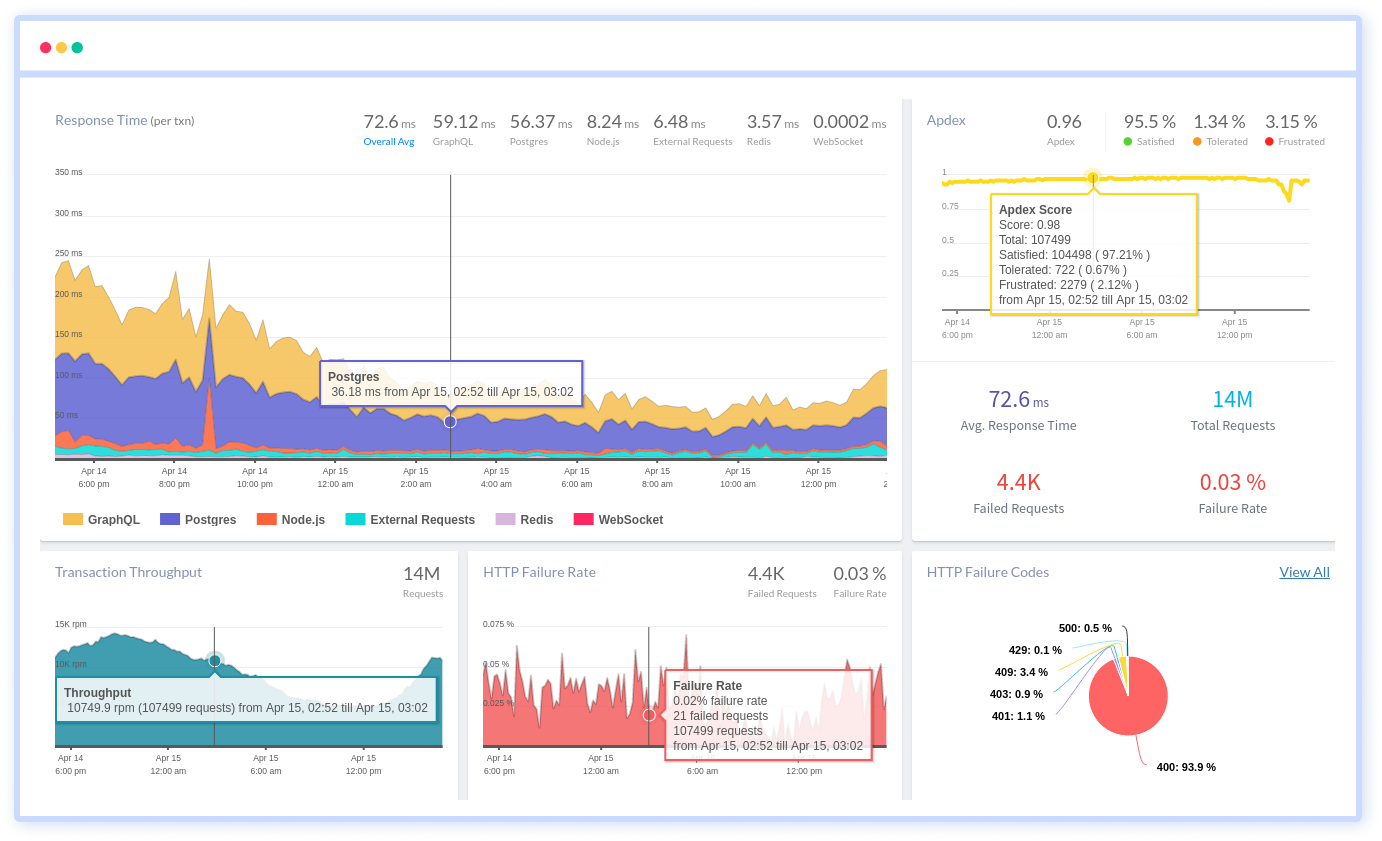
Atatus's user-centric API observability tracks how your actual customers experience your APIs and applications. Customers may easily get metrics on their quota usage, SLAs, and more.
It monitors the functionality, availability, and performance data of your internal, external, and third-party APIs to see how your actual users interact with the API in your application. It also validates rest APIs and keeps track of metrics like latency, response time, and other performance indicators to ensure your application runs smoothly.
#1 Solution for Logs, Traces & Metrics
![]() APM
APM
![]() Kubernetes
Kubernetes
![]() Logs
Logs
![]() Synthetics
Synthetics
![]() RUM
RUM
![]() Serverless
Serverless
![]() Security
Security
![]() More
More