Diving into React Select: A Beginner's Guide

With the evolution of technology, the way users interact with websites has drastically evolved. Functionalities such as filling out a form and login now take just a few clicks instead of manual efforts from the user’s end making interaction with websites and web applications more rapid, reliable, and interactive.
However, if you’re using modern frontend technologies such as React or Angular chances are you must have prayed for tools and libraries that make implementing select functionalities in the backend faster and easier.
For this, one of the widely used libraries among experts is React-Select. With this blog, we will take an in-depth look into how you can use React Select library in your React-Based projects efficiently with practical implementation.
- Introduction to React-Select
- Getting started with React-Select
- Creating a basic dropdown with React-Select
- Integrating bootStrap with React-Select
- Integrating custom styles in React-Select component
- OnChange and Autofocus functionality
- Working with APIs in React-Select
Introduction to React-Select
React select is an easy-to-integrate drop-down library built exclusively for React developers to enable them to create interactive dropdowns within minutes. It is an open-source library created by Jed Watson and has thousands of experts within its developer community.
With React-Select you can include functionalities such as auto-complete, multi-select, and AJAX support effortlessly and save up on development time. By adapting to React-Select you can have unique benefits such as:
- React-Select allows you to have select functionality for large data sets efficiently.
- The library provides developers CSS styling with emotion support as well to enable developers in making their designs more human.
- Customizing React-Select elements are pretty simple as they provide API support to developers.
- React-Select further allows frontend developers to efficiently animate their CSS for interactive user experience.
- The library also allows you to manage React-Select components easily and hence enables easy scalability for long-term projects.
- Lastly, it enables developers to save time in customizing and implementing select components which in the long run saves development time and cost.
Getting started with React-Select
Now that we have discussed how React-Select can benefit your frontend projects in multiple ways it’s time to get into some real-time action. However, if you’re planning to use React Select here are some of the essential initial requirements you should adjust your projects with for easy implementation:
- You should have npm or Yarn installed in your environment beforehand, if you don’t have them already you can install them before giving the examples below a try.
- You also need the “Create React App” CLI tool in your development environment.
- You should also have a basic understanding of foundational frontend technologies such as Bootstrap, Javascript, CSS, and HTMl for efficiently using and implementing React Select functionalities.
- Also, you should have a good grip on foundational concepts in React Library along with a preliminary understanding of Command Line Terminal.
If you are facing issues in any of the above-mentioned prerequisites you can always spend a few minutes brushing up your basics through various open-source resources. Once you are ready with these you can follow the steps below to install React Select library in your development environment:
Step 1: Use the command below to install a React Project with the use of the React-Select library enabled in it:
npx create-react-app react-select-tutorialStep 2: Now go to the project folder in your app and use the command mentioned below:
cd react-select-tutorialStep 3: Run your React project with the npm start command in it.
Step 4: Now you’re ready to install the React-Select library for using it. Use the command below to install the React-Select library in your development environment:
npm install react-selectOnce the React-Select library is installed without any hiccups you’re ready to implement the functionalities offered by it. Moving further we will take a look into how you can use some of its major features in detail.
Creating a basic dropdown with React-Select
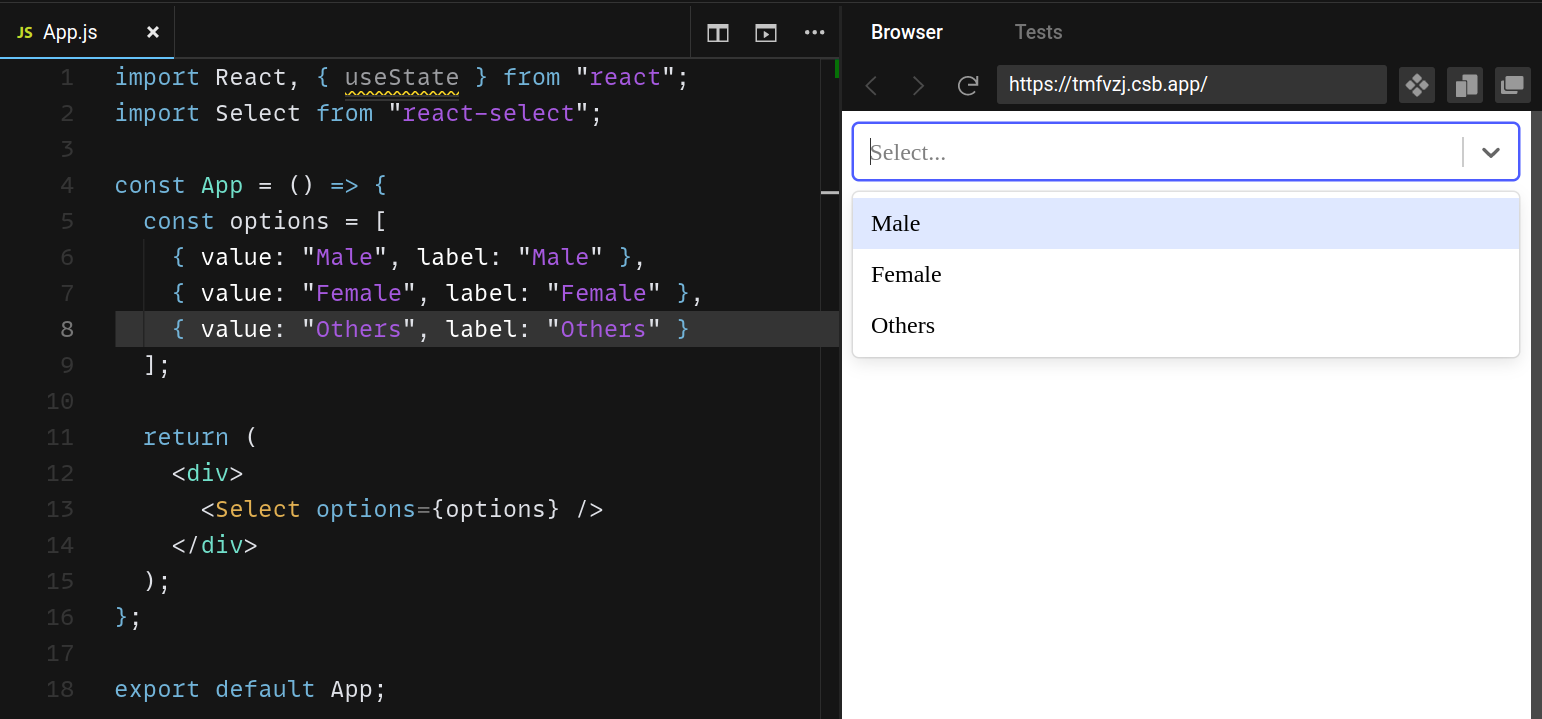
One of the most preliminary ways you can use React Select is to create a basic drown, With React-Select you can create a dropdown component with just a few lines of code easily.
Here’s an example of a basic dropdown created with the React-Select component.
import React, { useState } from "react";
import Select from "react-select";

const App = () => {
  const options = [
    { value: "Male", label: "Male" },
    { value: "Female", label: "Female" },
    { value: "Others", label: "Others" },
  ];

  return (
    <div>
      <Select options={options} />
    </div>
  );
};

export default App;
Integrating bootStrap with React-Select
To ensure consistent design implementation across your whole web application you can further add Bootstrap elements in your React-Select library. This will allow you to easily create dropdown UI components that seamlessly blend into your web application.
Below we will try to add bootstrap components into the above Dropdown menu we created:
import React, { useState } from "react";
import Select from "react-select";

const App = () => {
  const options = [
    { value: "Male", label: "Male" },
    { value: "Female", label: "Female" },
    { value: "Non-binary", label: "Non-Binary" }
  ];

  return (
    <div className="container">
      <div className="mt-5 m-auto w-50">
        <Select options={options} />
      </div>
    </div>
  );
};

export default App;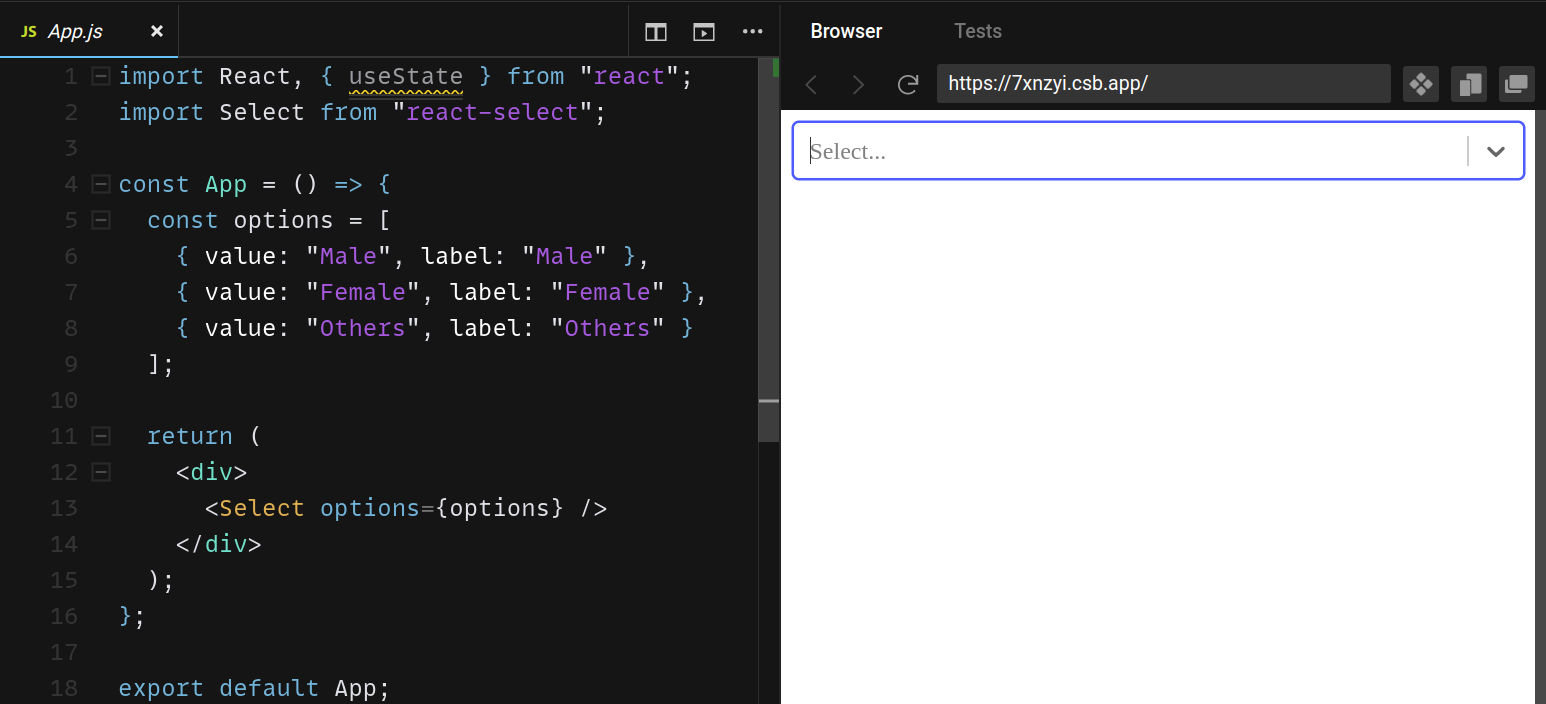
Adding a Bootstrap element within your Select option would help you to style your dropdown menu with ease.
Integrating custom styles in React-Select component
Although integrating bootstrap as mentioned above can help you add a bit of styling to your dropdowns with ease.
However, if you need your dropdown to be completely personalized according to your project’s design needs you can add custom elements to it as well without any hassles as shown below:
import React, { useState } from "react";
import Select from "react-select";
import "bootstrap/dist/css/bootstrap.css";

const App = () => {
  const options = [
    { value: "Male", label: "Male" },
    { value: "Female", label: "Female" },
    { value: "Non-binary", label: "Non Binary" }
  ];
  const customStyles = {
    option: (defaultStyles, state) => ({
      ...defaultStyles,
      color: state.isSelected ? "#212529" : "#fff",
      backgroundColor: state.isSelected ? "#a0a0a0" : "#008080",
    }),

    control: (defaultStyles) => ({
      ...defaultStyles,
      backgroundColor: "#008080",
      padding: "8px",
      border: "none",
      boxShadow: "none",
    }),
    singleValue: (defaultStyles) => ({ ...defaultStyles, color: "#fff" }),
  };

  return (
    <div className="container">
      <div className="mt-5 m-auto w-50 text-light">
        <Select options={options} styles={customStyles} />
      </div>
    </div>
  );
};


export default App;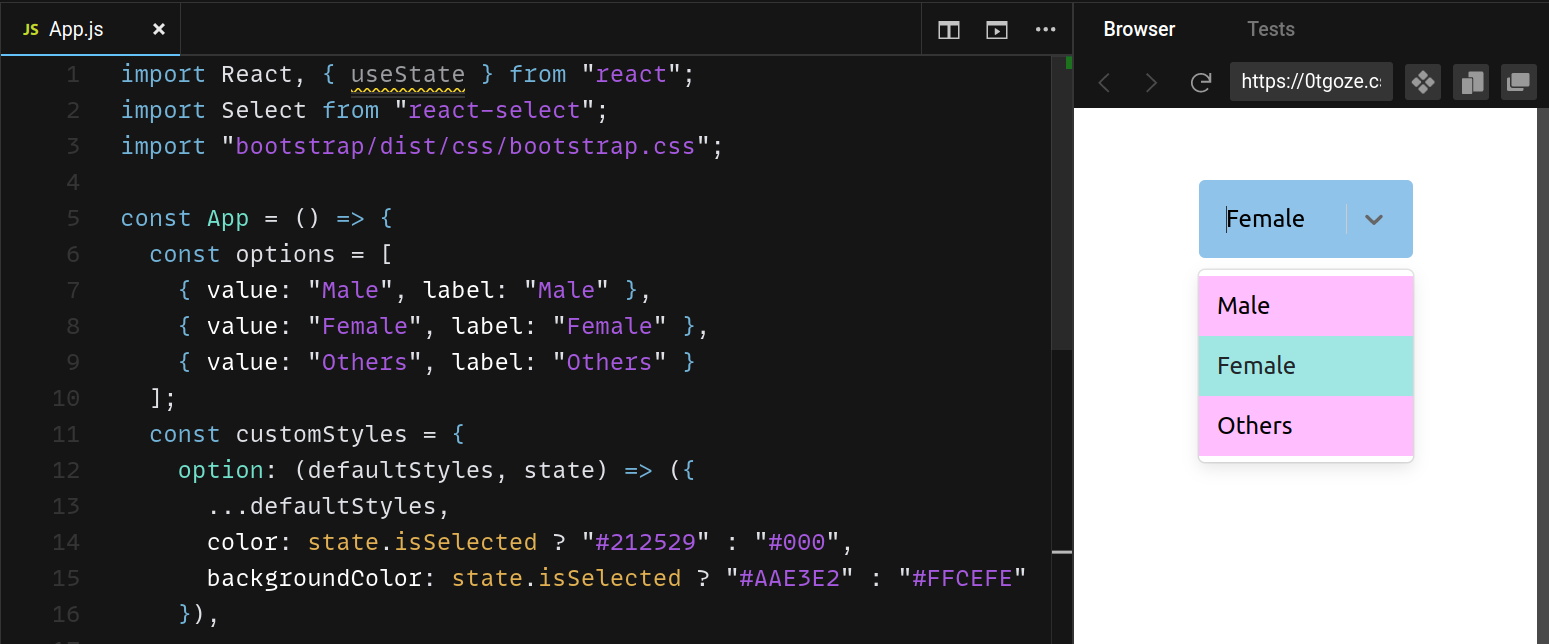
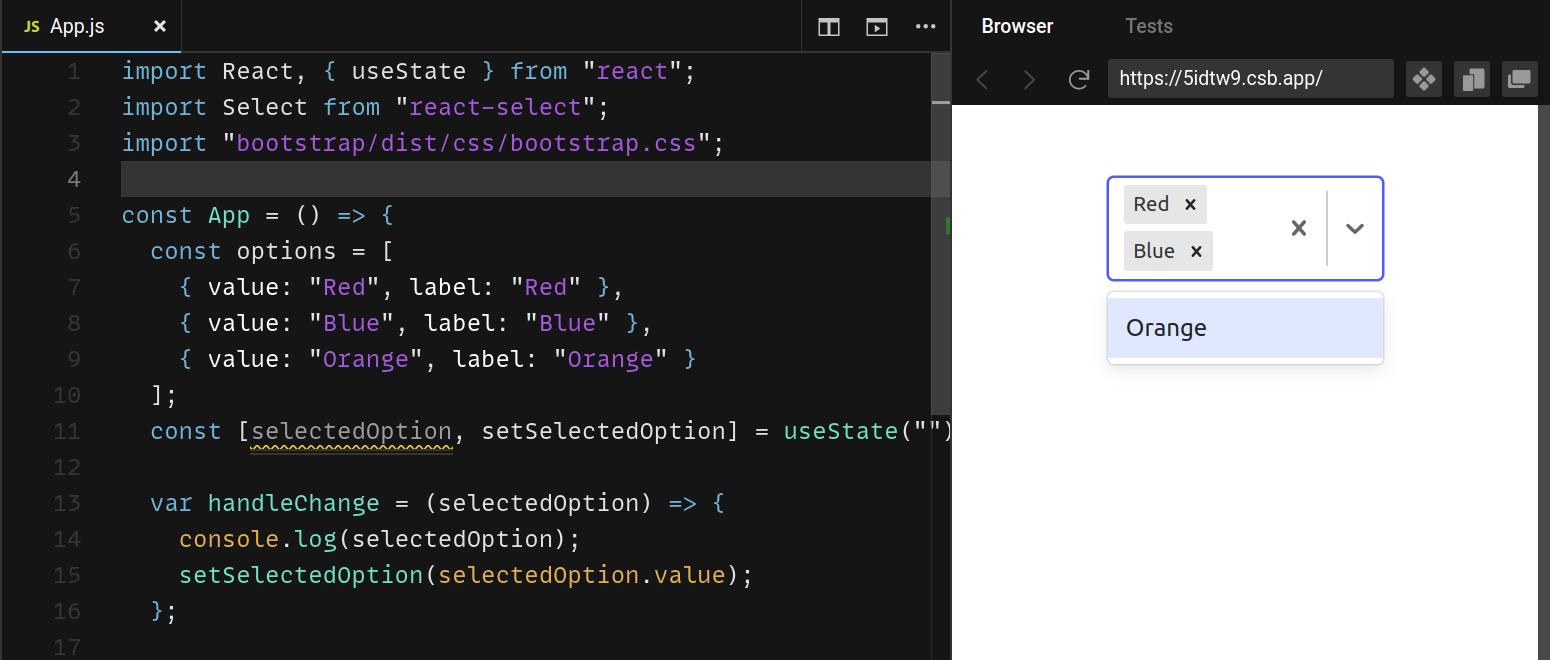
Integrating MultiSelect in React-Select
While creating forms or login flows you might further need React-Select to provide users with the capability of selecting multiple options in the dropdown menu. For this, React-Select library offers isMulti property in the select component.
This enables users to select multiple options with ease as mentioned below:
import React, { useState } from "react";
import Select from "react-select";
import "bootstrap/dist/css/bootstrap.css";

const App = () => {
  const options = [
    { value: "Male", label: "Male" },
    { value: "Female", label: "Female" },
    { value: "Non-binary", label: "Non Binary" }
  ];
  const [selectedOption, setSelectedOption] = useState("");

  var handleChange = (selectedOption) => {
    console.log(selectedOption);
    setSelectedOption(selectedOption.value);
  };

  return (
    <div className="container">
      <div className="mt-5 m-auto w-50">
        <Select isMulti onChange={handleChange} options={options} />
      </div>
    </div>
  );
}
export default App;
OnChange and Autofocus functionality
Just like traditional HTML codes you can use onChange and Autofocus option to enhance the way your Dropdown interacts with the users.
Here’s an example of how you can use both of the features by using OnChange and Autofocus event of React select:
import React, { useState } from "react";
import Select from "react-select";
import "bootstrap/dist/css/bootstrap.css";

const App = () => {
  const options = [
    { value: "Male", label: "Male" },
    { value: "Female", label: "Female" },
    { value: "Non-binary", label: "Non Binary" }
  ];
  const [selected, setSelected] = useState(null);

  const handleChange = (selectedOption) => {
    setSelected(selectedOption);
    console.log(`Option selected:`, selectedOption);
  };

  return (
    <div className="container">
      <div className="mt-5 m-auto w-50">
        <Select options={options} onChange={handleChange} autoFocus={true} />

        <div className="mt-4">
          {selected && <>You've selected {selected.value}</>}
        </div>
      </div>
    </div>
  );
};

export default App;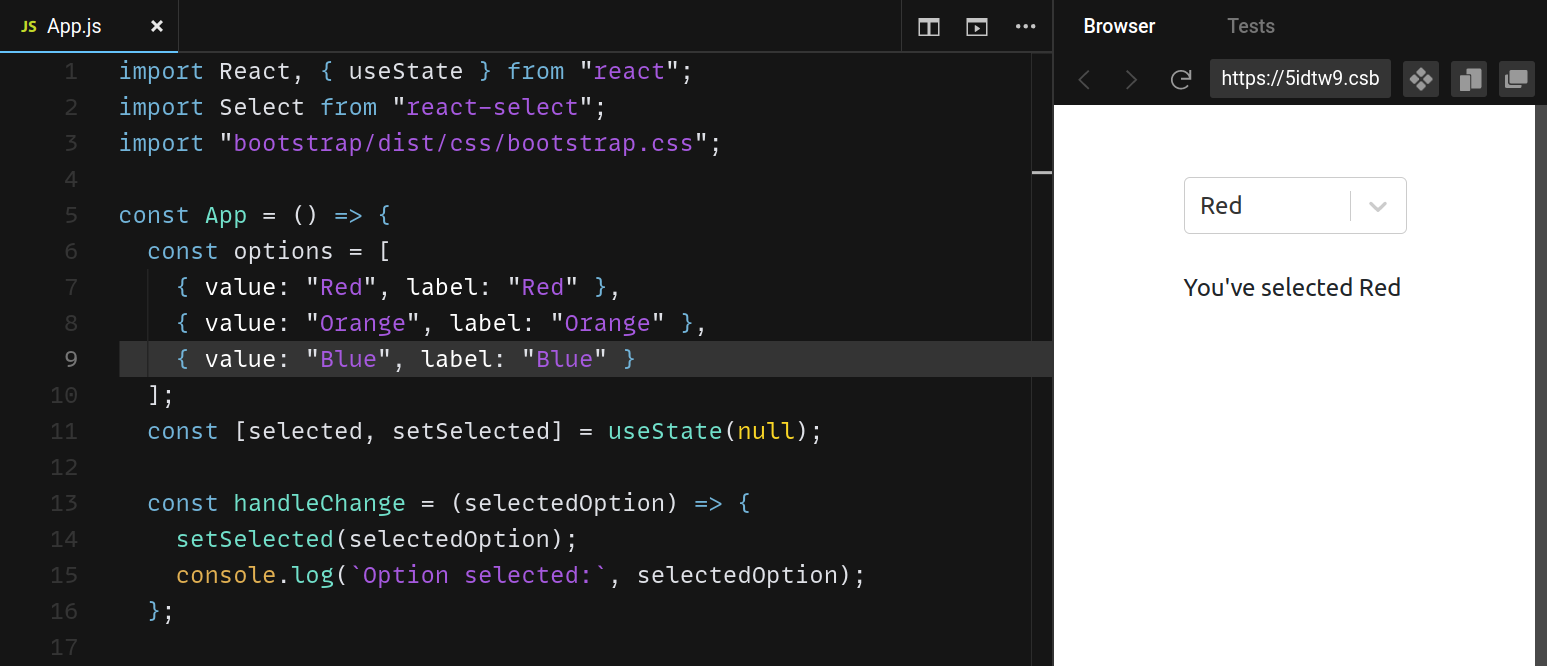
Working with APIs in React-Select
Although creating a dropdown for options fetched via API can be a complicated feat to achieve in general, with React-Select you can achieve this in seconds!
For this, React Select provides Async Components which helps in fetching data into the dropdown by using props such as cacheOptions and defaultOptions.
The cacheOptions assist developers in integrating the options fetched from API in the dropdown component whereas the defaultOptions can help set default values for the dropdown menu.
Final Words On React-Select
If you’re working on a long-term project with complicated functionalities React-Select can be your lifesaver. With its widespread functionality and effortless implementation with any React-based project as discussed above, it can provide a number of frontend features.
You can easily say goodbye to hours of implementing functionalities such as autocomplete and save yourself from the hassle of ever-expanding the frontend codebase with React Select.
So get started with the React-Select library today by using the examples mentioned above and reduce your workload significantly.
Further, the library is ever expanding and in the long run, can help you integrate a wider set of features within your frontend projects to help you meet those hefty deadlines and keep your clients amazed.
React Performance Monitoring with Atatus RUM
Visualize React errors and performance issues influencing your end-user experience. With React performance monitoring of Atatus you can identify and resolve problems faster with in-depth data points that assist you in analyzing and resolving them.
Using Atatus, you can get an overview of how your customers experience your React app. Learn how to identify the root cause of a slow load time, route change, and more on the front end by identifying performance bottlenecks in the front end.
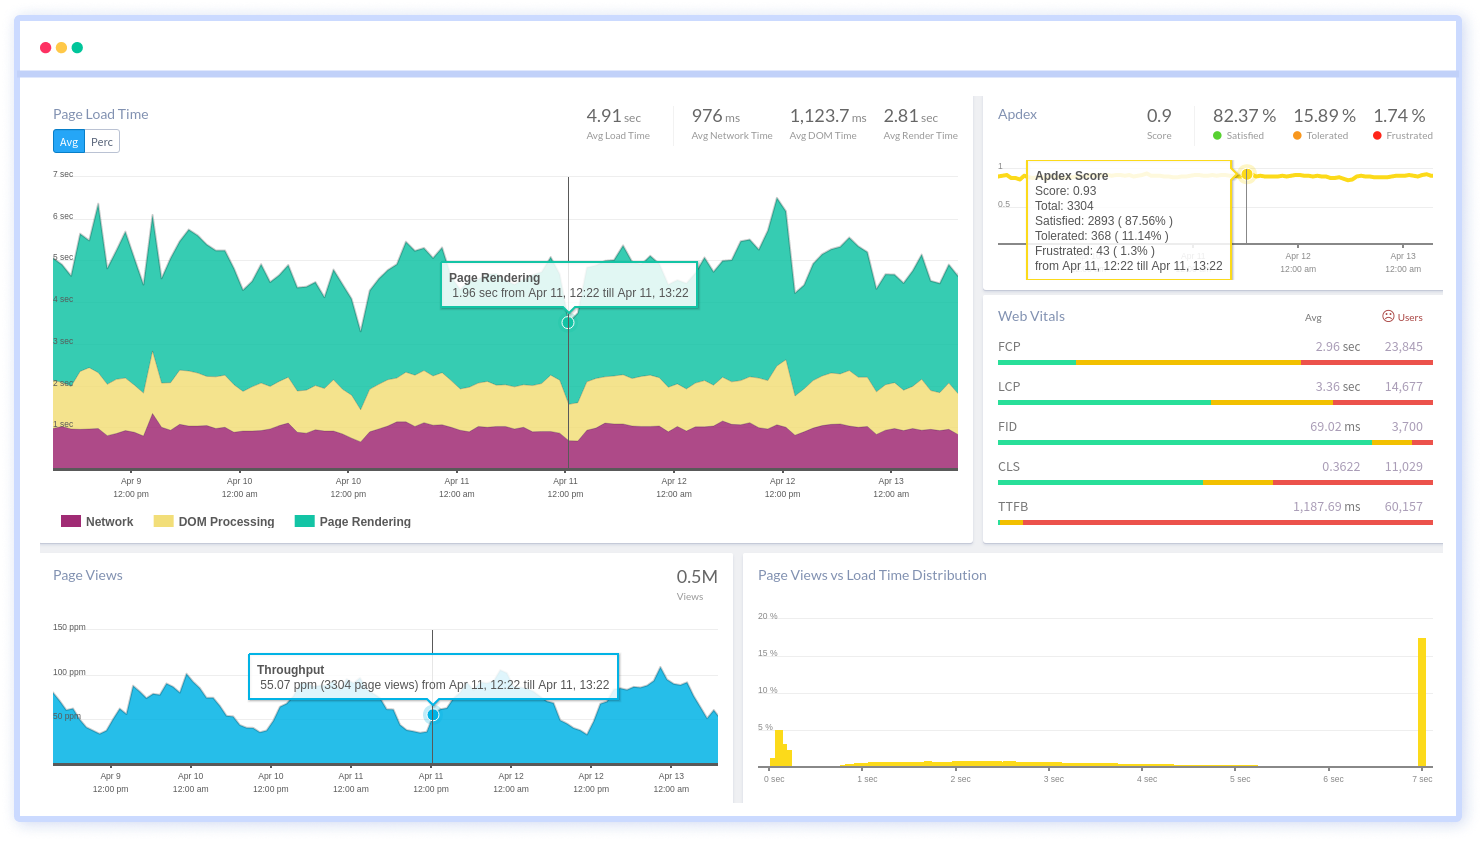
Ensure that your React app sends all XHR requests. Monitoring and measuring the response times and failure rates of XHR calls. Optimize AJAX request performance by identifying slow and failed calls. Analyze AJAX calls in real time based on the browser, the user, the version, the tag, and other attributes.
Identify the reasons behind bad front-end performance and slow page loading that are impacting your customers. Inspect individual users who are experiencing poor performance because of slow pages, React exceptions or a failing AJAX method.
Identify how your end users' experience is impacted by the network or geography. In addition to identifying slow React assets, long load times, and errors in sessions, session traces provide a waterfall view of the session.
Take a closer look at your React app performance with Atatus. To get started activate Atatus free-trial for 14 days!
#1 Solution for Logs, Traces & Metrics
![]() APM
APM
![]() Kubernetes
Kubernetes
![]() Logs
Logs
![]() Synthetics
Synthetics
![]() RUM
RUM
![]() Serverless
Serverless
![]() Security
Security
![]() More
More