Best Practices for Organizing and Maintaining Elasticsearch Indices

In Elasticsearch, an index is a logical container or namespace that holds a collection of documents that are related in some way. It is the primary unit for organizing and storing data.
Indices in Elasticsearch serve as containers for organizing and managing data, enabling efficient search and retrieval operations. Understanding the concept of indices is crucial for effective data organization and utilization in Elasticsearch-based applications.
You can think of an index as similar to a database table in a traditional relational database management system (RDBMS).
In this blog, we will look at some of the ways that will help us manage indices in Elasticsearch more efficiently.
Table of Contents:-
- Understanding Elasticsearch Indices
- Efficient Data Ingestion and Indexing
- Index Lifecysle Management(ILM)
- Best Practices for Managing Elasticsearch Indices
Understanding Elasticsearch indices
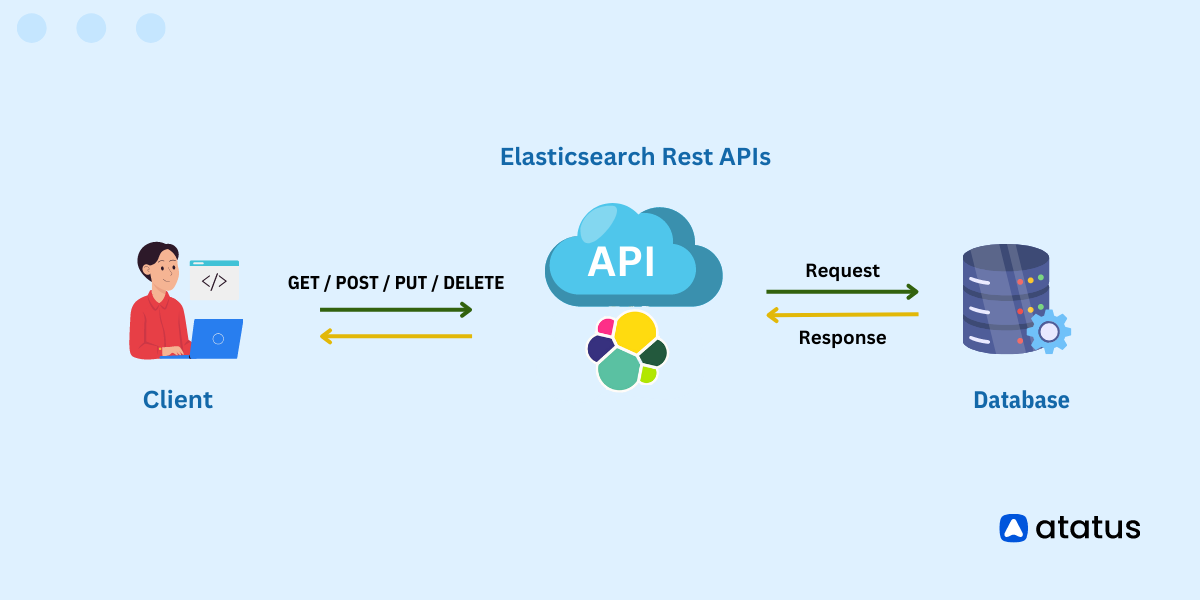
Indices provides the foundation for search and querying operations in Elasticsearch. You can perform various types of searches, including term searches, range searches, full-text searches, aggregations, and more, on the documents within an index.
Each document is stored in JSON format within an index. A document represents a single data entity, such as a customer, product, or log entry. Documents within an index do not require a predefined schema, as Elasticsearch is schema-less. However, a mapping can be defined to specify how fields are indexed and stored.
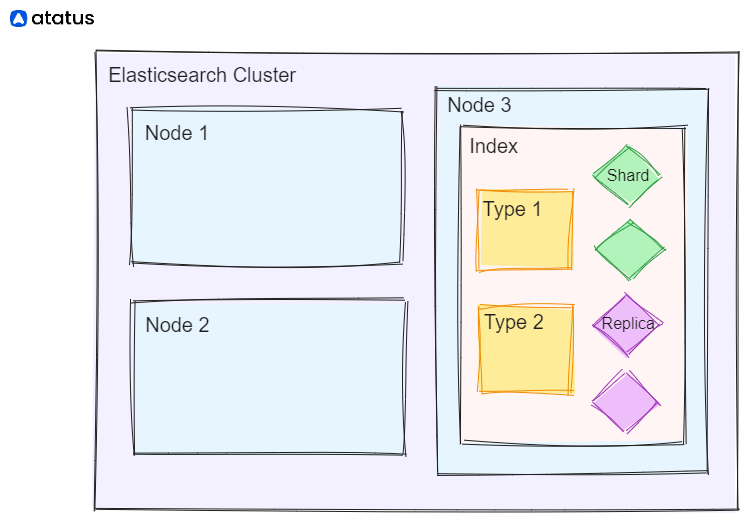
Elasticsearch indices organize data into smaller, manageable parts called shards. Sharding allows distributing data across multiple nodes in a cluster, enabling parallel processing and efficient scalability.
Each index can have its own settings and configurations. These settings include the number of shards, replication factors, analysis settings for text processing, and more. It's important to configure these settings based on your specific use case and requirements to achieve optimal performance and resource utilization.
Elasticsearch provides Index Lifecycle Management (ILM), which allows you to define policies for managing the lifecycle of an index. This includes actions like rollover, retention, and deletion based on predefined criteria or time-based intervals.
Also, Elasticsearch uses inverted indexes to enable efficient full-text search. The inverted index structure allows for fast retrieval of documents based on the indexed terms.
Elasticsearch supports index aliases, which provide a way to associate one or more indices with a single, logical name. Aliases are useful for scenarios where you need to switch between different versions of an index or perform operations on a group of related indices without explicitly specifying their names.
Efficient data ingestion and indexing
Efficient data ingestion and indexing are crucial for optimal search and retrieval performance in systems like Elasticsearch. To increase efficacy in data indexing, follow the points mentioned below:
- Start by defining the mapping for your data. Mapping determines how fields are indexed and stored, and it helps Elasticsearch understand the data's structure. Carefully design your mapping based on the nature of your data to ensure efficient indexing. Define a new mapping this way -
% curl -XPUT 'localhost:9200/get-together/_mapping/new-events' -d '{
  "new-events" : {
    "properties" : {
      "host": {
        "type" : "string"
      }
    }
  }
}'- If you have a large volume of data to ingest, it's recommended to use batch processing techniques. Instead of indexing one document at a time, batch multiple documents together and send them as a bulk request to Elasticsearch. This reduces the overhead of network communication and improves indexing performance.
- When performing batch processing, utilize Elasticsearch's Bulk API. The Bulk API allows you to send multiple indexing, update, or delete requests in a single API call. This significantly reduces the number of network round-trips required for ingestion, improving efficiency.
- Optimize your bulk requests for better performance. Consider the size of each bulk request—too small requests can introduce overhead, while too large requests can cause memory issues. Experiment with different batch sizes and monitor the indexing throughput to find the optimal value for your use case.
- By default, Elasticsearch refreshes the index after each individual document is indexed, making it immediately searchable. However, this incurs additional overhead. If real-time search is not critical during ingestion, you can disable the automatic refresh during bulk indexing, which improves indexing speed. Once ingestion is complete, you can manually refresh the index.
- Utilize index aliases to decouple your application from specific index names. Aliases allow you to perform operations, such as indexing or searching, on a logical group of indexes without directly referencing the index names. This enables you to smoothly switch between different versions or indexes without impacting your application, providing flexibility and efficiency during data ingestion and indexing.
- Continuously monitor the indexing performance and resource utilization of your Elasticsearch cluster. Use monitoring tools to identify any bottlenecks or performance issues. Adjust hardware resources, cluster settings, or indexing strategies as needed to optimize the performance and efficiency of data ingestion and indexing.
By following these steps, you can ensure efficient data ingestion and indexing, leading to faster search responses and improved overall performance in your Elasticsearch or similar search systems.
Index lifecycle management (ILM)
Index Lifecycle Management (ILM) is a feature commonly found in modern search engines and distributed data storage systems, like our Elasticsearch. It enables automated management of indexes.
ILM allows you to define policies that specify the lifecycle of an index, including its creation, rollover, retention, and deletion. This helps in managing the size, performance, and storage requirements of indexes, particularly in scenarios where data grows rapidly or needs to be retained for a certain period.
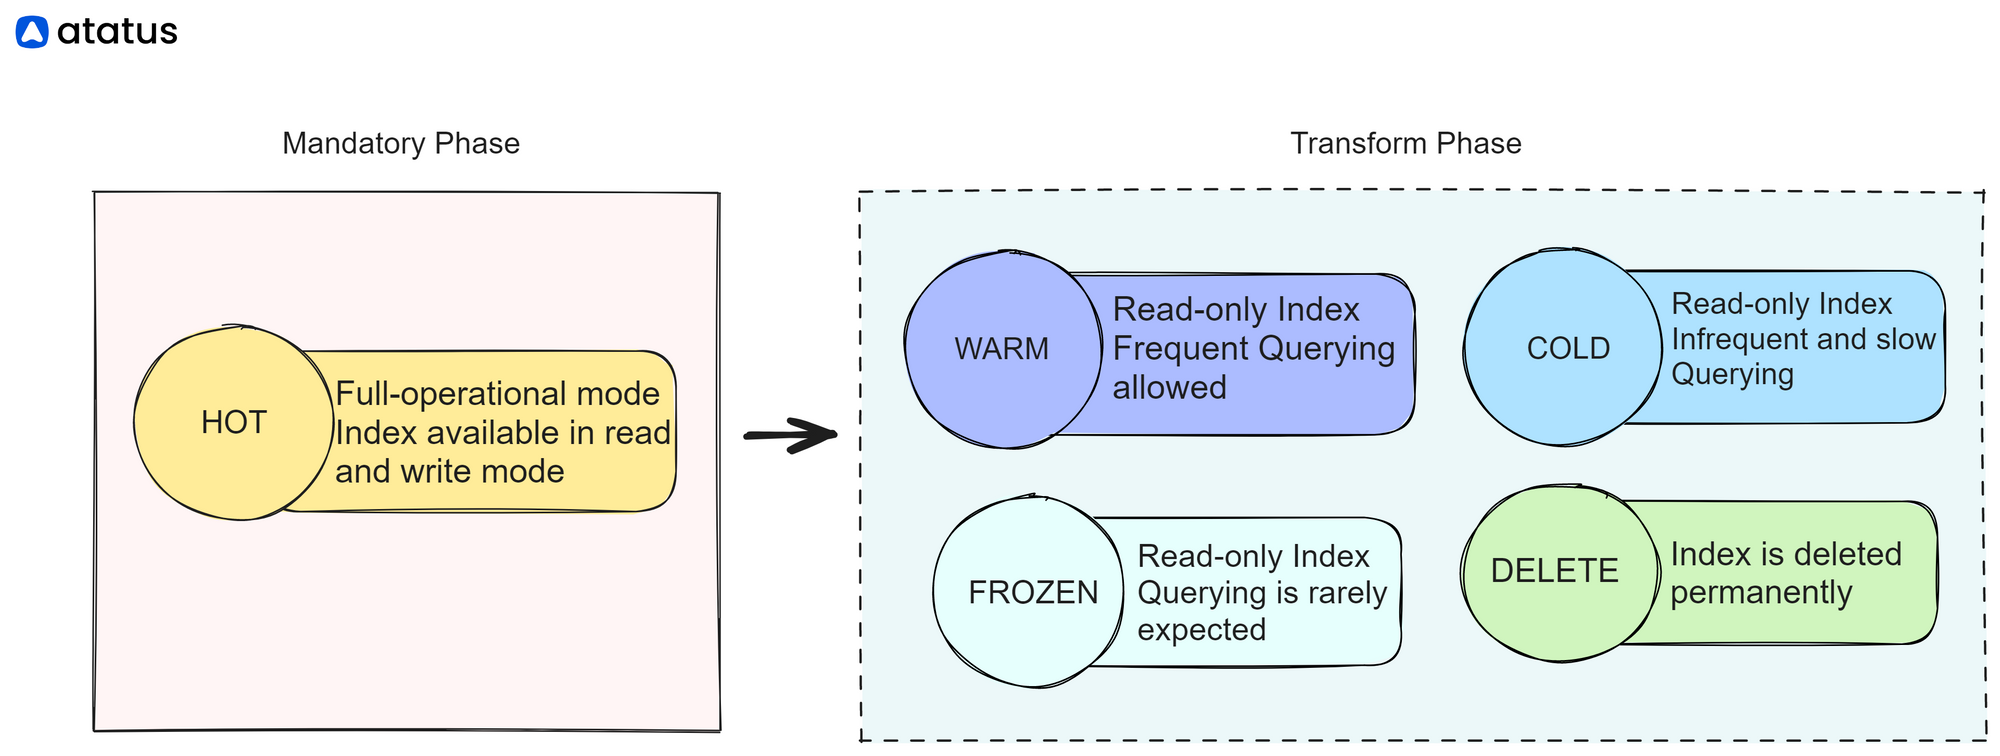
HOT is the only permanent Phase. Index can remain in HOT Phase forever or move to Transform Phases as and when needed.
The typical stages of an index's lifecycle are:
- Creation: When a new index is created, it starts with an initial set of configuration settings, such as the number of shards, replica settings, and mappings.
- Rollover: As data is added to an index, it grows in size. When the size or other conditions specified in the policy are met, ILM triggers a rollover process. Rollover creates a new index, based on a predefined template, and starts indexing new data into it.
- Retention: ILM enables you to define a retention period for an index. Once the retention period is reached, the index can be marked for deletion or moved to a lower-cost storage tier.
- Deletion: ILM allows you to automatically delete indexes that have reached their defined retention period or other criteria. Deletion helps in managing storage resources and ensures that data is not retained longer than necessary.
- Other Actions: In addition to rollover and deletion, ILM can perform other actions on indexes based on policies. For example, you can define a policy to optimize the index by merging smaller segments into larger ones for better search performance.
Best Practices for Managing Elasticsearch Indices
The purpose of this article was to give you the right direction while creating an index in Elasticsearch and managing them correctly. We have listed out some steps which you can keep in mind the next time you create an indices chart.
#1 Defining the Right Index Structure
Understand the structure and relationships within your data. Identify the entities, attributes, and relationships that need to be represented in the index. Determine the cardinality of relationships (one-to-one, one-to-many, or many-to-many) to inform your index design decisions.
Consider whether to normalize or denormalize your data. Normalization involves splitting data into separate entities and using relationships to connect them. Denormalization involves duplicating data to reduce the need for joins and improve query performance.
Identify the fields that need to be indexed and searchable. Consider the type of data (text, numeric, date, geospatial), the expected search queries, and the importance of each field in your data model. Prioritize fields that require full-text search, filtering, sorting, or aggregations.
Configure analyzers and tokenizers for text fields to handle language-specific stemming, stop words, lowercasing, and tokenization. Fine-tune mapping settings to optimize indexing and search performance.
Estimate the size of your index based on the expected data volume and retention period. Consider factors like daily data ingestion rate, storage capacity, and hardware limitations. Plan for data rotation, deletion, or archiving strategies to manage index size and optimize resource utilization.
#2 Setting Up Index Sharding and Replication
Sharding distributes data across multiple nodes in a cluster for parallel processing, while replication provides redundancy and high availability. Setting up index sharding and replication in Elasticsearch involves configuring the number of shards and replicas for your indices.
Sharding
- Decide the number of shards for your index. The number of shards should be determined based on factors such as the size of your data, expected indexing and search throughput, and the capacity of your hardware cluster.
- Create a new index or modify the settings of an existing index by specifying the number of shards using the "number_of_shards" parameter. For example
PUT /my_index
{
	"settings": {
		"number_of_shards": 5
	}
}- Elasticsearch will distribute the data across the specified number of shards. Each shard will be hosted on a different node in the cluster.
Replication
- Decide the number of replicas you want for your index. Replicas are copies of shards that provide redundancy and fault tolerance.
Specify the number of replicas using the "number_of_replicas" parameter. For example, to set the number of replicas to 1:
PUT /my_index/_settings
{
	"index": {
		"number_of_replicas": 1
	}
}- Elasticsearch will automatically create the specified number of replicas for each shard in the index. Replicas are distributed across different nodes to ensure high availability and load balancing.
Note: It's important to note that shards and replica configurations cannot be modified once an index is created. You may need to reindex data into a new index with the desired settings if you wish to change the number of shards or replicas for an existing index.
#3 Choosing Appropriate Mapping and Analysis
Choosing the appropriate mapping for Elasticsearch involves defining how your data will be indexed and stored. The mapping determines how Elasticsearch interprets and analyzes the fields in your documents.
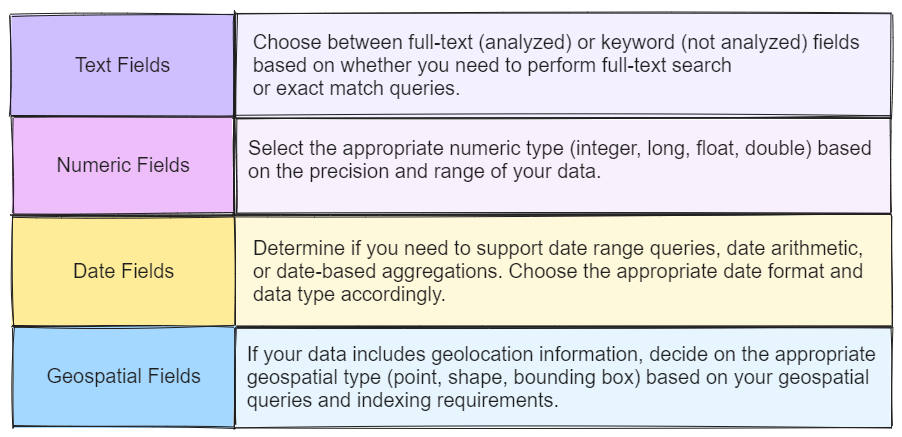
Start by understanding the nature of your data. Identify the types of fields you have, such as text, numeric, date, Boolean, or geospatial fields. Consider the data formats, character encodings, and any specific analysis or search requirements for each field.
Then, define Field Types. Elasticsearch provides a range of field types that define how data is indexed and stored. Choose the appropriate field types based on the semantics and characteristics of your data. For example:
Elasticsearch uses analyzers and tokenizers to preprocess text fields during indexing and searching. Choose the appropriate analyzers and tokenizers based on your language, text analysis requirements, and search use cases. Consider factors like stemming, stop words, lowercase/uppercase normalization, n-grams, or custom tokenization rules.
Elasticsearch offers dynamic mapping, which automatically infers field types based on the data it receives. While dynamic mapping can be convenient, it's essential to be cautious and understand the implications. Monitor and review dynamic mappings to ensure they align with your intended mapping structure.
Elasticsearch also allows defining multiple sub-fields for a single field. This enables indexing and searching the same field differently for various use cases. For example, you can have a "name" field with both a full-text analyzed sub-field and a keyword not-analyzed sub-field.
Elasticsearch provides various mapping parameters to fine-tune how fields are indexed and stored. These parameters include options for storing fields, enabling doc values for sorting and aggregations, configuring term vectors for highlighting, and more. Adjust these parameters based on your specific use case and performance requirements.
Test your mapping by indexing sample data and performing various search operations. Validate that the indexed data matches your expectations and that the search results meet your requirements. Iterate and refine the mapping as needed based on your findings.
#4 Optimizing Index Settings
Optimizing index settings in Elasticsearch can significantly improve performance and resource utilization.
i.) Shards and Replicas:
- Determine the optimal number of shards for your index based on data size, indexing and search throughput, and hardware capabilities. Avoid creating too many small shards, as it can lead to increased overhead. Strike a balance based on your specific use case.
- Configure the appropriate number of replicas for fault tolerance and high availability. Consider the number of nodes in your cluster and ensure sufficient resources are available to handle the desired replication factor.
ii.) Indexing and Refresh Settings:
- Adjust the refresh interval, which controls how often Elasticsearch updates the index to make new data searchable. By default, Elasticsearch refreshes every second. However, you can increase the refresh interval during high-volume indexing to reduce the frequency of refresh operations, improving indexing throughput.
- Consider disabling refresh altogether during bulk indexing and enable it manually once the bulk operation is complete. This can significantly boost indexing performance but note that the indexed data won't be immediately searchable until a manual refresh is triggered.
iii.) Merge Settings
Monitor the merge process in Elasticsearch, which combines smaller segments into larger ones to improve search performance. Adjust the merge settings based on your indexing patterns and available system resources to optimize merge performance. Parameters to consider include the number of segments and the merge policy.
iv.) Translog Settings
Elasticsearch uses a transaction log (translog) to recover data in case of node failures. Configure the translog settings based on your durability requirements and disk I/O capabilities. For example, you can adjust the translog flush frequency to balance between durability and write performance.
v.) Memory Configuration
Elasticsearch relies on the Java Virtual Machine (JVM) for memory management. Configure the JVM heap size appropriately to ensure sufficient memory for indexing, search operations, caching, and other Elasticsearch processes. Monitor the heap usage and adjust the memory settings accordingly.
vi.) Field Data and Caching
Evaluate and optimize the field data and caching settings for your indices. Field data caching can improve query performance, especially for aggregations and sorting. Determine which fields benefit from caching and adjust the field data settings accordingly.
vii.) Compression and Storage
Consider using compression for reducing the storage space occupied by your indices. Elasticsearch supports different compression algorithms for various data types. Evaluate the compression options and configure them based on the performance and storage trade-offs suitable for your use case.
#5 Monitoring and Maintenance Strategies
Monitor the cluster and index health using Elasticsearch monitoring tools or third-party monitoring solutions. Keep an eye on shard distribution, disk space usage, and overall cluster performance.
Adjust the number of shards and replicas based on changing requirements. Increasing the number of shards can improve parallelism but may increase overhead, while increasing the number of replicas provides better fault tolerance but consumes more disk space and resources.

By appropriately configuring sharding and replication, you can optimize performance, distribute data efficiently, and ensure data availability in your Elasticsearch cluster.
Remember to review and test the impact of each setting change on your specific workload and use case. Different settings may have varying effects depending on the data, hardware, and query patterns. Fine-tuning and optimizing index settings is an iterative process, and it's recommended to monitor and measure the impact of each adjustment to achieve the desired performance improvements.
Conclusion
The stability and performance of your Elasticsearch cluster directly depend on how well you set up index sharding and replication. Setting up proper indices is not an easy task. It requires a good understanding of both Elasticsearch’s data model as well as the data set being indexed.
So by carefully considering your data, field types, analyzers, and mapping parameters, you can define an appropriate mapping that optimizes search performance and fulfills your data querying requirements in Elasticsearch.
Also by utilizing ILM, you can automate the management of indexes, reducing the manual effort required to handle index maintenance tasks. This helps in maintaining optimal performance, efficient resource utilization, and adherence to data retention policies.
Atatus API Monitoring and Observability
Atatus provides Powerful API Observability to help you debug and prevent API issues. It monitors the consumer experience and is notified when abnormalities or issues arise. You can deeply understand who is using your APIs, how they are used, and the payloads they are sending.
Atatus's user-centric API observability tracks how your actual customers experience your APIs and applications. Customers may easily get metrics on their quota usage, SLAs, and more.
It monitors the functionality, availability, and performance data of your internal, external, and third-party APIs to see how your actual users interact with the API in your application. It also validates rest APIs and keeps track of metrics like latency, response time, and other performance indicators to ensure your application runs smoothly.
#1 Solution for Logs, Traces & Metrics
![]() APM
APM
![]() Kubernetes
Kubernetes
![]() Logs
Logs
![]() Synthetics
Synthetics
![]() RUM
RUM
![]() Serverless
Serverless
![]() Security
Security
![]() More
More