Top 7 Go Logging Libraries

Are you still relying on basic stdout and stderr for logging in your Go applications? It's time to level up your logging game!
Logging with stdout and stderr can be complex and limiting. Messages lack structure, context, and extensibility, making monitoring and analyzing errors hard. Manual inspection of log file is time-consuming and error-prone, especially as your application grows.
But There's a better way. Join us as we explore logging libraries in Go. These libraries offer structured logging, context propagation, log levels, and consistent integrations with monitoring tools.
Say goodbye to the stdout and stderr logging. With these libraries, monitoring and debugging your applications becomes easy. So why wait? Let’s discover the top 7 libraries.
1. Logrus
This Golang structured logger allows you to log messages with different levels and attach additional structured data to your logs. A guide on how to use Logrus in your Go code:
1. Install Logrus:
If you haven't installed Logrus yet, you can do so using go get:
go get github.com/sirupsen/logrus2. Import Logrus:
Import Logrus in your Go file where you want to use it:
import (
	"github.com/sirupsen/logrus"
)
3. Initialize Logrus:
You need to initialize Logrus before using it. You can set up Logrus with default settings:
log := logrus.New()Or you can configure it with custom settings. For example:
log := logrus.New()
log.SetFormatter(&logrus.JSONFormatter{})
log.SetLevel(logrus.DebugLevel)
4. Logging Messages:
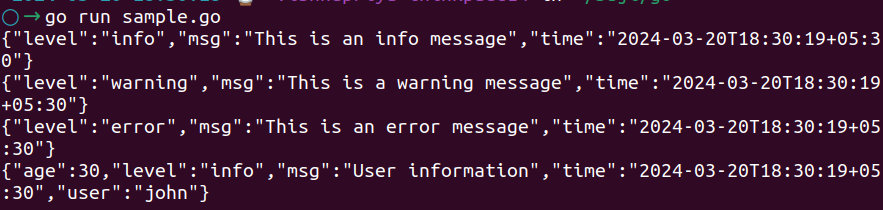
You can log messages with different severity levels using Logrus. There are six severity levels:
TraceDebugInfoWarnErrorFatal
To log messages, follow these steps:
log.Trace("This is a trace message")
log.Debug("This is a debug message")
log.Info("This is an info message")
log.Warn("This is a warning message")
log.Error("This is an error message")
log.Fatal("This is a fatal message")
You can also log messages with additional structured data:
log.WithFields(logrus.Fields{
	"key1": "value1",
	"key2": "value2",
}).Info("Additional structured data")
5. Output:
By default, Logrus logs to os.Stderr. However, you can configure Logrus to log to different outputs like files, syslog, etc., by setting the Out field of the logger.
log.Out = os.StdoutOr, you can add a hook to log to a file:
file, err := os.OpenFile("logfile.log", os.O_CREATE|os.O_WRONLY|os.O_APPEND, 0666)
if err == nil {
    log.Out = file
} else {
    log.Error("Failed to log to file: ", err)
}
2. Zap
Zap is a high-performance, structured logging library for Go (Golang). It's known for its speed and efficiency. Here's how you can use Zap in your Go code:
1. Install Zap:
You can install Zap using go get:
go get go.uber.org/zap2. Import Zap:
Import Zap in your Go file where you want to use it:
import "go.uber.org/zap"3. Initialize Zap:
You need to initialize Zap before using it. You can set up Zap with default settings:
logger, err := zap.NewProduction()
    if err != nil {
        panic("Failed: " + err.Error())
    }
4. Logging Messages:
You can log messages with different severity levels using Zap. There are four severity levels:
DebugInfoWarnError
You can log messages, like:
logger.Debug("This is a debug message")
logger.Info("This is an info message")
logger.Warn("This is a warning message")
logger.Error("This is an error message")
You can also log messages with additional structured data:
logger.Info("Additional structured data",
	zap.String("key1", "value1"),
	zap.Int("key2", 123),
)
5. Usage with Context:
You can use Zap with contexts to provide more context information:
logger.With(zap.String("request_id", requestID)).Info("Processing request")6. Output:
By default, Zap logs to os.Stderr. However, you can configure Zap to log to different outputs like files, syslog, etc. You can do this during initialization by specifying the output:
logger, err := zap.NewProduction(zap.Output(os.Stdout))Or, you can configure a custom output:
file, _ := os.Create("logfile.log")
logger, _ := zap.NewProduction(zap.Output(file))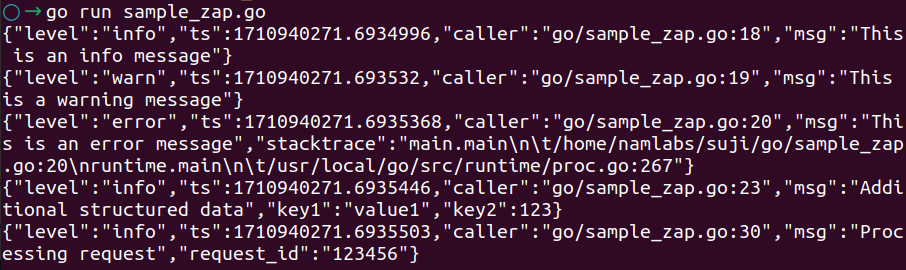
3. Zerolog
Zerolog is a fast and simple structured logger for Go. Let’s see how to use Zerolog in your Go code:
1. Install Zerolog:
You can install Zerolog using go get:
go get github.com/rs/zerolog2. Import Zerolog:
Import Zerolog in your Go file where you want to use it:
import "github.com/rs/zerolog/log"3. Initialize Zerolog:
Zerolog automatically initializes a global logger, so you don't need to initialize it explicitly. However, if you want to configure the logger, you can do it like this:
package main

import (
    "os"
    "github.com/rs/zerolog"
)

func main() {
    // Customize Zerolog's default logger
    zerolog.TimeFieldFormat = zerolog.TimeFormatUnix
    zerolog.SetGlobalLevel(zerolog.DebugLevel)

    // Optionally, output logs to a file
    f, _ := os.Create("logfile.log")
    log := zerolog.New(f).With().Timestamp().Logger()

    // Use the customized logger throughout your application
    log.Info().Msg("Logging initialized")
}
4. Logging Messages:
You can log messages with different severity levels using Zerolog. There are seven severity levels:
TraceDebugInfoWarnErrorFatalPanic
Here's how you can log messages:
log.Trace().Msg("This is a trace message")
log.Debug().Msg("This is a debug message")
log.Info().Msg("This is an info message")
log.Warn().Msg("This is a warning message")
log.Error().Msg("This is an error message")
log.Fatal().Msg("This is a fatal message")
log.Panic().Msg("This is a panic message")
You can also log messages with additional structured data:
log.Info().
Str("key1", "value1").
Int("key2", 123).
Msg("Additional structured data")
5. Output:
By default, Zerolog logs to os.Stderr. However, you can configure Zerolog to log to different outputs like files, syslog, etc., by setting the output writer:
log := zerolog.New(os.Stdout)Or, you can output logs to a file:
file, _ := os.Create("logfile.log")
log := zerolog.New(file)
You can also customize the output format by setting the Output field of the logger:
log := zerolog.New(os.Stdout).With().Caller().Logger()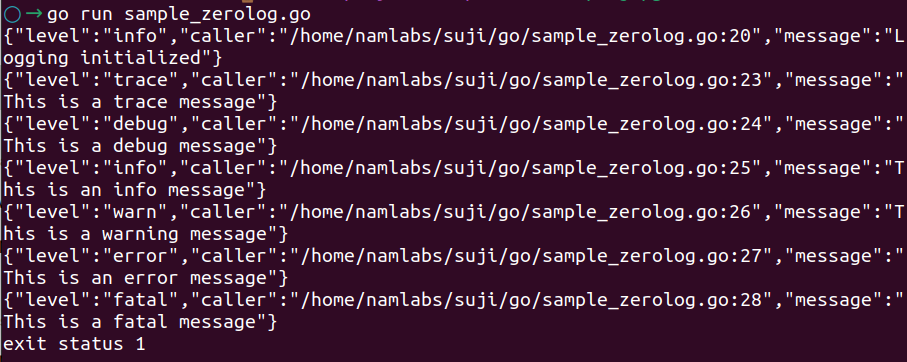
4. Seelog
Seelog is a logging framework for Go that is both flexible and powerful. It allows you to configure logging behavior through XML configuration files. A simple overview of Seelog in your Go code:
1. Install Seelog:
You can install Seelog using go get:
go get github.com/cihub/seelog2. Import Seelog:
Import Seelog in your Go file where you want to use it:
import "github.com/cihub/seelog"3. Configure Seelog:
Create a configuration file in XML format. Here's an example seelog.xml configuration:
<seelog minlevel="trace">
    <outputs formatid="main">
        <rollingfile type="size" filename="logs/app.log" maxsize="100000" maxrolls="5"/>
    </outputs>
    <formats>
        <format id="main" format="%Date %Time [%LEVEL] %Msg%n"/>
    </formats>
</seelog>
This configuration sets the log level to trace, logs to a rolling file named app.log, with a maximum size of 100000 bytes per file and a maximum of 5 rolled files. It uses a custom format for log messages.
4. Load Configuration:
Load the Seelog configuration file in your Go code:
func main() {
	logger, err := seelog.LoggerFromConfigAsFile("seelog.xml")
	if err != nil {
		panic("Error: " + err.Error())
	}
	seelog.ReplaceLogger(logger)
	defer seelog.Flush()

	// Your code continues here
}
This loads the configuration from the XML file and replaces the default logger with the configured logger. seelog.Flush() ensures all buffered log entries are written before exiting the program.
5. Logging Messages:
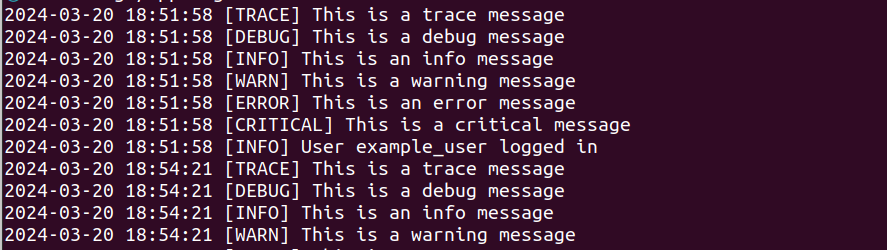
The log messages using the configured logger. Seelog provides various logging levels:
TraceDebugInfoWarnErrorCritical
Example:
seelog.Trace("This is a trace message")
seelog.Debug("This is a debug message")
seelog.Info("This is an info message")
seelog.Warn("This is a warning message")
seelog.Error("This is an error message")
seelog.Critical("This is a critical message")
You can also log messages with formatting:
seelog.Infof("User %s logged in", username)6. Advanced Logging:
Seelog supports more advanced features, such as logging contexts, custom log levels, and more. For further details, refer to the Seelog documentation.
7. Output:
Seelog will output log messages according to the configuration specified in the XML file.
5. Apex Log
Logrus is the inspiration for package log, which implements a simple structured logging API. A basic guide on how to use Apex/log in your Go code:
1. Install Apex/log:
You can install Apex/log using go get:
go get github.com/apex/log2. Import Apex/log:
Import Apex/log in your Go file where you want to use it:
import (
	"os"
	"github.com/apex/log"
	"github.com/apex/log/handlers/text"
)
3. Initialize the Logger:
You need to initialize the logger before using it. An example of how to set up a logger with a text handler:
func main() {
	// Create a new logger
	l := log.NewLogger(os.Stdout)

	// Set level of the log
	l.SetLevel(log.InfoLevel)

	// Attach a handler to the logger (e.g., text handler)
	l.SetHandler(text.New(os.Stdout))

	// Use logger
	l.Info("This is an info message")
	l.Warn("This is a warning message")
	l.Error("This is an error message")
}
You can also use a different handler, depending on your requirements. For example, you could use JSON or Syslog handlers.
4. Log Messages:
Log messages with different severity levels using the initialized logger. There are six severity levels:
DebugInfoWarnErrorFatalPanic
Log messages example:
l.Debug("This is a debug message")
l.Info("This is an info message")
l.Warn("This is a warning message")
l.Error("This is an error message")
l.Fatal("This is a fatal message")
You can also log messages with additional fields:
l.WithField("key", "value").Info("Additional information")5. Customization:
Apex/log allows for various customizations, such as adding custom fields, setting log levels, using different handlers, etc.
6. Output:
By default, Apex/log logs to os.Stderr with a text formatter. You can customize the output by attaching different handlers to the logger.

6. Logr
Logr is an abstraction for structured logging in Go, which allows you to write logs without binding your code to a specific logging implementation. It's a part of the Kubernetes ecosystem. Basic steps to use Logr in your Go code:
1. Install Logr:
You can install Logr using go get:
go get github.com/go-logr/logr2. Import Logr:
Import Logr in your Go file where you want to use it:
import (
       "github.com/go-logr/logr"
       "github.com/go-logr/zapr"
)Note: You also need to choose an implementation for Logr. In this example, we'll use
zapr, which integrates Logr with Zap, a logging library.
3. Initialize Logger:
Initialize the logger with the desired logging backend. Here, we'll use Zap:
package main

import (
	"go.uber.org/zap"
)

func main() {
	// Create a Zap logger instance
	zapLogger, _ := zap.NewProduction()
	defer zapLogger.Sync()

	// Create a Logr logger using zapr
	logger := zapr.NewLogger(zapLogger)

	// Use the logger throughout your application
	logger.Info("This is an info message")
	logger.Error(fmt.Errorf("an error occurred"), "This is an error message")
}
4. Log Messages:
You can log messages with different severity levels using the Logr logger. Commonly used levels are Info, Error, and V(1) for verbose logging:
logger.Info("This is an info message")
logger.Error(fmt.Errorf("an error occurred"), "This is an error message")
logger.V(1).Info("This is a verbose message")
5. Customization:
Logr provides various methods for customizing log messages, such as adding structured data, setting log levels, etc. Refer to the Logr documentation for more customization information.
6. Output:
Logr doesn't handle the output directly; instead, it delegates logging to the chosen logging implementation. In this example, we used Zap as the logging backend, so the output is configured based on Zap's configuration.

7. Log15
Log15 is a simple and efficient logging library for Go. An overview to use Log15 in your Go code:
1. Install Log15:
You can install Log15 using go get:
go get gopkg.in/inconshreveable/log15.v22. Import Log15:
Import Log15 in your Go file where you want to use it:
import (
       "gopkg.in/inconshreveable/log15.v2"
   )
3. Initialize Logger:
Initialize the logger with the desired configuration. You can set the output stream, log level, and other options:
func main() {
	// Create a new logger instance
	logger := log15.New()

	// Optionally, set the log level (default is INFO)
	logger.SetHandler(log15.StdoutHandler)

	// Log messages
	logger.Info("This is an info message")
	logger.Warn("This is a warning message")
	logger.Error("This is an error message")
}
4. Logging Messages:
You can log messages with different severity levels using Log15. Commonly used levels are Info, Warn, and Error:
logger.Info("This is an info message")
logger.Warn("This is a warning message")
logger.Error("This is an error message")
You can also log messages with additional context:
logger.Info("User login", "username", "john_doe")5. Customization:
Log15 provides various customization options, such as changing the log format, adding custom handlers, etc. Refer to the Log15 documentation for more advanced usage.
6. Output:
By default, Log15 logs to standard output (stdout). You can change the output destination by configuring a different handler.

Important Note: As a general rule, avoid logging any sensitive business data or personally identifiable informaIt includes sensitive IP addresses, names, and credit card numbersd numbers. While logging such data might enhance the utility of logs for engineering purposes, it introduces significant security risks. Additionally, adhering to regulations such as GDPR and HIPAA often prohibits logging personal data.
Conclusion
To conclude, here are some tips for logging in to Go:
1. Use Structured Logging: Utilize structured logging formats like JSON or key-value pairs to facilitate log analysis and searching.
2. Choose the Right Logging Library: Select a library that meets your project's needs in terms of performance, flexibility, and ease of use. Popular options include Logrus, Zap, and Zerolog.
3. Set Appropriate Log Levels: Use log levels such as DEBUG, INFO, WARN, ERROR, and FATAL to provide varying levels of detail in logs. Adjust log levels dynamically based on deployment environment and operational needs.
4. Avoid Logging Sensitive Information: Refrain from logging sensitive data like personal information, credit card numbers, or authentication tokens to prevent security risks and comply with regulations.
5. Include Contextual Information: Improve logs with contextual information such as request IDs, timestamps, error details, and relevant metadata to aid in troubleshooting and debugging.
6. Handle Errors Gracefully: Log errors with sufficient context to understand their cause and impact. Implement error-handling mechanisms to prevent cascading failures and ensure robustness.
7. Monitor and Analyze Logs: Review logs regularly to identify patterns, anomalies, and performance bottlenecks. Implement monitoring and alerting systems to address issues proactively.
8. Continuously Improve Logging: Request feedback from stakeholders and developers to iteratively refine logging practices, ensuring that logs remain informative, actionable, and aligned with evolving requirements.
These practices allow you to use Go logging to improve visibility, diagnose issues, and maintain the reliability and security of your applications.
Monitor Your Go Applications with Atatus
Atatus provides developers with insights into the performance of their Golang applications. By tracking requests and backend performance, Atatus helps identify bottlenecks in the application and enables developers to diagnose and fix errors more efficiently.

Golang monitoring captures errors and exceptions that occur in Golang applications and provides a detailed stack trace, enabling developers to quickly pinpoint the exact location of the error and address it.
We provide flexible alerting options, such as email, Slack, PagerDuty, or webhooks, to notify developers of Golang errors and exceptions in real-time. This enables developers to address issues promptly and minimize any negative impact on the end-user experience.
Try Atatus’s entire features free for 14 days.
#1 Solution for Logs, Traces & Metrics
![]() APM
APM
![]() Kubernetes
Kubernetes
![]() Logs
Logs
![]() Synthetics
Synthetics
![]() RUM
RUM
![]() Serverless
Serverless
![]() Security
Security
![]() More
More