Winston Logging Tutorial for Node.js Applications
Winston Logger is one of the most popular logging libraries for Node.js. This library decouples the different aspects of logging, such as log levels, formatting, and storage, to make them independent and provide an array of different combinations.
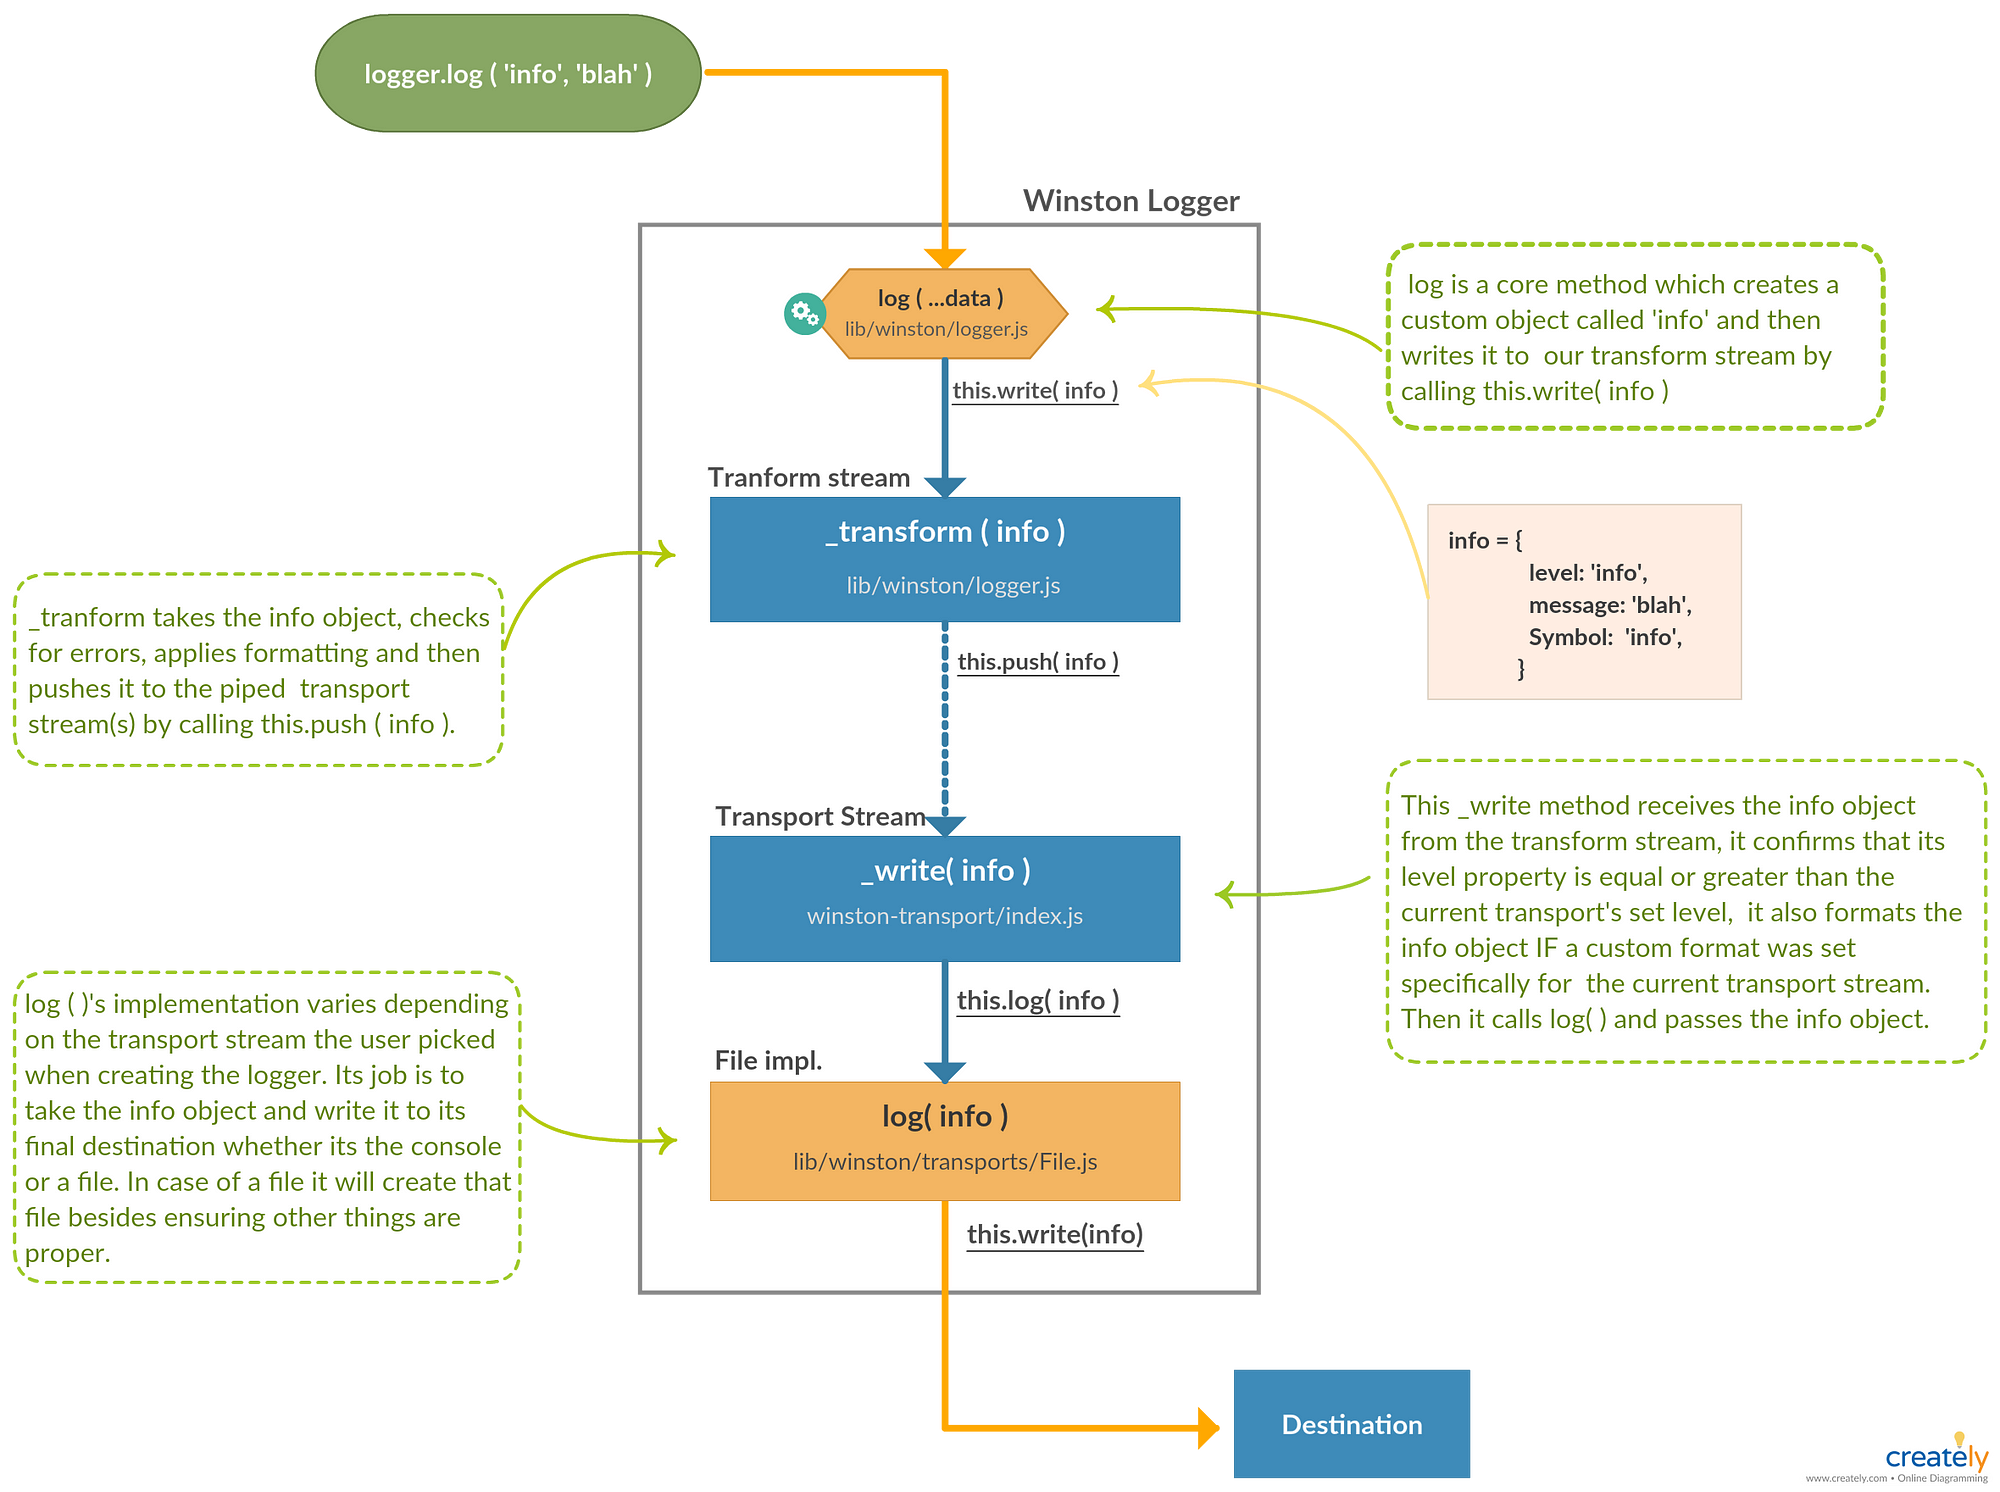
Additionally, you can implement logging in your application using Node.js streams to minimize performance impact.
In this article, we are going to discuss how to install Winston Logger and use it for your Node.js application. Factors that set apart Winston from other logging libraries are its configurable log formats, use of transports for routing messages, and formatting of the search and appearance of log messages.
We will discuss about each of these features and learn with examples. Let’s start!
Table Of Contents:
- Getting Started with Winston
- Installing Winston in Node.js Project
- Additional Configuration Options
- What are Transports in Winston?
- Formats in Winston
- Using Different Log Levels
Getting Started with Winston
The first thing you must have handy before you begin logging your Node.js application is to update your Node version to the latest one. Also, have Winston npm installed locally on your machine before you start.
Read about npm morgan logger here.
As you read at the beginning of this article, Winston is a popular logging library for Node.js. It provides a flexible and extensible logging framework that allows developers to log messages from their applications with various levels of severity, format those messages, and direct them to different outputs or transports.
Now let’s look at some of the key features of Winston:
- Logging Levels - Winston supports different logging levels such as 'info', 'warn', 'error', 'debug', etc. This allows developers to categorize and prioritize log messages based on their severity.
- Transports - Winston allows you to specify where log messages should be sent. It supports multiple transports, including the console, files, databases, and more. You can configure different transports to handle logs in various ways.
- Customizable Formats - You can customize the format of log messages, including timestamps, log levels, and additional metadata. This flexibility allows developers to tailor log entries to their specific needs.
- Asynchronous Logging - Winston is designed to perform logging operations asynchronously, which helps avoid blocking the main thread of your application.
- Extensibility - Winston is extensible, allowing developers to create custom transports, formats, and log levels to meet specific requirements.
As we have now got a rough idea of what and all makes up Winston Logger, let’s look into them in a bit more detail.
Installing Winston in Node.js Project
The quite obvious first step to getting started with Winston is by installing it. Some prerequisites for this tutorial are Nodejs v14, Express, NPM v6, and Docker.
Step 1: Install Winston Logger
Open a terminal and navigate to your project directory. Run the following command to install Winston using npm:
npm install winstonNext, import it into your Node.js application:
const winston = require('winston');Although Winston provides a default logger that you can use by calling a level method on the Winston module, the recommended way to use it is to create a custom logger through the createLogger() method.
Step 2: Create a Logging Module
Create a separate module for handling logging. You can create a file, e.g., logger.js, to encapsulate the Winston configuration. Follow the model provided below.
// logger.js
const winston = require('winston');
// Create a logger instance with a console transport
const logger = winston.createLogger({
    level: 'info', // Set the default log level
    format: winston.format.simple(), // Use the simple format
    transports: [
        new winston.transports.Console() // Log to the console
        // You can add more transports here, such as a file transport
        // new winston.transports.File({ filename: 'logfile.log' })
    ]
});
module.exports = logger;
Step 3: Use the Logger in Your Application
In your application files, you can now import and use the logger module wherever you need to log messages. Add your node.js application file in the beginning and continue with the logger.js file.
// Example application file
const logger = require('./logger');
// Log messages at different levels
logger.info('This is an informational message');
logger.warn('This is a warning message');
logger.error('This is an error message');
Additional Configuration Options
You can customize the configuration according to your needs. For example, you can add more transports, adjust log levels, or use different log formats.
What are Transports in Winston?
In Winston, a transport is a mechanism that defines where log messages should be sent. Transports are responsible for handling and routing log messages to various destinations, such as the console, files, databases, or external services. Winston provides a modular architecture that allows you to configure multiple transports and direct log messages to different outputs simultaneously.
We will see the three modes of transport available in Winston: Console, file and HTTP.
i.) Console Transport - Sends log messages to the console. Useful for development and debugging.
const winston = require('winston');

const logger = winston.createLogger({
    transports: [
        new winston.transports.Console()
    ]
});
ii.) File Transport - Writes log messages to a file. Useful for persisting logs for later analysis.
const winston = require('winston');

const logger = winston.createLogger({
    transports: [
        new winston.transports.File({
            filename: 'logfile.log'
        })
    ]
});
iii.) HTTP Transport - Sends log messages as HTTP requests. Useful for centralized log storage in remote servers.
const winston = require('winston');
const winstonHttp = require('winston-http');

const logger = winston.createLogger({
    transports: [
        new winston.transports.Http({
            host: 'logs.example.com'
        })
    ]
});
Custom Transports
You can create custom transports to send log messages to any destination of your choice. This is useful for integrating Winston with specific services or systems.
const winston = require('winston');

class MyCustomTransport extends winston.Transport {
    log(info, callback) {
        // Your custom logging logic here
        console.log(info.message);
        callback();
    }
}

const logger = winston.createLogger({
    transports: [
        new MyCustomTransport()
    ]
});
Extra: To use multiple transports simultaneously, you can configure them in the transports array:
const winston = require('winston');

const logger = winston.createLogger({
    transports: [
        new winston.transports.Console(),
        new winston.transports.File({
            filename: 'logfile.log'
        })
        // Add more transports as needed
    ]
});
Formats in Winston
In Winston, formats are used to define the structure and appearance of log messages. Formats determine how each log entry is presented, including details like timestamps, log levels, and additional metadata. Winston provides a range of built-in formats, and you can also create custom formats to tailor log entries to your specific needs.
Customizing Formats
You can customize Formats by including details that you want to extract and vice-versa. In the example below we have combined timestamp and log level in a single log entry.
const winston = require('winston');

const logger = winston.createLogger({
    format: winston.format.combine(
        winston.format.timestamp(),
        winston.format.simple()
    ),
    transports: [
        new winston.transports.Console()
    ]
});
You can also create custom formats to define exactly how log entries should be formatted. This allows for fine-grained control over the appearance of log messages.
const winston = require('winston');

const customFormat = winston.format.printf(({
    level,
    message,
    timestamp
}) => {
    return `${timestamp} [${level}]: ${message}`;
});

const logger = winston.createLogger({
    format: winston.format.combine(
        winston.format.timestamp(),
        customFormat
    ),
    transports: [
        new winston.transports.Console()
    ]
});
By using formats, you can customize the structure and style of your log entries to meet the requirements of your application or integrate with specific logging systems. The flexibility of Winston's formatting options allows you to adapt your logging output to different use cases.
Using Different Log Levels
Winston supports several log levels that allow you to categorize and prioritize log messages based on their severity. Here are the common log levels provided by Winston:
- error: Logs error messages. This level is typically used for critical issues that require immediate attention.
- warn: Logs warning messages. This level is used for issues that are not critical but may need attention.
- info: Logs informational messages. This level is often used for general information about the application's state.
- http: Logs HTTP-related messages. This level is useful for logging information about incoming HTTP requests
- verbose: Logs more verbose messages, providing additional details about the application's operation.
- debug: Logs debug messages. This level is used for detailed debugging information.
- silly: The lowest log level, used for extremely detailed or trivial information.
logger.error('This is an error message');
logger.warn('This is a warning message');
logger.info('This is an informational message');
logger.http('This is an HTTP message');
logger.verbose('This is a verbose message');
logger.debug('This is a debug message');
logger.silly('This is a silly message');
Logging levels in winston follow the severity ordering specified by RFC5424: severity of all levels is assumed to be numerically ascending from most important to least important.
Each level is given a specific integer priority. The higher the priority, the more important the message is considered, and the lower the corresponding integer priority. For example, as specified in RFC5424 the syslog levels are prioritized from 0 to 7 (highest to lowest).
Similarly, npm logging levels are prioritized from 0 to 6 (highest to lowest):
{
error: 0,
warn: 1,
info: 2,
http: 3,
verbose: 4,
debug: 5,
silly: 6
}
When configuring Winston, you can set the log level to control which messages are actually logged. For example, if you set the log level to 'info', only messages with a severity level of 'info' and higher (e.g., 'warn' and 'error') will be logged.
Note: It's often helpful to set it to a lower level in production to reduce the volume of logs.
const winston = require('winston');

const logger = winston.createLogger({
    level: 'debug',
    format: winston.format.simple(),
    transports: [
        new winston.transports.Console()
    ]
});

module.exports = logger;
This is an example where the log level is adjusted to ‘debug’ which is a severity 5.
Monitor Your Node.js Applications with Atatus
Atatus keeps track of your Node.js application to give you a complete picture of your clients' end-user experience. You can determine the source of delayed response times, database queries, and other issues by identifying backend performance bottlenecks for each API request.

Node.js performance monitoring made bug fixing easier, every Node.js error is captured with a full stack trace and the specific line of source code marked. To assist you in resolving the Node.js error, look at the user activities, console logs, and all Node.js requests that occurred at the moment. Error and exception alerts can be sent by email, Slack, PagerDuty, or webhooks.
#1 Solution for Logs, Traces & Metrics
![]() APM
APM
![]() Kubernetes
Kubernetes
![]() Logs
Logs
![]() Synthetics
Synthetics
![]() RUM
RUM
![]() Serverless
Serverless
![]() Security
Security
![]() More
More

