Set Resource Requests and Limits Correctly: A Kubernetes Guide
Kubernetes has revolutionized the world of container orchestration, enabling organizations to deploy and manage applications at scale with unprecedented ease and flexibility.
Yet, with great power comes great responsibility, and one of the key responsibilities in the Kubernetes ecosystem is resource management. Ensuring that your applications receive the right amount of CPU and memory resources is a fundamental task that impacts the stability and performance of your entire cluster.
In this article, we will delve into the critical aspects of setting resource requests and limits correctly in Kubernetes. We'll explore why this is essential, how to define and adjust these parameters, and the tools and best practices to ensure your applications run seamlessly in a resource-constrained environment.
Table Of Contents:-
- Understanding Resource Requests and Limits
- Identifying Workload Requirements
- Setting Resource Requests
- Setting Resource Limits
- Balancing Requests and Limits
- Testing and Optimizing the results
Understanding Resource Requests and Limits
Before setting resource requests and limits, it's crucial to understand what these terms mean and their implications for your Kubernetes workloads.
Resource requests specify the minimum amount of CPU and memory a container needs, while resource limits set an upper boundary on resource consumption. This understanding is foundational to resource management in Kubernetes.
We have covered more on resource requests and limits in detail in this blog - Optimizing Workloads in Kubernetes. Kindly check it out.
Identifying Workload Requirements
To determine the resource requirements of your Kubernetes workloads, you need to assess the characteristics of the applications you are deploying, such as-
- CPU Usage: Measure or estimate the average and peak CPU utilization of your containers.
- Memory Usage: Analyze the memory requirements of your containers, including both working memory and buffer space.
- Resource Constraints: Identify any constraints or recommendations provided by the application documentation or developers.
Setting Resource Requests
Resource requests ensure that Kubernetes scheduler places your containers on nodes with available resources meeting these requirements.
Gist: For CPU Requests, specify the minimum CPU required using the CPU field in your container's resource request section. And for Memory Requests, indicate the minimum memory needed using the memory field in the resource request section.
To set up resource requests in Kubernetes, you need to specify resource requirements for your pods in the YAML configuration file.
First of all, edit or Create a Kubernetes YAML Configuration File for your pod or deployment. You can use a text editor or a YAML-aware tool. For example, to create a simple Pod definition:
apiVersion: v1
kind: Pod
metadata:
  name: my-pod
spec:
  containers:
    - name: my-container
      image: 'my-image:latest'
      resources:
        requests:
          memory: 1Gi
          cpu: 500m
In this example, we've set resource requests for the container within the pod.
In the resources section of the container specification, you specify resource requests using the requests field. You can also specify CPU and memory requests as needed for your application.
Then, Save the YAML configuration file with your desired resource requests.
To create or update the pod with these resource requests, you can use the kubectl apply command.
kubectl apply -f my-pod.yamlYou can check that the resource requests have been set by running:
kubectl describe pod my-podChoosing the right Kubernetes Cluster Setup - This blog will help you learn more about cluster set-up and management.
Setting Resource Limits
Resource limits are designed to prevent a container from consuming excessive resources.
Gist: Set an upper limit for CPU utilization using the cpu field in the container's resource limit section. Specify the upper memory limit using the memory field in the resource limit section.
In Kubernetes, you can set resource limits for containers by defining the resources section within a pod's or container's configuration file.
Create a YAML file or edit an existing one that defines the pod or container configuration. You should include the resources section to specify the resource limits. Let’s take the example we used above:
apiVersion: v1
kind: Pod
metadata:
  name: my-pod
spec:
  containers:
  - name: my-container
    image: nginx
    resources:
      limits:
        memory: "1Gi"
        cpu: "0.5"
In this example, we've set a memory limit of 1 gigabyte (1Gi) and a CPU limit of 0.5 CPU cores.
To create or update the pod with the resource limits, use the kubectl apply or kubectl create command, specifying the YAML file:
kubectl apply -f your-pod-config.yamlYou can check if the resource limits have been set by running the following command:
kubectl get pod your-pod-name -o=jsonpath='{.spec.containers[0].resources.limits}'(Replace your-pod-name with the actual name of your pod.)
Note: Ensure that you specify the resource limits in the correct units. For CPU, you can use decimal numbers or fractions (e.g., "0.5" or "500m" for half a core). For memory, you can use "Gi" for gibibytes, "Mi" for mebibytes, "Ki" for kibibytes, and so on.
Keep in mind that setting or modifying resource limits won't take effect immediately on running pods. The changes will apply the next time the pod is restarted. You can either delete the pod, or use other strategies like rolling updates or deployment strategies to apply the changes gracefully.
Balancing Kubernetes Requests and Limits
Strike a balance between resource requests and limits. While resource requests and limits can be equal, setting them differently allows for more flexibility:
- Setting resource requests and limits equally ensures that the container will be guaranteed the specified resources.
- If you set resource requests lower than limits, the container is guaranteed the requested resources, but can burst to the limit when necessary. However, be cautious about possible container termination when limits are exceeded.
- Set resource requests based on your application's actual resource needs to ensure it runs reliably.
- Set resource limits to prevent applications from monopolizing resources and negatively impacting other workloads.
- Monitor resource utilization and adjust requests and limits as needed.
Kubernetes also supports features like Horizontal Pod Autoscaling (HPA) and Vertical Pod Autoscaling (VPA) to adjust resources dynamically based on workload requirements.
1. Horizontal Pod Autoscaling (HPA)
HPA is designed to automatically adjust the number of pod replicas in a replica set, deployment or stateful set based on metrics like CPU utilization or custom application metrics.
When you set up an HPA, you define a target metric, such as CPU usage, and a desired target value (e.g., 50% CPU utilization). The HPA controller continually monitors the metrics and, if the target is not met, it scales the number of pods up or down to meet the desired metric value.
If you have an HPA configured to maintain 50% CPU utilization, and your pods start consuming more CPU, the HPA controller will automatically add more pod replicas to handle the load.
HPA configuration example:
apiVersion: autoscaling/v2
kind: HorizontalPodAutoscaler
metadata:
  name: my-hpa
spec:
  scaleTargetRef:
    apiVersion: apps/v1
    kind: Deployment
    name: my-deployment
  minReplicas: 2
  maxReplicas: 10
  metrics:
    - type: Resource
      resource:
        name: cpu
        target:
          type: Utilization
          averageUtilization: 50
2. Vertical Pod Autoscaling (VPA)
VPA focuses on adjusting the resource requests and limits of individual pods to ensure they have enough resources to run efficiently. It monitors pod resource utilization and adjusts resource requests and limits accordingly.
VPA analyzes the historical resource usage of pods and then updates their resource requests and limits to match the actual usage. This helps in avoiding over- or under-provisioning of resources, leading to efficient resource utilization.
If a pod's resource limits are set too low, VPA can automatically increase them to ensure the pod runs smoothly without hitting resource constraints.
VPA configuration example:
apiVersion: autoscaling.k8s.io/v1
kind: VerticalPodAutoscaler
metadata:
  name: my-vpa
spec:
  targetRef:
    apiVersion: apps/v1
    kind: Deployment
    name: my-deployment
  updatePolicy:
    updateMode: Auto
It's important to note that while HPA focuses on the number of pod replicas, VPA focuses on the individual pod's resource configuration. You can use both HPA and VPA together in your Kubernetes cluster to dynamically scale your applications and optimize resource allocation.
Testing and Optimizing the results
Testing is essential to ensure that your resource requests and limits are correctly set.
You can use the kubectl describe command to check the resource settings for a pod, as well as the status of those resources. For example, to check a pod's CPU and memory limits:
kubectl describe pod your-pod-nameLook for the "Limits" section in the output to confirm that the specified limits match your configuration.
The kubectl top command provides real-time resource utilization for pods, nodes, and containers. Use it to monitor how resources are actually being consumed:
kubectl top podsThis will display the CPU and memory usage for each pod. Compare this data to your resource requests and limits.
Simulate realistic workloads to verify that resource settings are adequate.
Deploy container monitoring tools like Prometheus, Grafana, or Kubernetes monitoring tools like Atatus to get more detailed insights into resource utilization. These tools can help you visualize metrics and detect resource bottlenecks.
Resource requests and limits should not be static. Continuously monitor your application's resource usage and adjust the settings as needed. Optimize these parameters as your application evolves to ensure efficient resource utilization and stability.
Conclusion
Resource requests and limits are the guardians of stability and efficiency in your Kubernetes cluster. When configured correctly, they ensure a fair allocation of resources, prevent resource contention, and protect your applications from overcommitting.
By following the steps given in the article, you can effectively set resource requests and limits in Kubernetes to guarantee the right amount of resources for your containers while preventing resource over-consumption. This contributes to better resource allocation and application performance within your Kubernetes cluster.
As we conclude this guide, remember that Kubernetes is not merely about deployment; it's about effective orchestration. By setting resource requests and limits with precision, you empower your cluster to handle workloads gracefully and maintain a healthy ecosystem.
Atatus Kubernetes Monitoring
With Atatus Kubernetes Monitoring, users can gain valuable insights into the health and performance of their Kubernetes clusters and the applications running on them. The platform collects and analyzes metrics, logs, and traces from Kubernetes environments, allowing users to detect issues, troubleshoot problems, and optimize application performance.
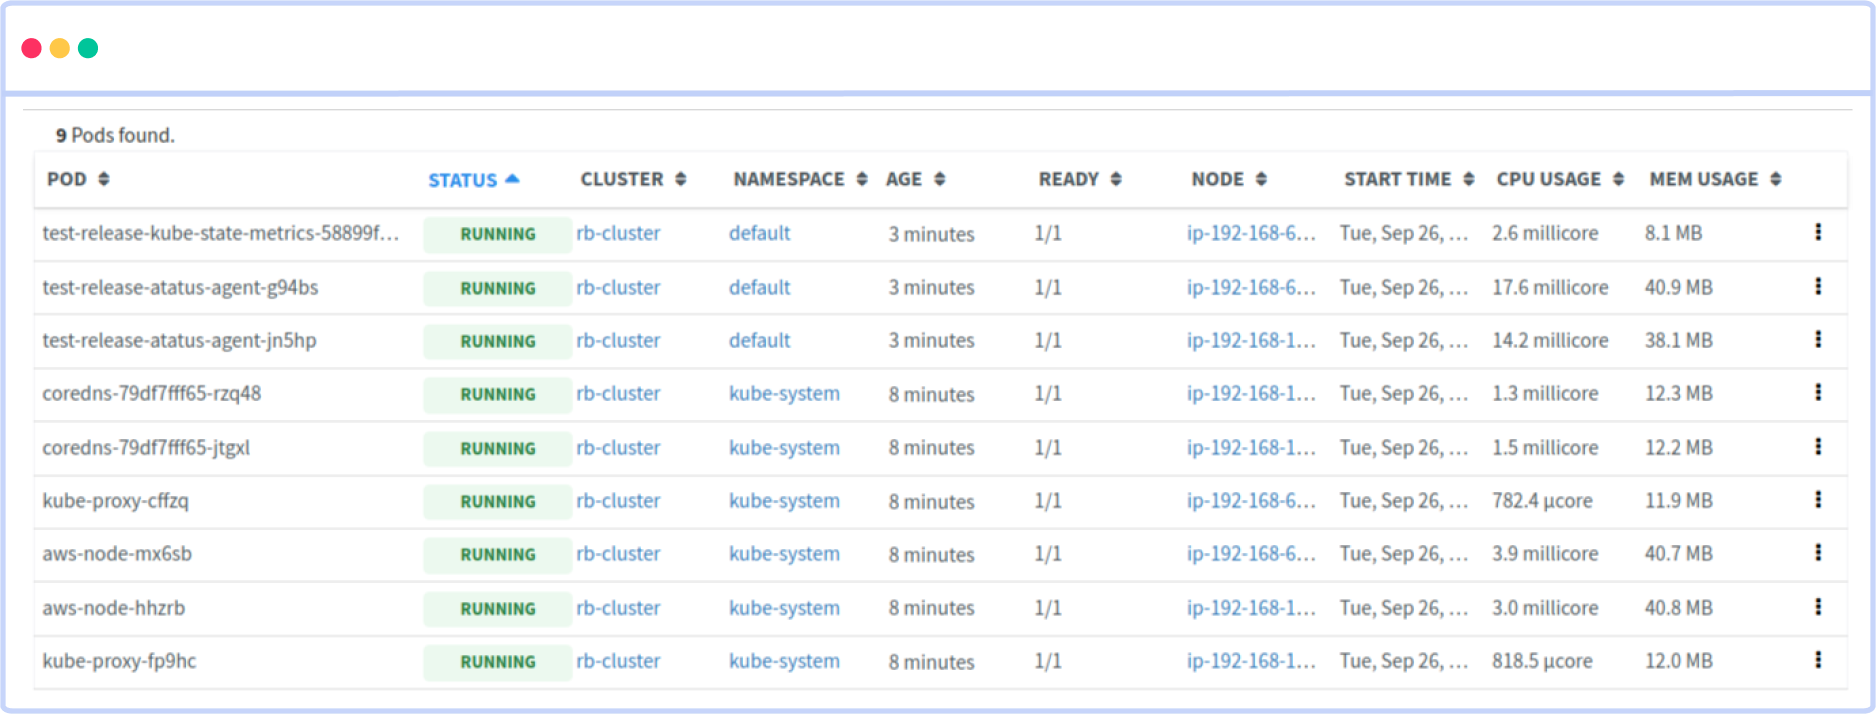
You can easily track the performance of individual Kubernetes containers and pods. This granular level of monitoring helps to pinpoint resource-heavy containers or problematic pods affecting the overall cluster performance.
#1 Solution for Logs, Traces & Metrics
![]() APM
APM
![]() Kubernetes
Kubernetes
![]() Logs
Logs
![]() Synthetics
Synthetics
![]() RUM
RUM
![]() Serverless
Serverless
![]() Security
Security
![]() More
More