A Beginner's Guide to Morgan NPM Logger

One of the most popular Node.js web frameworks is Express.js. It enables you to rapidly and easily create APIs and other web applications. However, constructing a server is only half the battle; the other half is keeping it running. You should read the logs to have a solid grasp of what's going on with your application.
However, if not done correctly, logging can be a headache (as in searching through thousands of not-so-important log entries in search of one line with an actual meaningful error message).
There are two ways to build a web server using Node.js: the hard way and the easy way (Express.js). The same can be said about logging in to Express.js, which may be done in either a difficult or simple way (using Morgan).
You'll discover what Morgan is and how to utilize it with Express.js in this tutorial.
- Introduction
- Getting Set Up
- Getting Started with Morgan NPM
- Log Output Format
- Redirecting the Log Output
- Logging into Multiple Destinations
Introduction
Morgan is a middleware for node.js that logs HTTP requests and is commonly used in Express projects. Express is a node.js routing and middleware web framework that is quick, unprejudiced, and simple.
An Express application is nothing more than a collection of middleware function calls. However, before going into Morgan, we must first comprehend what middleware functions are.
The middleware pattern is just a list of handler methods, each of which calls the next in line once it has done its work. This list is used by Express to pre-process requests with whatever logic you wish to include in your application. Authentication validations, request structure validation, adding new attributes, and many others are examples.
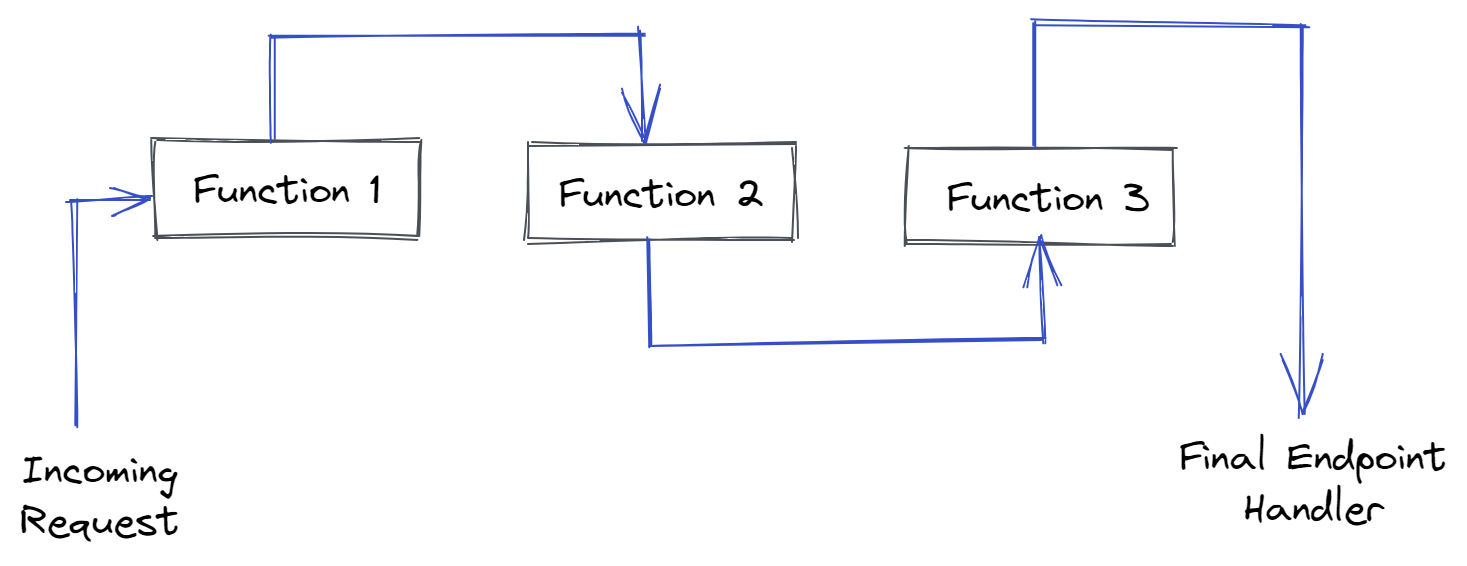
Every function you add to the list will be called with the request object, the response object if the function needs to break the regular flow, and a callback function to ensure that the next function in line is called.
Morgan npm provides exactly this, as you'll see, with a middleware function that will pick up the request object and record everything you need, such as the method used, the origin IP, the requested URL, and so on.
The request object (req), the response object (res), and the next middleware function in the application's request-response cycle (usually designated by a variable named next()) are all available to middleware functions.
Consider the following three function arguments:
- Request Object (req)
The request query string, parameters, body, HTTP headers, and so on are all properties of the HTTP request. - Response Object (res)
When an HTTP request is received, an Express application sends an HTTP response. - Next Middleware Function
Next() is executed if the current middleware function does not complete the request-response cycle.
In reality, multiple middleware functions can be used at the same time. When there are multiple, they are executed one by one in the order in which they were used in the express.
Why Should You Use Morgan?
Morgan simplifies the work of logging HTTP requests to and from your application in a single statement. Normally, developers must write all of the logging code by hand. They must tell Node.js/Express.js what to store, how to save, and where to save it.
Morgan takes care of it for you. It gathers logs from your server and prepares them for reading. It also has a few predetermined defaults built-in, saving you the time and effort of having to set up all of the logging yourself.
It can be highly useful when launching a new project, but it's also very powerful, thus it's also suitable for big projects.
Getting Set Up
Morgan is installed via NPM, just like any other Node.js module:
npm install morganAfter that, you must tell Node.js to include Morgan in your app:
const morgan = require('morgan');That concludes the fundamentals. Morgan is now up and running and ready to use.
Getting Started with Morgan NPM
This isn't a difficult module to use; it doesn't have a lot of features or configuration choices, but it does one thing effectively. It gives you a middleware function for any framework that supports that pattern (Express or otherwise).
Here's how to incorporate it into your project:
const express = require('express')
const morgan = require('morgan')

const app = express()
const port = 8080
app.use(morgan('combined'))

app.get('/', function(req, res) {
    res.send('Hello, World!!!')
})

app.listen(port, () => {
    console.log(`Sample app listening at http://localhost:${port}`)
})
The above code demonstrates how simple it is to use Morgan: simply need it and use the user function to add it as a middleware.
That's all you'll need to get started logging; in fact, the code above prints the following line on every request:
49.207.184.55 - - [06/Dec/2021:05:55:21 +0000] "GET / HTTP/1.1" 200 15 "-" "Mozilla/5.0 (Macintosh; Intel Mac OS X 10_14_6) AppleWebKit/537.36 (KHTML, like Gecko) Chrome/96.0.4664.55 Safari/537.36"It's worth noting that Morgan isn't given much in the way of setup; it was built to have some extremely helpful defaults. In reality, you won't be able to do anything with this module except tweaking its output and the logs' destination.
Log Output Format
Morgan's logs may be customized to include exactly the information you require, which is one of its most useful features. You can format your logs in one of two ways:
- Pre-defined Log
This module already has a simple pre-configured set of items to log; all you have to do now is choose the combination that best meets your needs. - Manually by using Tokens
You can also easily build new ones if the pre-defined ones aren't enough.
#1 Pre-defined Log
There are five predefined formats that you can utilize to quickly obtain the information you require. They are as follows:
- combined - This sets your logs to the Apache standard combined format
- common - Refers to the Apache common format standard
- dev - A color-coded log format (based on request status)
- short - Less than the normal format, with only a few items you'd expect to see in a request logline
- tiny - Even less, simply the reaction time and a few extras
If you want to use the format function, you'll need three arguments: tokens, req, and res. The HTTP request is req, and the HTTP response is res. A token is an object that contains all declared tokens. The function should return a string that will be the logline, or undefined/null if you don't want to log anything.
Let's have a look at these three possibilities:
Using a predefined format string:
app.use(morgan('tiny'))Using a format string of predefined tokens:
app.use(morgan(':method :url :status :res[content-length] - :response-time ms'))It's worth noting that predefined format strings can produce the same results as predefined tokens. Examine what they have to offer. Morgan's GitHub site and the Express documentation for Morgan middleware both have a list of all their predefined format strings and tokens.
When utilizing predefined tokens, keep in mind that they must always be declared as strings, with a colon before the token's name :method.
Using a custom format function
app.use(morgan((tokens, req, res) => {
    return [
        tokens.method(req, res),
        tokens.url(req, res),
        tokens.status(req, res),
        tokens.res(req, res, 'content-length'), '-',
        tokens['response-time'](req, res), 'ms'
    ].join(' ')
}))
Returning to the previous example, here's how the module logs the same request in several formats:
The output of the ‘Combined’ format:
49.207.184.55 - - [06/Dec/2021:05:55:21 +0000] "GET / HTTP/1.1" 200 15 "-" "Mozilla/5.0 (Macintosh; Intel Mac OS X 10_14_6) AppleWebKit/537.36 (KHTML, like Gecko) Chrome/96.0.4664.55 Safari/537.36"The output of the ‘Dev’ format:
49.207.184.55 - GET / 304 556.460 ms - -The output of ‘Tiny’ format:
GET / 304 - - 545.730 msThese are quite well-formatted, and if you don't have any unique requirements, they'll suffice. However, if you need more granular control over the format of your loglines (for example, to add extra information that isn't readily available, or to arrange them in a more human-readable way), you can use tokens to add the information you need.
#2 Log Tokens
Create your custom tokens and logging format as another alternative. Morgan has complete access to the contents of an HTTP request and response. This means that even if your application uses custom HTTP headers, Morgan can still log them.
You must generate your tokens if you wish to customize your middleware routines. Simply call morgan.token() with a name and a callback function to create a token. A string value is expected to be returned by this callback function.
Tokens are basic placeholders that you can use in a middleware format string. The predefined formats effectively perform the same thing, but you can mix and match any of the 13 tokens to get the exact logline you want.
Morgan npm gives you tokens like the client's user agent, the requested url, and the response time, among other things. To receive a complete list of tokens, see the whole documentation.
Let's imagine your application generates a custom HTTP header called "user-type," and you want to log the content of this header. To accomplish this, take these steps:
morgan.token('user-type', function(req, res) {
    return req.headers['user-type']
})
The preceding line generates a new custom token, which you can use in your Morgan log format by adding :user-type.
app.use(morgan(':method :url :status :user-type'));Output:
Server listening on port :8080
GET / 200 admin
What if these pre-defined tokens aren't enough?
You can use the same approach, but instead of supplying a string, you can send a function to which you can add as much logic as you need.
Directly inserting a token for a certain header, for example, would look like this:
morgan.token("host", function(req, res) {
    return req.headers['host']
})
What if you wanted to send it back to them in JSON format?
morgan.token("json", function(req, res) {
    return JSON.stringify({
        url: req.url,
        method: req.method,
        httpVersion: req.httpVersion
    })
})
Because the token must be a string, remember to call the stringify method. The following is the output of a token like this:
{ "url":"/", "method":"GET", "httpVersion":"1.1" }Redirecting the Log Output
We haven't talked about the logs' output location yet, but by default, the logs are written to standard output (which is usually your terminal window). Given that distributed architectures are now the norm, logging into the standard output isn't particularly useful. In reality, it's comparable to using Morgan instead of console.log.
Morgan npm, fortunately, allows you to replace the logs' output location by overwriting the stream that was used to write them. This, however, will require a fundamental understanding of how Node.js Streams function; after all, this isn't just about specifying a destination path, but also about writing the entire output procedure.
The middleware method returned by the module allows an optional second parameter to define the stream to utilize to accomplish this.
By creating a new Stream object and providing it to the middleware, you may route the logger's output to a single file, as shown below:
let logStream = fs.createWriteStream(path.join(_dirname, ‘file.log’), {
    flags: ‘a’
})

// setup the logger
app.use(morgan('update', {
    stream: logStream
}))
The concept of allowing you direct access to the output stream, while low-level, allows developers a lot of flexibility. You may or may not be familiar with Node.js's Stream object, but it's a standard interface that any module that utilizes it must implement; in other words, everyone uses streams in the same way, so you can rest assured that it will meet your needs.
Some modules provide stream-compatible interfaces to well-known storage, such as Mongoose-Morgan, which allows you to directly stream Mongoose logs into MongoDB. If you can't locate a morgan-compatible module, develop a function that returns a writable stream and transmits the data where you need it.
The example below demonstrates how simple it is to build a writable stream that can be used with Morgan:
const express = require('express')
const morgan = require('morgan')
const Writable = require("stream").Writable

const app = express()
const port = 8080

let logStream = fs.createWriteStream(path.join(_dirname, 'file.log'), {
    flags: 'a'
})

// setup the logger
app.use(morgan('update', {
    stream: logStream
}))

class MyStream extends Writable {
    write(line) {
        // Here you send the log line to wherever you need
        console.log("Logger - ", line)
    }
}

// Create a new named format
morgan.token("timed", "A new :method request for :url was received. " +
    "It took :total-time[2] milliseconds to be resolved")

let writer = new MyStream()

// Use the new format by name
app.use(morgan('timed', {
    stream: writer
}))

app.get('/', function(req, res) {
    res.send('Hello, World!!!')
})

app.listen(port, () => {
   console.log(`Sample app listening at http://localhost:${port}`)
})
The code above, obviously, does nothing more than transmit data to the terminal window, as Morgan npm does by default, but you get the idea. Instead of console.log, you can use S3 compatible code or an HTTP request to transmit the log to an ELK instance that is completely controlled. All of them are real and viable possibilities, due to the stream access provided by the module.
Logging into Multiple Destinations
Finally, the skip option – another attribute of the optional second argument – is a handy little technique. You can use it to create a function that tells the logger which events to ignore and which to log.
Although the following example focuses on one use case, having a higher level of verbosity in development environments versus merely logging truly vital information in production environments is another case.
const express = require('express')
const morgan = require('morgan')
const app = express()
const port = 8080

// Skip requests that aren't for the homepage
function isNotHomePage(req, res) {
    return (req.path !== "/")
}
app.use(morgan('combined', {
    skip: isNotHomePage
}))

app.get('/', function(req, res) {
    res.send('Welcome Home!')
})
app.get('/hello', function(req, res) {
    res.send('Hello, World!!!')
})

app.listen(port, () => {
   console.log(`Sample app listening at http://localhost:${port}`)
})
It's very basic; the function receives both the request and response objects, allowing you to select whether or not to log the request based on that information. The event will be skipped if the function returns TRUE; otherwise, the logger will handle it.
It doesn't accomplish much on its own, but if you start adding loggers and different skipping criteria, you can design logic that sends log lines to different destinations depending on your needs.
The following code demonstrates how to leverage almost everything we've studied so far to develop a logging mechanism in Morgan that saves information about unsuccessful requests to a file while writing information about successful requests to the terminal window.
const express = require('express')
const morgan = require('morgan')
const rt = require("file-stream-rotator")
const Writable = require("stream").Writable
const app = express()
const port = 8080

class TerminalStream extends Writable {
    write(line) {
        // Here you send the log line to wherever you need
        console.log("Logger:: ", line)
    }
}

let fileWriter = rt.getStream({
    filename: "errors.log",
    frequency: "daily",
    verbose: true
});

let terminalWriter = new TerminalStream()

// Skip requests that aren't for the homepage
const skipSuccess = (req, res) => res.statusCode < 400;
const skipError = (req, res) => res.statusCode >= 400;

// Error logging
app.use(morgan('combined', {
    skip: skipSuccess,
    stream: fileWriter
}))

// Success logging
app.use(morgan('combined', {
    skip: skipError,
    stream: terminalWriter
}))

app.get('/', function(req, res) {
    res.send('Welcome Home!')
})
app.get('/hello', function(req, res) {
    res.send('Hello, World!!!')
})

app.listen(port, () => {
   console.log(`Sample app listening at http://localhost:${port}`)
})
The skip logic is the key here, as it allows us to separate the data flow into two independent middleware logs based on the status code received (in this example).
The two streams in the following section of the code describe where to save each logger's output as well as the format. Although the format for all circumstances is the same in this example, you could easily use different formats for each case.
Finally!!!
We went over how to install Morgan, how to use the built-in presets, and how to make your own in this post. To get started with Morgan, you'll usually just need to add two or three lines of code.
Morgan is a powerful tool that allows you to generate unique logging formats for your Express.js applications. Morgan can be used for both small projects that require quick and easy logging and larger applications that require specialized solutions.
Atatus Logs Monitoring and Management
Atatus offers a Logs Monitoring solution which is delivered as a fully managed cloud service with minimal setup at any scale that requires no maintenance. It monitors logs from all of your systems and applications into a centralized and easy-to-navigate user interface, allowing you to troubleshoot faster.
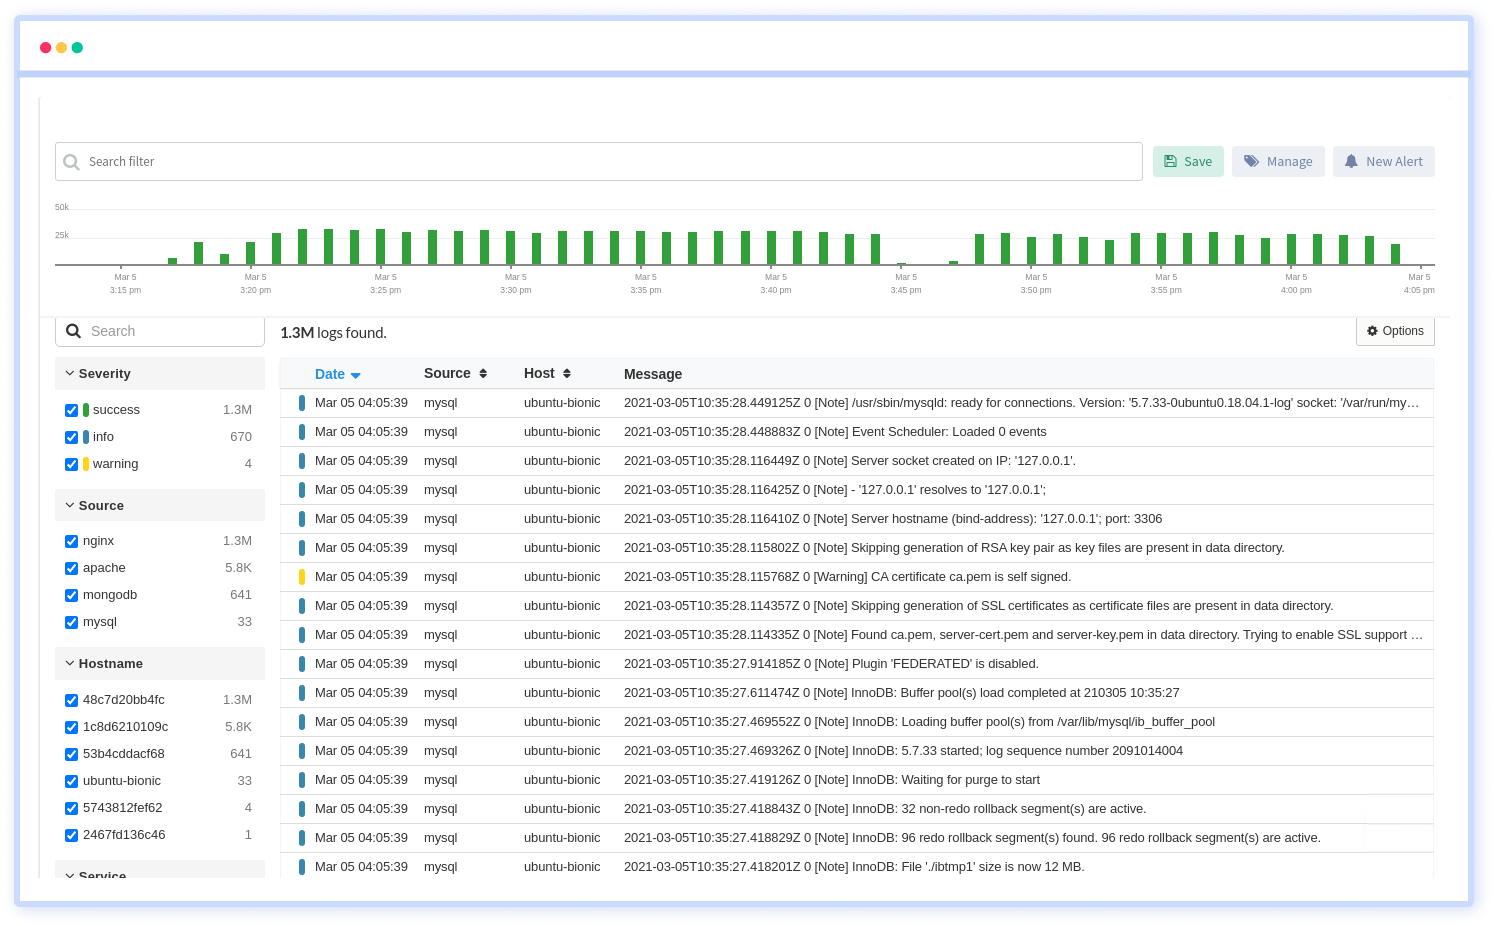
We give a cost-effective, scalable method to centralized logging, so you can obtain total insight across your complex architecture. To cut through the noise and focus on the key events that matter, you can search the logs by hostname, service, source, messages, and more. When you can correlate log events with APM slow traces and errors, troubleshooting becomes easy.
#1 Solution for Logs, Traces & Metrics
![]() APM
APM
![]() Kubernetes
Kubernetes
![]() Logs
Logs
![]() Synthetics
Synthetics
![]() RUM
RUM
![]() Serverless
Serverless
![]() Security
Security
![]() More
More