14 Useful Bash Aliases that Make Shell Less Complex and More Fun

Do you frequently find yourself typing a long command on the command line or checking the bash history for a command you've already typed?
If you answered yes to any of the above questions, bash aliases will come in helpful. You can use aliases in Bash functions to create a shortcut command for a longer command.
When working on the command line, bash aliases are essentially shortcuts that can save you time and effort by eliminating the need to remember long commands.
A Bash alias is a way to replace or complement existing Bash commands with new ones. Bash aliases make it simple for users to personalize their POSIX terminal experience. They're usually found in $HOME/.bashrc functions or $HOME/bash_profile script files.
In the default .bashrc file of any new user account, most distributions include at least a few popular aliases. These are basic aliases that demonstrate the syntax of a Bash alias variable:
alias ls='ls -F'
alias ll='ls -lh'
However, not all distributions have pre-populated aliases. If you manually create aliases, you'll need to import them into your current Bash functions:
$ source ~/.bashrcOtherwise, you can close and reopen your terminal to have the configuration file reloaded.
You can then type ll to get the results of ls -l, and you can type ls to get the output of plain old ls, due to the aliases created in your Bash initialization script.
Having those aliases is fantastic, but it only scratches the surface of what's possible. Here are the top 14 useful Bash aliases that you won't be able to live without after you've tried them.
In this article, we will cover the 14 useful Bash Aliases as follows:
- Set Up First
- Display All Bash Aliases
- Creating Bash Aliases
- Sort by File Size
- Sort by Modification Time
- Count Files
- View Only Mounted Drives
- Find a Command in Your Grep History
- Add a Copy Progress Bar
- Temporarily Stop Using Aliases
- Removing an Alias
- Protect Yourself from File Removal Accidents
- Make Bash Shell Aliases Permanent
- Simplify your Git workflow
#1 Set Up First
Create a file called ~/.bash_aliases before you start:
$ touch ~/.bash_aliasesThen add the above aliases script in your ~/.bashrc functions or ~/.bash_profile file:
if [ -e $HOME/.bash_aliases ]; then
    source $HOME/.bash_aliases
fi
If you wish to try out any of the aliases mentioned in this article, add them to your .bash_aliases file.
#2 Display All Bash Aliases
By typing alias on the command line, you can see a list of bash aliases.
aliasThe output may resemble the example below.
alias l='ls -CF'
alias la='ls -A'
alias ll='ls -alF'
alias ls='ls --color=auto'
alias sl="ls"
alias apt='sudo apt'
#3 Creating Bash Aliases
All user-defined aliases should be stored in the ~/.bashrc functions to guarantee that they survive reboots and logging in and out. You can use the command-line interface to run those functions, but the aliases will only work in the current bash session.
Creating aliases in bash functions is a simple process. The following is the example syntax:
alias alias_name="command_to_perform"The alias keyword is followed by the alias name, an equal sign, and then the command you want to perform when creating an alias. The command must be surrounded in quotes, with no space between the equal sign and the command. Each alias variable must be defined on a separate line.
One of the most commonly used and useful commands on the Linux command line is ls. Most people normally use the -la parameter with this command to get a full list of all files and directories, even to find the hidden ones.
If you want to create permanent aliases, you'll need to add them in the .bashrc file directly or the .bash_aliases file. Add the aliases to a new line at the end of the file. You can also leave a comment so that you can see where all of the aliases are located. Consider the following example:
#############
# Aliases
#############
alias df="df -h"
Before you add new aliases, make sure they haven't already been added by your Linux distribution, as many of them come with a configuration that includes aliases that have already been added. You can save and close the file after you've inserted the aliases.
When you add new aliases, they will be available the next time you start a shell session. If you wish to find the changes without doing this, run the following command, which will force bash functions to read the file again in your current session:
source ~/.bashrc#4 Sort by File Size
If you started your computing career with GUI file managers like GNOME's Nautilus, MacOS's Finder, or Windows Explorer, you're undoubtedly used to sorting a list of files by size. You can perform the same thing on a terminal, but it's not as quick.
On a GNU system, add this alias to your configuration:
alias lt='ls --human-readable --size -1 -S --classify'This alias substitutes it with an ls command that finds and displays each item's size before sorting it by size in a single column with a comment indicating the file type. After you've loaded your new alias variable, try it out.
Because the ls command on macOS or BSD doesn't have the same options, this alias works instead:
alias lt='du -sh * | sort -h'This version yields slightly different results.
#5 Sort by Modification Time
You get to work every Monday, sit down at your computer, open a terminal, and find you've forgotten what you were doing the previous Friday. To list the most recently updated files, you'll need an alias (another useful one).
Create an alias variable with the ls command to help you remember where you left off:
alias left='ls -t -1'The output is simple, however, you can make it longer by using the —long option.
#6 Count Files
If you need to find how many files are in a directory, you can use one of the most well-known and useful UNIX command structures. You use the ls command to list files, then use the -1 option to limit the output to one column, and then pipe that output to the word count tool to count how many lines of single files there are.
It's a fantastic example of how the UNIX philosophy enables users to create their solutions by combining minor system components. This command combination requires a lot of typing if you use it several times a day, and it doesn't work for a directory of directories without the -R option, which adds extra lines to the output and renders the exercise useless.
This alias makes it simple:
alias count='find . -type f | wc -l'This one counts files but not the contents of folders, ignoring directories. If you have a project folder with five directories, each with three files, the alias variable returns 15 because the whole project has 15 files.
#7 View Only Mounted Drives
It used to be so simple to use the mount command. You could find and retrieve a list of all the mounted filesystems on your computer with only one command, and it was commonly used and useful to gain an overview of what devices were attached to a workstation. Because most PCs don't have many more USB ports than that, seeing more than three or four entries used to be impressive, and the results were manageable.
Computers have become a little more complicated in recent years, and the results of the mount can be difficult to decipher due to LVM, physical drives, network storage, and virtual filesystems.
For example, use an alias like this to address the problem:
alias mnt="mount | awk -F' ' '{ printf \"%s\t%s\n\",\$1,\$3; }' | column -t | egrep ^/dev/ | sort"This alias parses the output of mount column by column with awk, reducing the output to what you're presumably searching for what hard drives, and not file systems, are mounted.
#8 Find a Command in Your Grep History
When you find out how to accomplish anything in the terminal, you pledge yourself that you'll never forget it. After an hour, you've entirely forgotten what you've done.
Searching into your Bash history is something that everyone needs to do at some point in their lives. You can use Ctrl+R to run a reverse search through your history if you find precisely what you're looking for, but sometimes you don't remember the specific command you're looking for.
To make things a little easier, here's an alias:
alias gh='history | grep'#9 Add a Copy Progress Bar
Progress bars are mocked by everyone since they are notoriously wrong. Despite this, we all seem to want a "bar" deep down. The UNIX cp command lacks a progress indication, but it does provide a -v verbosity option, which means it will echo the name of each file transferred to your terminal.
That's a fine trick, but it doesn't work so well when you're transferring a large file and want to see how much of it hasn't been moved yet.
The pv command adds a progress indicator to the copy process, but it's not widely used as a default application. The rsync command, on the other hand, comes standard with practically every POSIX system and is widely regarded as one of the most efficient ways to transfer files both locally and remotely.
Even better, it comes with a built-in progress bar.
alias cpv='rsync -ah --info=progress2'It's the same as using the cp command with this alias (progress bar).
#10 Temporarily Stop Using Aliases
In some cases, you'll need to use the real command rather than an alias that already exists. However, you do not want to delete the alias and then re-define it.
That's why there's a simple hack you may apply to temporarily use the original command.
\aliasnameFor example, alias cp=“cp -iv” will ask for confirmation to overwrite the file regularly. Consider the situation when you need to copy a large number of files and you know that all of them must be overwritten. You might wish to use the usual cp command in this scenario. Below is an example:
\cp * /backup/directory/#11 Removing an Alias
We have shown you how to remove and unset aliases, which is the inverse of adding them.
With the following command, you can remove/unset aliases:
unalias llIf you want to remove/unset all of the set aliases, type:
unalias -a#12 Protect Yourself from File Removal Accidents
If you wish to delete a file, drag it to your trash, exactly like you would on a desktop computer. Because the trash is an accessible, physical location in your filesystem, POSIX makes this simple.
Depending on your platform, this location may change: The trash is placed at ~/.local/share/Trash on FreeDesktop and ~/.Trash on macOS, but it's merely a directory where you put files that you want out of sight until you're ready to delete them forever.
Using this simple alias, you can dump files into the trash from your terminal:
alias tcn='mv --force -t ~/.local/share/Trash'This alias makes use of the mv flag, which allows you to pass the file you want to move as the final argument, bypassing the typical requirement that it be listed first. You can now move files and folders to your system trash using your new command.
#13 Make Bash Shell Aliases Permanent
Only the current login session is affected by the alias. The aliases will be gone whenever you log out or reset the system. To avoid this issue, add the following to your ~/.bashrc file:
vi ~/.bashrcEnter the following code to make the alias c for the current user permanent:
alias c='clear'The file should be saved and closed. The /etc/bashrc file can be used to create system-wide aliases (i.e. aliases for all users). The alias command is included in several shells, including ksh, tcsh/csh, ash, bash functions, and others.
#14 Simplify Your Git workflow
Here's an alias for finding the top level of a Git project, regardless of where you're working in it, and then changing directory to it, changing to the master branch, and performing a Git pull:
alias git='cd `git rev-parse --show-toplevel` && git checkout master && git pull'This type of alias is far from generally beneficial, but it highlights how a relatively basic alias may remove a lot of time-consuming navigation, commands, and prompt waiting.
An alias that is both simpler and more universal returns you to the Git project's top level. This alias is important since it behaves as a "temporary home" directory when you're working on a project. Going "home" should be as easy as going to your own home, and here's how to do it:
alias cg='cd `git rev-parse --show-toplevel`'No matter how far down into your Git project's directory hierarchy you have descended, the command cg now returns you to the top.
Wrapping up
This article should have given you some ideas for your aliases and bash functions. Using these frequently can make your time in the shell more fun and less complicated.
Remember to avoid redefining existing commands with possibly damaging behavior. Even going the other way and aliasing a command to a safer variation can backfire the first time you use a system without it after you've grown accustomed to it.
Monitor Your Entire Application with Atatus
Atatus provides a set of performance measurement tools to monitor and improve the performance of your frontend, backends, logs, and infrastructure applications in real-time. Our platform can capture millions of performance data points from your applications, allowing you to quickly resolve issues and ensure digital customer experiences.
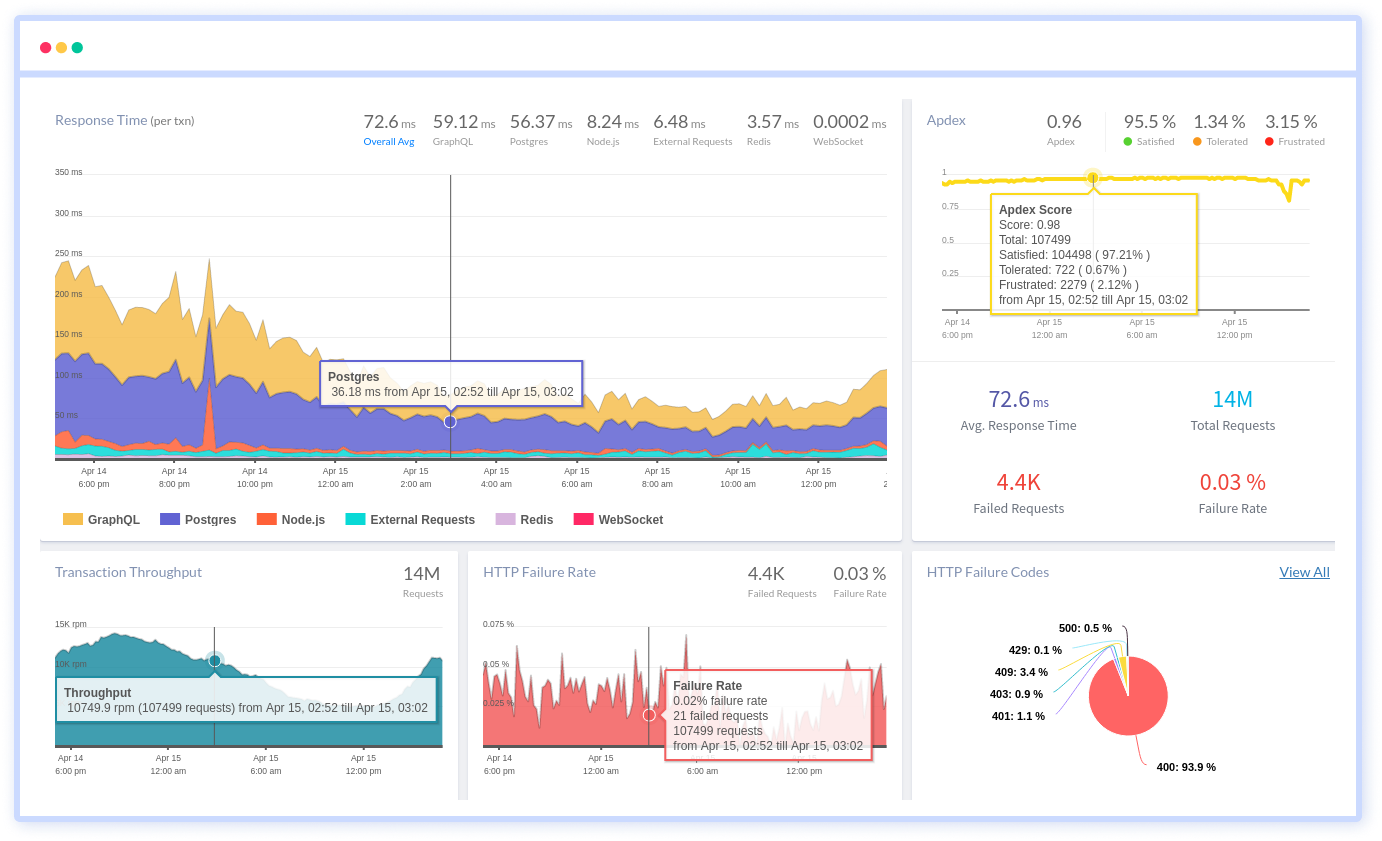
Atatus can be beneficial to your business, which provides a comprehensive view of your application, including how it works, where performance bottlenecks exist, which users are most impacted, and which errors break your code for your frontend, backend, and infrastructure.
#1 Solution for Logs, Traces & Metrics
![]() APM
APM
![]() Kubernetes
Kubernetes
![]() Logs
Logs
![]() Synthetics
Synthetics
![]() RUM
RUM
![]() Serverless
Serverless
![]() Security
Security
![]() More
More