Authentication and Authorization for RESTful APIs: Steps to Getting Started
Why do APIs require authentication in the first place?

Users don't always need keys for read-only APIs. However, most commercial APIs require permission via API keys or other ways. Users might make an unlimited number of API calls without needing to register if your API had no security. Allowing limitless requests would make it impossible to develop a business structure for your API.
Furthermore, without authentication, it would be difficult to link requests to individual user data. There would also be no mechanism to defend against malicious users deleting another user's data (for example, by issuing DELETE requests on another's account).
Finally, you had no way of knowing who was accessing your API or which endpoints were the most popular. API developers must clearly consider how to authenticate and authorize requests to their API.
We will go over the following:
- Authentication vs. Authorization
- Step 1: Defining the Actual Token
- Step 2: Choose – URL Parameter vs. Cookies vs. Local Storage
Authentication vs. Authorization
Having a well-thought-out authentication and authorization strategy is one of the challenges of establishing any RESTful API. Authentication, Security, and Logging are all cross-cutting challenges that affect numerous parties.
To avoid misunderstandings, two distinct actions are frequently discussed together:
- Authentication
It's the process of verifying the credentials of a connection attempt. The credentials from the remote access client are transferred to the remote access server in plaintext or encrypted format using an authentication protocol. Checking a username/password or ensuring that a token is signed and not expired are examples of Authentication. It does not imply that this individual has permission to use a specific resource. - Authorization
Checks for resources that the user has permission to access or alter based on stated roles or claims. It happens once you've successfully authenticated. The authenticated user, for example, is granted read access to a database but not the ability to edit it. The same is true for your API. Although regular users have access to specific resources or endpoints, special admin users have access to privileged resources and endpoints.
In a nutshell, Authentication verifies that you are who you say you are, while Authorization determines whether or not you have access to a certain resource.
Of fact, these definitions are frequently implemented in tandem and are interdependent, so when we talk about authentication, we're talking about the entire system.
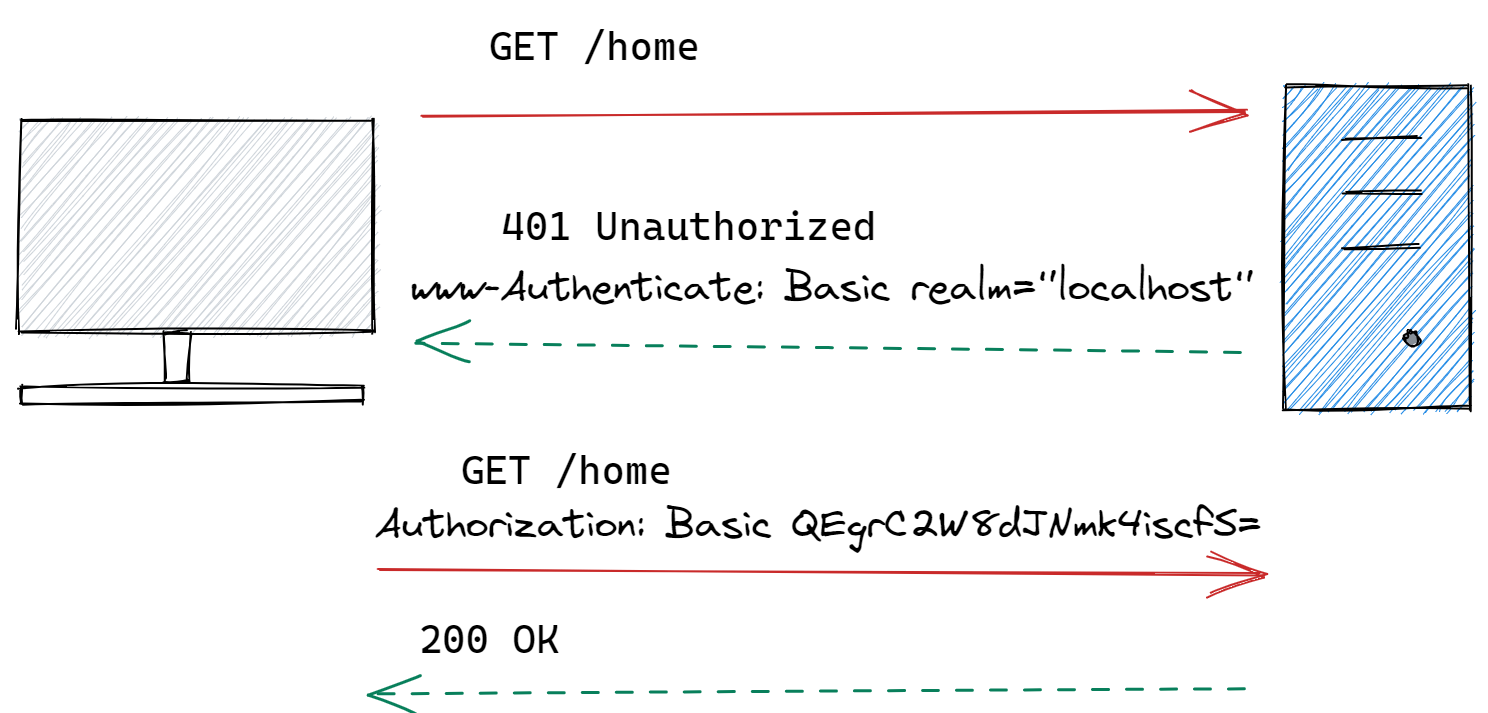
Basic Authentication 👩💻
Using HTTP basic authentication is the simplest approach to deal with authentication. We append 'username:password' encoded in base64 to a specific HTTP header.
GET / HTTP/1.1
Host: example.org
Authorization: Basic Zm9vOmJhcg==
It's important to note that your credentials are not encrypted, even though they're encoded. From a basic authentication, retrieving the username and password is quite simple. This authentication system should only be used with SSL/TLS and not with plain HTTP.
Basic Authorization 🕵️♀️
The sender inserts a ‘username:password’ into the request header using this way. Base64 is an encoding technique that turns the login and password into a set of 64 characters to ensure secure delivery. An example of a Basic Authorization in a request header is as follows:
Authorization: Basic QEgrC2W8dJNmk4iscfS=Basic Authorization APIs will also support HTTPS, which encrypts message content over the HTTP transport protocol. Without HTTPS, hackers could easily decipher the username and password.
The API server decrypts the message and checks the header when it receives it. It chooses whether to accept or refuse the request after decoding the string and assessing the username and password.
So we learned about authentication and authorization in the above section, let's jump into the steps to build Authentication and Authorization for RESTful APIs:
Step 1: Defining the Actual Token
When developing an authentication strategy, one of the first things to consider is the type of token you'll employ. There are several approaches, but two of the most popular are:
#1 JWT Tokens (JSON Web Tokens) 🎟️
JWT Tokens are entire JSON Objects that have been base64 encoded and signed with a symmetric shared key or a public/private key combination. The distinction is that if you have a customer who wants to verify that a token is signed but should not be permitted to produce tokens, you may give them the public key, which will prevent them from creating tokens but will allow them to validate them.
The subject or user id, as well as when the token was generated and when it expires, may all be found in the JWT. By signing with a secret, you ensure that only you may generate a token, ensuring that it hasn't been changed with (for example, by changing the user id or expiring).
One thing to bear in mind is that, while JWTs are signed, they are rarely encrypted (although you can encrypt it optionally). This means that anyone with access to the token can read any data included within it. It's a good idea to include identifiers like a user id in the token, but not personally-identifying information like an email address or social security number.
The Reason Why JWTs are So Great: 👍
JWTs have the advantage of being able to be used without a backing store. The token itself contains all of the information needed to authenticate the user. It's simple to avoid relying on centralized authentication servers and databases in a distributed microservice world.
The individual microservice just requires a middleware to handle token verification as well as the secret key required for verification. Verifying entails examining the signature as well as a few criteria such as the claims and the token's expiration date.
Verifying the right authenticity of a token takes only a few CPU cycles and does not require any IO or network access, making it extremely scalable on modern web server hardware.
The Reason Why Doesn’t Everyone Use JWTs: 👎
One disadvantage of JWTs is that it's a little more difficult to ban users or add/remove roles if you need something done right away. Remember that the JWT has an expiration date that can be set up to a week in advance. Even if you mark the user as disabled in your database, there is no way to immediately invalidate the token because it is stored client-side. You must instead wait until it expires.
This can have an impact on your architecture, especially if you're developing a public API that could be abused by a single power user or an e-commerce system that needs to block fraudulent customers. There are alternatives, such as having a blacklist of tokens or user ids if all you care about is blocking compromised tokens or users, however, this may bring a database back into your auth framework.
Making sure each token has a jti claim is a good approach to blacklist or a JWT Id which can be stored in the database. Assuming the number of tokens you want to invalidate is substantially less than the number of users in your service, this should scale very simply. You can even cache it locally in the same process as your API code, eliminating the need for a database server with multiple 9s of uptime.
#2 Opaque Tokens 🎫
Let's look at a secondary option, Opaque Tokens, now that we've examined the advantages and disadvantages of JWTs. Tokens that are opaque are exactly what they sound like. The opaque token is merely a primary key that leads to a database item that includes the information, rather than holding the user's identity and claims in it.
Redis and other fast key-value stores are ideal for exploiting in-memory hash tables for O(1) payload lookup. Roles can be updated because they are read straight from a database, and the user will see the new roles as soon as the changes propagate through your backend.
Of course, maintaining the key-value store and the auth server adds to the complexity. Each service must handshake with the auth server to obtain claims or roles, depending on your architecture.
The Reason Why Opaque Tokens are Great: 👍
The primary advantage of opaque tokens is their security. The resource server, or API, is the intended recipient of access tokens. A client may, however, ignore this rule and parse a token anyhow. Clients are prevented from developing logic based on the content of access tokens by utilizing opaque tokens.
The Reason Why Doesn’t People Use Opaque Tokens: 👎
Opaque tokens are simply a long string of characters that provide no information. A token must be validated by querying the identity provider if it is still valid and then returning the user details required by the service. This method of authenticating and exchanging tokens can be a bit "chatty," and it also necessitates a way to persist and load the tokens within the identity provider.
#3 A Combination 🤝
A combination of both approaches has yet to be discussed. You can use JWT to handle authentication, such as ensuring that the user is who they claim to be. The JWT, on the other hand, does not include authorization for specific resources. To put it another way, the JWT only handles authentication and not authorization.
Step 2: Choose – URL Parameter vs. Cookies vs. Local Storage
Second, the token must be stored somewhere by a client web application. URL Parameter, Cookies, and Local Storage are the three options that most people consider. In terms of security, each offers advantages and downsides.
URL Parameters 🔗
To begin with, we never recommend including a token in a URL. URLs are bookmarked, shared with friends, and posted on the internet, among other things. It is far too simple for a person to capture the URL of a website they enjoy and send it to a friend. The friend now has all of the necessary authentication credentials to sign in on behalf of that user. There are also a number of other issues to consider, such as the fact that most loggers will log the URL in plain text at the very least. It's a lot less probable that someone will open Chrome's developer tools and copy their cookie or local storage.

As a result, we're left with merely Cookies vs Local Storage.
If you're trying to build RESTful APIs, the Cookie is essentially the same as the Authorization Header. In reality, you could wrap the same JWT that would be sent in an Authorization Header in a cookie. Many pure RESTful APIs intended for external consumption just utilize a standard or custom permission header because it is more explicit. There can also be a combination, such as when a web application uses Cookies to communicate with a RESTful API behind a proxy. When relaying the request, the proxy will extract the Cookie and add the required headers.
Cookies 🍪
Cookies are useful because they feature security flags like HTTP Only and Secure that may be set to impose security checks. The cookie cannot be read by any Javascript code or sent in plain text over HTTP if the HTTP Only and Secure flags are set. As a result, the Cookie can be immune to Cross-Site Scripting (XSS) attacks. A Cross-Site Request Forgery (XSRF or CSRF) is a different form of attack that might affect cookies. XSRF indicates that a hacker on another site can duplicate an input form on your site and POST form data to ours.
Cookies are transferred with every HTTP request to your real domain that the cookie is valid for, even if the hacker does not have access to the cookie itself. As a result, the hacker does not need to read the cookie; all that is required is for the hacker to successfully POST form data to your real site.
This is one of the risks associated with cookies. They are sent with every request, whether static or AJAX. There are workarounds, but the basic principle is that your web server must be able to tell if the request came from your own website running in a browser or from someone else's. A hidden anti-forgery token is one approach to accomplish this.
One method is to create and store a unique random key in the cookie, which must be provided together with the POSTed form data. Due to the same-origin policy, only your legitimate site can access the cookie, while the hacker site cannot. Your server can then check to see if the token in the cookie matches the token in the form data. On XSRF, there are various protection solutions.
Local Storage 💾
Javascript can be vulnerable to Cross-Site Scripting (XSS) attacks, posing a security concern for local storage. XSS used to be caused by improperly escaping user input, but nowadays, your modern web application likely imports lots of JS libraries, ranging from analytics and attribution tracking to ads and minor UI elements.
Your website domain's local storage is worldwide. As a result, every JavaScript on your website, whether it uses a third-party library or not, has access to the same local storage. Within your application, there is no sandboxing. Your analytics library, for example, accesses and writes to the same local storage as your application code.
While GA is most likely fine, have you double-checked that quick UI element you added?
There was also a worry in the past if JavaScript made AJAX requests in plain text even if the page was secured by HTTPS. Now that browsers are enforcing mixed content checks, this isn't as much of a worry as it formerly was. Something to keep in mind if you're using an outdated browser or one that hasn't been enforced.
Another drawback of local storage is that it cannot be accessed from numerous subdomains. These sites can't read the local storage if you have a different blog or email subdomain. If you don't plan on signing in to too many domains, this may be sufficient.
Summary
Authentication confirms that you are who you say you are, whereas authorization checks if you have permission to access a given resource. When working with REST APIs, it's important to keep security in mind from the beginning.
GET (read), POST (create), PUT (replace/update), and DELETE (to delete a record) are frequently used in RESTful APIs. Not every resource collection, user, or action is a good fit for each of these options. Check that the incoming HTTP method for the session token/API key, as well as the resource collection, action, and record associated with it, are legitimate.
Monitor API Failures with Atatus
Monitoring API failures in production is very hard. You'll need tools like Atatus to figure out which APIs are failing, how often they're failing, and why they're failing.
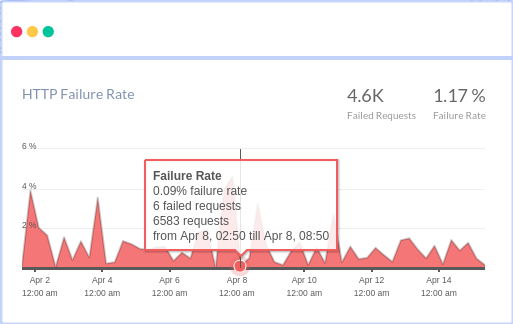
You can see the most common HTTP failures and get detailed information about each request, as well as custom data, to figure out what's causing the failures. You may also view how API failures are broken down by HTTP Status Codes and which end-users have the most impact.
#1 Solution for Logs, Traces & Metrics
![]() APM
APM
![]() Kubernetes
Kubernetes
![]() Logs
Logs
![]() Synthetics
Synthetics
![]() RUM
RUM
![]() Serverless
Serverless
![]() Security
Security
![]() More
More