Creating Tables Using React Table Library

Tables are an essential part of front-end development. Be it creating structured data or making data visualization easier for users including tables is almost essential. However, if you’re working with React often creating complex tables might provide you with insufferable stress as the process is quite complex and time-consuming.
Hence, instead of using only React to create tables the use of external libraries for table creation is often encouraged for react-developers. There are multiple open-source libraries with active community support that can help you create unique and interactive libraries for your React projects in no time!
Today we will discuss one of the most popular libraries in react react_table to help your build unique and interactive tables for your React projects.
Table of Contents
- React Table: Introduction and Features
- React Table Examples
- When to use & avoid react tables
- Challenges in implementing react_table
React Table: Introduction and Features
The react_table is a community-backed and open-source react library that allows developers to create unique and interactive tables in their web development projects. The library also sports multiple basic table-related functions that make sorting, filtering, customizing, and searching through tables easier for users. It helps developers in avoiding the hurdles of creating table functionalities from scratch.
Here are some of the amazing features of the react_table library that make it unique:
- The library offers basic features such as sorting, filtering, and searching to assist developers in crafting interactive tables.
- The
react_tablehelps you create infinitely long tables and provide support for the pagination feature to help you develop sensible tables. - With the use of the
react_tablelibrary, you can further edit row and column data and showcase and hide them according to your needs. - Lastly,
react_tablehelps you build device-friendly tables with scroll support functionality for improved interaction.
React Table Examples
Now that you’re familiar with the react_table library and know the versatile functionalities it offers its target users, it's for some action!!
Let’s look into some examples of how you can use react_table to create unique and interactive tables that assist users in enhanced data visualization.
Note: The examples below work on the assumption that you have created your react project using create-react-app. To build a react app that can use react_table you can follow the command below:
npx create-react-app react-table-demoAfter this, you’re all set to create unique react tables for your project.
Creating a simple react table with data
Before we begin a journey to master the react_table library and its features let’s start with a simplistic react table with data set that needs to be shown in the form of a table.
In this example, we will try to create a simple table that helps in mapping out cities, their temperature, and weather conditions respectively.
import React from "react";
import { useTable } from "react-table";

function table() {
  const data = React.useMemo(
    () => [
      {
        col1: "Brisbane",
        col2: "27",
        col3: "sunny",
      },
      {
        col1: "sydey",
        col2: "30",
        col3: "cold",
      },
      {
        col1: "London",
        col2: "23",
        col3: "rain",
      },
    ],
    []
  );

  const columns = React.useMemo(
    () => [
      {
        Header: "City",
        accessor: "col1",
      },
      {
        Header: "Temperature",
        accessor: "col2",
      },
      {
        Header: "Weather",
        accessor: "col3",
      },
    ],
    []
  );

  const { getTableProps, getTableBodyProps, headerGroups, rows, prepareRow } =
    useTable({ columns, data });

  return (
    <table {...getTableProps()}>
      <thead>
        {headerGroups.map((headerGroup) => (
          <tr {...headerGroup.getHeaderGroupProps()}>
            {headerGroup.headers.map((column) => (
              <th
                {...column.getHeaderProps()}
                style={{
                  borderBottom: "solid 3px white",
                  color: "grey",
                }}
              >
                {column.render("Header")}
              </th>
            ))}
          </tr>
        ))}
      </thead>
      <tbody {...getTableBodyProps()}>
        {rows.map((row) => {
          prepareRow(row);
          return (
            <tr {...row.getRowProps()}>
              {row.cells.map((cell) => {
                return (
                  <td
                    {...cell.getCellProps()}
                    style={{
                      padding: "10px",
                      border: "solid 1px",
                    }}
                  >
                    {cell.render("Cell")}
                  </td>
                );
              })}
            </tr>
          );
        })}
      </tbody>
    </table>
  );
}

export default table
Let’s look into the essential elements and functions of the code so that you can get an in-depth understanding of what’s happening in the code itself before we proceed into adding further functionalities.
useTable: assists in building a table instance with row and column as their basic feature.getTableProps: Helps resolve props required by the table wrapper with ease.GetTableBodyProps: It resolves props requested by the table body wrapper.prepareRow: It prepares a row for rendering and must be implemented on rows that are about to be displayedheaderGroups and rows: are the table data structures that are derived from rows and columns.
Sorting the react table with usesortby
Sorting is an essential function and it's often used in the react tables to help users easily arrange the table data for better usability. Let us use our above-mentioned table and further add a sorting functionality for each of its columns by using the default usesortby functionality.
import React from "react";
import { useState, useEffect } from "react";
import { useTable, useSortBy } from "react-table";

function sortingTable() {
  const data = React.useMemo(
    () => [
      {
        col1: "Brisbane",
        col2: "27",
        col3: "sunny",
      },
      {
        col1: "sydey",
        col2: "30",
        col3: "cold",
      },
      {
        col1: "London",
        col2: "23",
        col3: "rain",
      },
    ],
    []
  );

  const columns = React.useMemo(
    () => [
      {
        Header: "City",
        accessor: "col1",
      },
      {
        Header: "Temperature",
        accessor: "col2",
      },
      {
        Header: "Weather",
        accessor: "col3",
      },
    ],
    []
  );

  const { getTableProps, getTableBodyProps, headerGroups, rows, prepareRow } =
    useTable({ columns, data }, useSortBy);

  return (
    <table {...getTableProps()}>
      <thead>
        {headerGroups.map((headerGroup) => (
          <tr {...headerGroup.getHeaderGroupProps()}>
            {headerGroup.headers.map((column) => (
              <th
                {...column.getHeaderProps(column.getSortByToggleProps())}
                style={{
                  borderBottom: "solid 3px white",
                  color: "black",
                }}
              >
                {column.render("Header")}
                <span>
                  {column.isSorted ? (column.isSortedDesc ? "🔽" : "🔼") : ""}
                </span>
              </th>
            ))}
          </tr>
        ))}
      </thead>

      <tbody {...getTableBodyProps()}>
        {rows.map((row) => {
          prepareRow(row);
          return (
            <tr {...row.getRowProps()}>
              {row.cells.map((cell) => {
                return (
                  <td
                    {...cell.getCellProps()}
                    style={{
                      padding: "10px",
                      border: "solid 1px",
                    }}
                  >
                    {cell.render("Cell")}
                  </td>
                );
              })}
            </tr>
          );
        })}
      </tbody>
    </table>
  );
}

export default sortingTable;
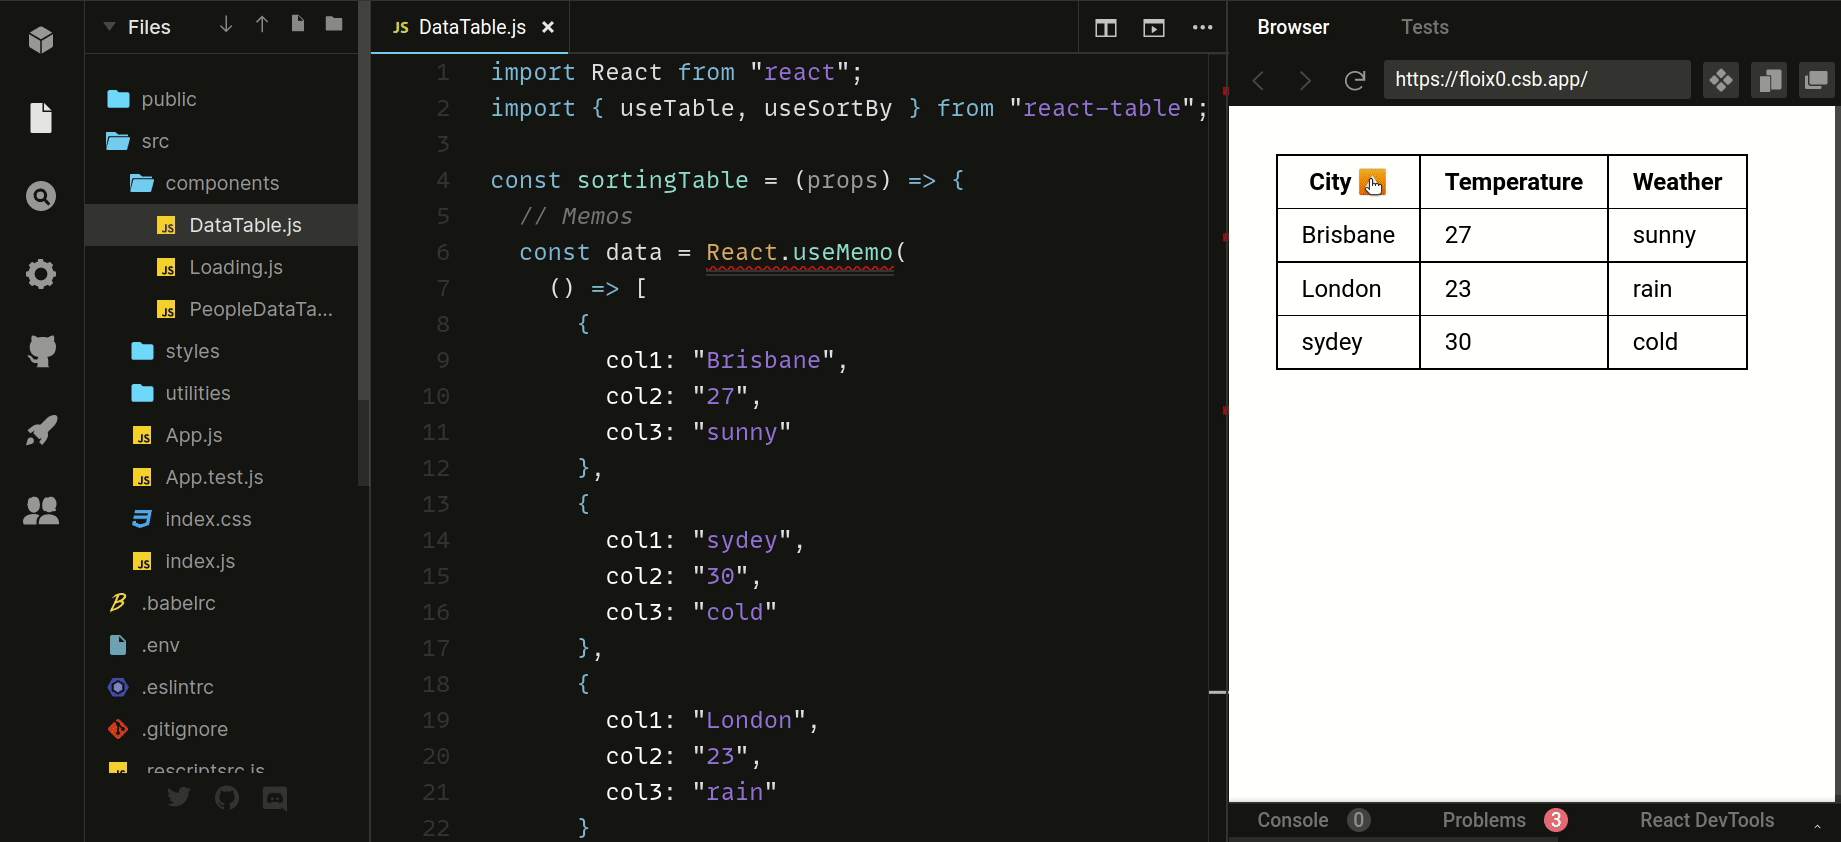
In this example the usesortby functionality as you can notice via the output allows users to sort the columns both in alphabetical and numerical order making the table interactive.
Filtering the table with usefilter
Filtering is yet another common functionality that is essential for making your table user-friendly and unique. There are two ways of filtering your table data usefilter and useGlobalfilter.
import React from "react";
import {
  useTable,
  useSortBy,
  useFilters,
  useGlobalFilter,
  useAsyncDebounce,
} from "react-table";

function GlobalFilter({
  preGlobalFilteredRows,
  globalFilter,
  setGlobalFilter,
}) {
  const temp = preGlobalFilteredRows.length;
  const [value, setValue] = React.useState(globalFilter);
  const onChange = useAsyncDebounce((value) => {
    setGlobalFilter(value || undefined);
  }, 200);

  return (
    <span>
      Search:{" "}
      <input
        value={value || ""}
        onChange={(e) => {
          setValue(e.target.value);
          onChange(e.target.value);
        }}
        placeholder={`${temp} records...`}
        style={{
          fontSize: "1.1rem",
          border: "0",
        }}
      />
    </span>
  );
}

// Define a default UI for filtering
function DefaultColumnFilter({
  column: { filterValue, preFilteredRows, setFilter },
}) {
  const temp = preFilteredRows.length;

  return (
    <input
      value={filterValue || ""}
      onChange={(e) => {
        setFilter(e.target.value || undefined); // Set undefined to remove the filter entirely
      }}
      placeholder={`Search ${temp} records...`}
    />
  );
}

function Example() {
  const data = React.useMemo(
    () => [
      {
        col1: "Sydey",
        col2: "27",
        col3: "rain",
        col4: "739",
        col5: "90",
      },
      {
        col1: "London",
        col2: "30",
        col3: "sunny",
        col4: "740",
        col5: "87",
      },
      {
        col1: "Dallas",
        col2: "23",
        col3: "sunny",
        col4: "743",
        col5: "77",
      },
      {
        col1: "Seattle",
        col2: "34",
        col3: "sunny",
        col4: "738",
        col5: "40",
      },
      {
        col1: "Warsaw",
        col2: "25",
        col3: "Cold",
        col4: "739",
        col5: "88",
      },
    ],
    []
  );

  const columns = React.useMemo(
    () => [
      {
        Header: "City",
        accessor: "col1", // accessor is the "key" in the data
      },
      {
        Header: "Temperature",
        accessor: "col2",
      },
      {
        Header: "Weather Forecast",
        accessor: "col3",
      },
      {
        Header: "Pressure",
        accessor: "col4",
      },
      {
        Header: "Humidity",
        accessor: "col5",
      },
    ],
    []
  );

  const defaultColumn = React.useMemo(
    () => ({
      // Let's set up our default Filter UI
      Filter: DefaultColumnFilter,
    }),
    []
  );

  const {
    getTableProps,
    getTableBodyProps,
    headerGroups,
    rows,
    prepareRow,
    state,
    visibleColumns,
    preGlobalFilteredRows,
    setGlobalFilter,
  } = useTable(
    {
      columns,
      data,
      defaultColumn, // Be sure to pass the defaultColumn option
    },
    useFilters,
    useGlobalFilter,
    useSortBy
  );

  return (
    <div>
      <table {...getTableProps()} style={{ border: "solid 1px black" }}>
        <thead>
          {headerGroups.map((headerGroup) => (
            <tr {...headerGroup.getHeaderGroupProps()}>
              {headerGroup.headers.map((column) => (
                <th
                  {...column.getHeaderProps(column.getSortByToggleProps())}
                  style={{
                    borderBottom: "solid 3px red",
                    color: "black",
                  }}
                >
                  {column.render("Header")}
                  <span>
                    {column.isSorted ? (column.isSortedDesc ? "🔽" : "🔼") : ""}
                  </span>
                  <div>{column.canFilter ? column.render("Filter") : null}</div>
                </th>
              ))}
            </tr>
          ))}
          <tr>
            <th
              colSpan={visibleColumns.length}
              style={{
                textAlign: "left",
              }}
            >
              <GlobalFilter
                preGlobalFilteredRows={preGlobalFilteredRows}
                globalFilter={state.globalFilter}
                setGlobalFilter={setGlobalFilter}
              />
            </th>
          </tr>
        </thead>
        <tbody {...getTableBodyProps()}>
          {rows.map((row) => {
            prepareRow(row);
            return (
              <tr {...row.getRowProps()}>
                {row.cells.map((cell) => {
                  return (
                    <td
                      {...cell.getCellProps()}
                      style={{
                        padding: "10px",
                        border: "solid 1px gray",
                      }}
                    >
                      {cell.render("Cell")}
                    </td>
                  );
                })}
              </tr>
            );
          })}
        </tbody>
      </table>
    </div>
  );
}

export default Example;

usefilter: It allows users to filter a specific column in which it is assigned.useGlobalfiler: It’s implemented all over the table and helps in filtering data from the overall table.
However, both methods are useful, and choosing one ultimately depends on your usability needs. Let’s again refer to the previous example and add a few more columns to it so that we can filter through the data with both the hooks mentioned.
Here’s how you can use both usefilter and useGlobalfilter to create effective filter functionality.
When to use & avoid react tables
Now that you can effectively access all the major functionalities of react_tables you can easily make decent tables using the library. However, react_tables offers its own perks and drawbacks which while making them a perfect fit for certain situations can also lead to confusing results in other cases.
Here are the scenarios where adapting to react table library can be of great aid:
- When you need a table with simple functionalities
- For creating tables with custom designs
- For implementing tables that need extensible features.
However, if your table needs the functionalities mentioned below it is best to steer clear of them:
- If your table needs support for both touch and non-touch devices.
- If you’re planning to build a very long table looking for an alternative would be much better. option as in such cases using react_table might negatively affect your performance.
Challenges in implementing react_table
The react_table library is a perfect fit for developers trying to create functional tables however it comes with its own drawbacks which you should be mindful of while working with it. Here are some of the challenges of using the react_table library:
- Scrolling: Although
react_tablesupports scroll functionality, in the case of thecustom-widthtable where you might need a custom scrollbar whose implementation can be tricky if you are using thereact_tablelibrary. - Responsiveness: To make a
react_table-basedtable UI responsive you’ll have to customize its layout for smaller screen sizes which can be a time-consuming and tiring process. Dynamic Column Width: Thereact_tablelibrary does not support the dynamic width setup functionality. It can be very tricky to achieve this and often causes UI glitches as well.
Final Words on React Table Implementation
From the discussion above you are now all set to create amazing tables in your react projects without breaking a sweat. The react_table library provides an all-around feature and functionalities to help developers with creating simple and interactive tables.
However with issues such as dynamic column width and custom scrolling they might not be a universal fit for every time you need a table in your react UI.
So it's always a good idea to access the table requirements before you implement react_table. Hope this helped make the process of react-based table creation a breezy journey
React Performance Monitoring with Atatus RUM
Visualize React errors and performance issues influencing your end-user experience. With React performance monitoring of Atatus you can identify and resolve problems faster with in-depth data points that assist you in analyzing and resolving them.
Using Atatus, you can get an overview of how your customers experience your React app. Learn how to identify the root cause of a slow load time, route change, and more on the front end by identifying performance bottlenecks in the front end.
Ensure that your React app sends all XHR requests. Monitoring and measuring the response times and failure rates of XHR calls. Optimize AJAX request performance by identifying slow and failed calls. Analyze AJAX calls in real time based on the browser, the user, the version, the tag, and other attributes.
Identify the reasons behind bad front-end performance and slow page loading that are impacting your customers. Inspect individual users who are experiencing poor performance because of slow pages, React exceptions or a failing AJAX method.
Identify how your end users' experience is impacted by the network or geography. In addition to identifying slow React assets, long load times, and errors in sessions, session traces provide a waterfall view of the session.
Take a closer look at your React app's performance with Atatus. To get started activate Atatus free-trial for 14 days!
#1 Solution for Logs, Traces & Metrics
![]() APM
APM
![]() Kubernetes
Kubernetes
![]() Logs
Logs
![]() Synthetics
Synthetics
![]() RUM
RUM
![]() Serverless
Serverless
![]() Security
Security
![]() More
More