Two-Factor Authentication(2FA) using Speakeasy
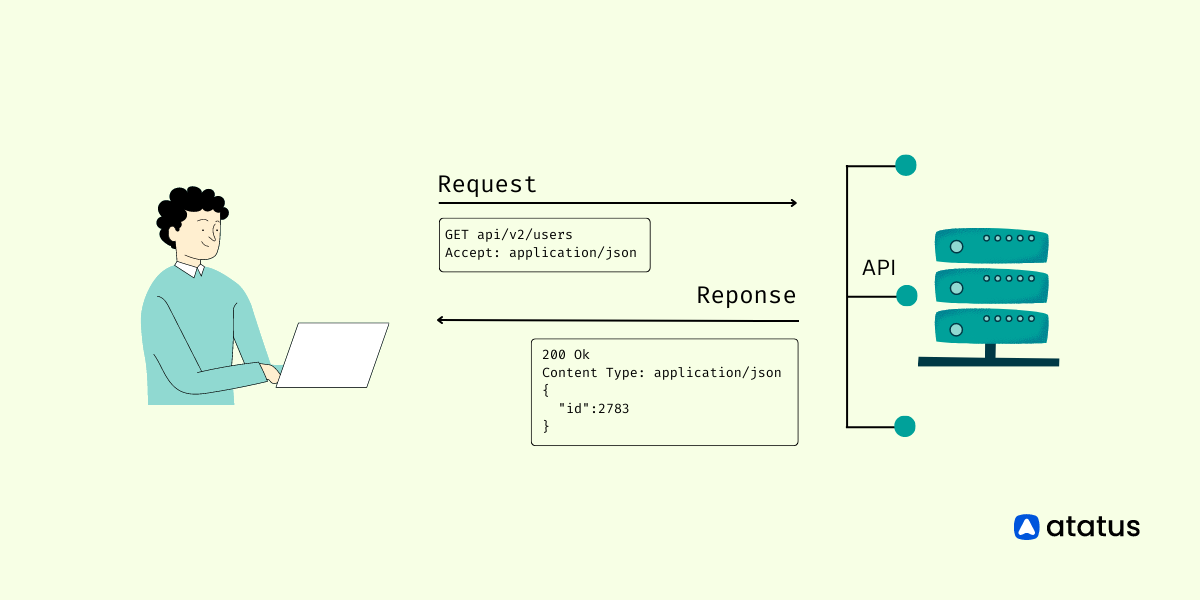
Normally, you must submit a password in order to log into an application. In the case of two-factor authentication, you must also provide a one-time temporary password (also known as a token) in addition to your regular password. You can get this OTP in a variety of ways. The different varieties of 2FA are determined by how the OTP is provided. The OTP can be sent via email, SMS, as a software token using applications such as Google Authenticator, or as a hardware token. TOTPs(Time-Based OTP) are commonly used to refer to OTPs generated by software and hardware tokens.
We'll learn how to authenticate using the Speakeasy library in this article. We'll also learn how to use a token issued by the Google Authenticator application to implement two-factor authentication on the backend.
- Introduction
- Set Up First
- Install Dependencies
- Setting Up the Application
- The node JSON Database
- Using Postman to Send Requests
- Generating the Secret Key
- Verify Two-Factor Authentication Secret
- Verify User Tokens
#1 Introduction
Two-factor authentication (2FA) is an additional layer of account security that I strongly advise everyone to set up. Unlike typical username/password authentication, 2FA asks the user to submit an additional piece of personal information. The most well-known version of 2FA, for example, involves the end-user answering a security question. If the end-user created the security question, they should be able to answer it without difficulty.
It could be a security question:
- What is your mother's maiden name?
- What was the name of the first animal you ever had as a companion?
- What was the name of the town where you were born and raised?
The Speakeasy library uses a One-Time Password(OTP) for two-factor authentication. The library adds an extra layer of protection to the normal authentication procedure in an application. Speakeasy gives extra data required for account access using the OTP.
Here's where you can learn more about the Speakeasy library.
#2 Set Up First
Let's start by utilizing the init command to set up our application.
npm init -yThe command will generate a package.json file containing the project's metadata.
{
    "name": "two-factor-auth",
    "version": "1.0.0",
    "description": "",
    "main": "index.js",
    "scripts": {
        "test": "echo \"Error: no test specified\" && exit 1",
        "start": "nodemon start"
    },
    "keywords": [],
    "author": "mia-roberts",
    "license": "ISC",
    "dependencies": {
        "express": "^4.17.1",
        "node-json-db": "^1.3.0",
        "speakeasy": "^2.0.0",
        "uuid": "^8.3.2"
    }
}
#3 Install Dependencies
Our application will require some project-specific requirements when it has been set up.
The following are some of the dependencies:
- As the backend server, express is used
- uuid generates a universally unique user identifier (userId)
- To save the data as JSON, we'll use node-json-db as our database
- For authentication, use the speakeasy library
- As a development dependency, we'll use nodemon
We won't have to restart our application every time we make a change using nodemon.
npm install --save express nodemon speakeasy uuid node-json-db#4 Setting Up the Application
We'll start by setting up our server. Our server will execute on the index.js file, which is the application's entry point.
As a result, we add the following code to the index file:
const express = require('express')

const app = express();
const PORT = process.env.PORT || 5000
app.use(express.json())
We add our dependencies to the index.js file after we've set up the server.
The uuid will generate a unique userId, and the node-json-db will store the userId as well as the secret connected with it in a database.
// add the speakeasy library
const speakeasy = require('speakeasy')

// add the uuid dependacy
const uuid = require('uuid')

// add node-json-db
const { JsonDB } = require('node-json-db')
const { Config } = require('node-json-db/dist/lib/JsonDBConfig')
#5 The node JSON Database
The node-json-db module will be used to store user records in JSON format in our application.
To learn more about node-json-db, click here.
As stated in the node-json-db documentation, we will add the following script to initialize the node-json-db:
const db = new JsonDB(new Config("DataBase", true, false, '/'));- new Config() - Generates a database configuration for node-json-db
- DataBase - Defines the JSON storage file's name
- true - Instructs the database to save each time a push is made
- false - Tells the database to save the data in a machine-readable format
- / - When accessing our database values, the separator to utilize
#6 Using Postman to Send Requests
We will use Postman to send requests to the backend of our application because it does not have a frontend.
Postman is a web application that handles requests that would otherwise be handled by HTML.
We'll utilise three routes in Postman: /signup, /verify, and /validate.
Now we'll make the following URLs:
- Register: http://localhost:5000/api/signup
- Verify: http://localhost:5000/api/verify
- Validate: http://localhost:5000/api/validate
#7 Generating the Secret Key
Creating a key to link the server and the application that will produce the two-factor authentication codes is the first step in establishing two-factor authentication. To enable two-factor authentication, we need to add a route that creates a user and returns the user ID as well as a key. We'll utilize the generateSecret function in Speakeasy to accomplish this. This method returns an object containing the secret in the following formats: ascii, hex, base32, and otpauth_url.
We presume that a user is authenticated using his or her userId in this application. As a result, we disregard any other user identification information.
In the Database.json file, we'll register users and save their userId together with the secret-key generated by the speakeasy. The registration procedure starts with a POST request to the index.js file's /signup route.
We then generate a unique user ID and a temporary secret key for that user ID using uuid. The userId and secret_key are then saved in the node-json-db.
The following is the process's code:
app.post('/api/signup', (request, response) => {

    const userId = uuid.v4()

    try {

        const path = `user/${userId}`
        const tempSecret = speakeasy.generateSecret()
        db.push(path, {
            userId,
            tempSecret
        })

        // we only need the base32
        response.json({
            userId,
            secret: tempSecret.base32
        })

    } catch (error) {
        console.log(error)
        response.status(500).json({
            message: 'Error generating the secret'
        })
    }
})
After adding this code, we can use Postman to send a request to this endpoint to generate a secret. We should receive an id and secret information.
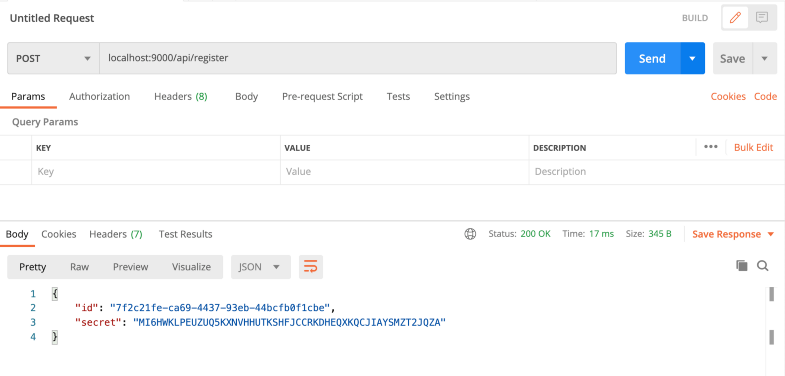
Enter the key you just received into your Google Authenticator app which you can get from the Google Play Store for Android and the App Store for iOS.
#8 Verify Two-Factor Authentication Secret
We need to verify the secret key after we've entered it into the authenticator application so we can use it to produce codes. We kept the secret as a temporary secret, as you can see. We can proceed to permanently keep it after confirmation.
To complete the verification, we'll need to develop an endpoint that gets the authenticator app's user ID and a code. The endpoint then compares these to the temporary secret saved in the endpoint, and if everything checks out, we save the secret permanently:
app.post("/api/verify", (request, response) => {

    const { userId, token } = req.body;

    try {
        // Retrieve user from database
        const path = `/user/${userId}`;
        const user = db.getData(path);
        console.log({
            user
        })

        const { base32: secret } = user.temp_secret;

        const verified = speakeasy.totp.verify({
            secret,
            encoding: 'base32',
            token
        });

        if (verified) {

            // Update user data
            db.push(path, {
                id: userId,
                secret: user.tempSecret
            });

            res.json({
                verified: true
            })

        } else {
            res.json({
                verified: false
            })
        }
    } catch (error) {
        console.error(error);
        res.status(500).json({
            message: 'Error retrieving user'
        })
    };
})
Retrieve the code from your two-factor authentication application so we can check the secret with a Postman request.

The secret key is saved permanently after verification and is used to validate future codes.
#9 Verify User Tokens
Verifying the codes that the user provides from their authenticator application is the final step in two-factor authentication. Another route must be added to ensure that the tokens entered by the user are valid. The user ID and token will be sent to this endpoint, which will then validate the token against the permanently stored secret. The Speakeasy TOTP(Time Based One Time Password) verify function handles the verification.
The secret, the encoding to use to verify the token, the token, and a window option are all received in this object. A token's validity window is the amount of time it is valid for. This is normally 30 seconds, however, it might vary based on the time chosen by the two-factor process's developer.
During verification, the window settings describe how many windows to crosscheck the token against before and after the current one. If the number of windows is increased, the user can still be confirmed even if the token is entered a few seconds late. You must be careful not to provide an excessively large window allowance, as this will make the verification procedure less secure.
Let's add the validate tokens endpoint:
app.post("/api/validate", (request, response) => {
const { userId, token } = req.body;
try {
// Retrieve user from database
const path = `/user/${userId}`;
const user = db.getData(path);
console.log({
user
})
const { base32: secret } = user.secret;
// Returns true if the token matches
const isTokenValid = speakeasy.totp.verify({
secret,
encoding: 'base32',
token,
window: 1
});
if (isTokenValid) {
res.json({
validated: true
})
} else {
res.json({
validated: false
})
}
} catch (error) {
console.error(error);
res.status(500).json({
message: 'Error retrieving user'
})
};
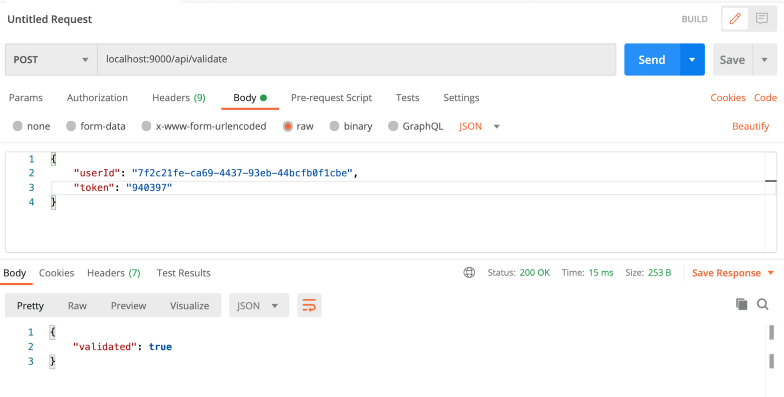
})Let's acquire a new code from the authenticator application, which we can check with Postman.
That concludes the discussion.
Two-factor authentication has been successfully implemented. We learned how to construct a shared secret between your server and an authenticator application, verify the secret, and use it to validate tokens in this article. This is what the index.js file should look like in its entirety:
const express = require("express");
const bodyParser = require('body-parser');
const JsonDB = require('node-json-db').JsonDB;
const Config = require('node-json-db/dist/lib/JsonDBConfig').Config;
const uuid = require("uuid");
const speakeasy = require("speakeasy");
const app = express();
const dbConfig = new Config("myDataBase", true, false, '/')
const db = new JsonDB(dbConfig);

app.use(bodyParser.json());
app.use(bodyParser.urlencoded({
    extended: true
}));

app.get("/api", (req, res) => {
    res.json({
        message: "Welcome to the two factor authentication exmaple"
    })
});

app.post("/api/signup", (req, res) => {
    const id = uuid.v4();

    try {
        const path = `/user/${id}`;
        // Create temporary secret until it it verified
        const tempSecret = speakeasy.generateSecret();
        // Create user in the database
        db.push(path, {
            id,
            tempSecret
        });
        // Send user id and base32 key to user
        res.json({
            id,
            secret: tempSecret.base32
        })
    } catch (e) {
        console.log(e);
        res.status(500).json({
            message: 'Error generating secret key'
        })
    }
})
app.post("/api/verify", (req, res) => {

    const { userId, token } = req.body;

    try {
        // Retrieve user from database
        const path = `/user/${userId}`;
        const user = db.getData(path);
        console.log({
            user
        })

        const { base32: secret } = user.tempSecret;
        const verified = speakeasy.totp.verify({
            secret,
            encoding: 'base32',
            token
        });

        if (verified) {
            // Update user data
            db.push(path, {
                id: userId,
                secret: user.tempSecret
            });
            res.json({
                verified: true
            })
        } else {
            res.json({
                verified: false
            })
        }

    } catch (error) {
        console.error(error);
        res.status(500).json({
            message: 'Error retrieving user'
        })
    };
})

app.post("/api/validate", (req, res) => {

    const { userId, token } = req.body;

    try {
        // Retrieve user from database
        const path = `/user/${userId}`;
        const user = db.getData(path);
        console.log({ user })

        const { base32: secret } = user.secret;

        // Returns true if the token matches
        const isTokenValid = speakeasy.totp.verify({
            secret,
            encoding: 'base32',
            token,
            window: 1
        });

        if (isTokenValid) {
            res.json({
                validated: true
            })
        } else {
            res.json({
                validated: false
            })
        }
    } catch (error) {
        console.error(error);
        res.status(500).json({
            message: 'Error retrieving user'
        })
    };
})

const port = 9000;
app.listen(port, () => {
    console.log(`App is running on PORT: ${port}.`);
});
Conclusion
If they have two-factor authentication set up, we give them an input to enter a code that we submit to the server with their login credentials for validation. While we looked at utilizing an authenticator app for two-factor authentication, Speakeasy can also generate codes and send them to the user over SMS for verification.
Speakeasy makes adding two-factor authentication to your applications a breeze. Build a user interface that allows users to sign up with a username and password, as well as the ability to enable two-factor authentication and scan a QR code to connect to a two-factor authentication app.
This article's code is available on GitHub.
Leave us a comment on the below comment section regarding the article.
Monitor Your Entire Application with Atatus
Atatus provides a set of performance measurement tools to monitor and improve the performance of your frontend, backends, logs and infrastructure applications in real-time. Our platform can capture millions of performance data points from your applications, allowing you to quickly resolve issues and ensure digital customer experiences.

Atatus can be beneficial to your business, which provides a comprehensive view of your application, including how it works, where performance bottlenecks exist, which users are most impacted, and which errors break your code for your frontend, backend, and infrastructure.
#1 Solution for Logs, Traces & Metrics
![]() APM
APM
![]() Kubernetes
Kubernetes
![]() Logs
Logs
![]() Synthetics
Synthetics
![]() RUM
RUM
![]() Serverless
Serverless
![]() Security
Security
![]() More
More