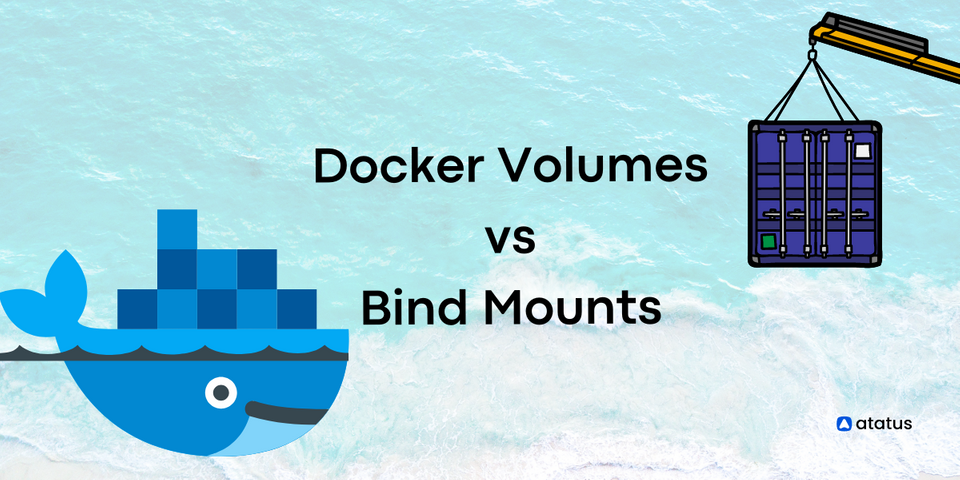
Docker: Volumes Vs Bind Mounts
The Docker environment provides loose isolation between your applications and your host machine because it containerizes your applications.
In other words, this implies that your application operates in a container independently of your host computer in order to achieve its intended results.
Docker containers have a writable layer on top that allows you to modify the contents of the container while it is running.
However, the container lifecycle dictates how these changes are made. Deleted containers don't retain their changes unless they're stopped.
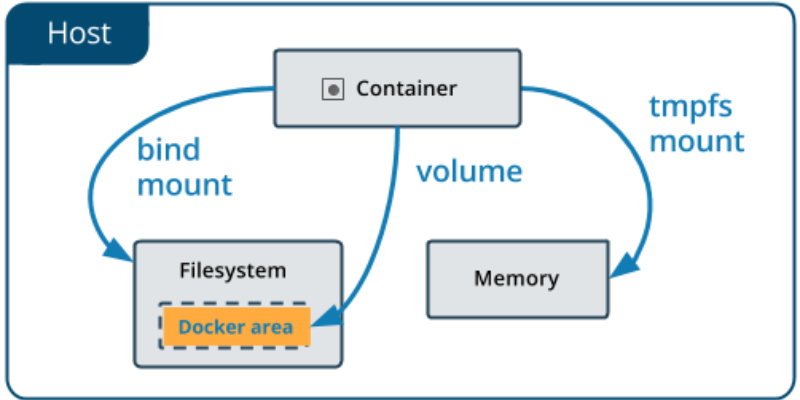
Volumes function as file storage locations as well but are driven in the same way as resources by Docker. As opposed to Bind Mounts, volumes do not need to be associated with containers at the creation time.
Compared to Bind Mounts, Volumes are more flexible and have more features, making them the most recommended option.
In your container, Bind Mount provides you access to local file/directory storage on your local machine. This means that any changes you make inside the docker container will be mirrored inside the outside container (file/directory).
Table Of Contents
- What are Docker Volumes?
- What are Bind Mounts?
- Volumes vs Bind Mounts
- Volumes Usage
- Bind Mounts Usage
What are Docker Volumes?
Docker is used for creating and managing the container. The volume can be created explicitly using the docker volume create command, or it can be created automatically by Docker when a container or service is created.
The Docker host stores volumes in a directory when you create them. The directory in this path is mounted when you mount the volume into a container. Docker manages volumes and isolates them from the host machine's core functionality in a similar way to bind mounts.
There is no limitation to the number of containers a volume can be mounted in simultaneously. Docker does not automatically remove volumes when no running container uses them. By using docker volume prune, unused volumes can be removed.
An anonymous volume or a named volume can be mounted. A Docker host gives anonymous volumes a random name that is guaranteed to be unique within that host when they are mounted into a container.
The behavior of a named and anonymous volume does not differ based solely on their names. Besides supporting volumes, volume drivers enable you, among other things, to store data remotely.
What are Bind Mounts?
Docker has offered this feature ever since its inception. There is less functionality available with binding mounts compared to volumes. Bind mounts mount files and directories from the host machine into the container.
In this case, the full path to the file or directory on the host machine should be used. You do not need to have already created the file or directory on the Docker host. If it does not exist already, it is created on demand.
It's very fast to mount files via bind mounts, but they require a specific directory structure in the host's file system.
If you're creating Docker applications, you might want to consider using named volumes. Bind mounts cannot be managed directly using Docker CLI commands.
Volumes vs Bind Mounts
Some of the major difference between volumes and bind mounts are listed here:
| Volumes | Bind Mount |
| Easy backups and recoveries | There is a bit of complexity involved in backup and recovery. You don't have to worry about it if you know what folders to backup |
| To mount it, you only need the volume name. Paths are not required. | It is necessary to provide a path to the host machine when mounting with bind mounts. |
| Containers can have volumes created while they are being created. | The mount folder will be created when the host machine doesn't contain the folder. |
| There are APIs and CLIs for interacting with Docker volumes. | Using CLI commands, you cannot access bind mounts. The host machine still allows you to work with them instantly. |
The volumes are stored in /var/lib/docker/ volumes.
|
A bind mount can reside anywhere on a host computer. |
Volumes Usage
In addition, Docker can create a volume during the creation of containers and services when you run the docker volume create command.
Creating and managing a volume
In contrast to bind mounts, volumes can be created and managed externally.
Create a volume
A Docker volume can be created and managed outside of a container by using the following command.
$ docker volume create [volume_name]A directory for the volume is automatically created under the /var/lib/docker/volume/path folder by Docker on the host.
Mount this volume on a container so that multiple containers can share and persist data.
List the volumes
To list the volumes, run the following command.
$ docker volume listYou will see a list of volumes, specified by their location and their name, in the output.
Inspect a volume
To inspect a volume, run the following command.
$ docker volume inspect [volume_name]There is also a directory listed under the mount point path that contains everything stored within the data volume under the mount point path, including the location on the host (mount point).
The mounting of a data volume
In the docker run command, add the --mount flag to mount a data volume to a container. This command adds the volume to the specified container in which the data will be stored, allowing the data to be created inside the virtual environment. When mounting a data volume to a container, use the following syntax.
docker run --mount source=[volume_name],destination=[path_in_container] [docker_image]It is also auto-saved on the host's data volume for everything in that directory.
Remove a volume
When deleting a Docker volume, its name must be specified. You can remove a volume by using the following command syntax.
$ docker volume rm [volume_name]Currently, Docker does not remove volumes if they are not in use. The container responds with an error if there is a container with the volume specified.
All volumes can be deleted at once
Here's how to delete all unused Docker volumes:
$ docker volume pruneStart a container using Volume
A Docker container that starts with a newly created volume is created by Docker. The container mounts myvol2 as /app/, as shown in the following example.
The same results are produced by -v and --mount. Unless both the container and the volume are removed after the first test runs, the devtest container and myvol2 volume cannot be run simultaneously.
--mount
 $ docker run -d \
    --name devtest \
    --mount source=myvol2,target=/app \
    nginx:latest
-v
 $ docker run -d \
    --name devtest \
    -v myvol2:/app \
     nginx:latest
Use Docker to inspect devtest and ensure the volume is mounted correctly. This is where you can find the Mounts section:
"Mounts": [{
  "Type": "volume",
  "Name": "myvol2",
  "Source": "/var/lib/docker/volumes/myvol2/_data",
  "Destination": "/app",
  "Driver": "local",
  "Mode": "",
  "RW": true,
  "Propagation": ""
}],
This shows that the mount is read-write, has the correct source and destination, and shows that the mount is a volume.
Remove the volume from the container and stop it. You must remove the volume separately.
$ docker container stop devtest$ docker container rm devtest$ docker volume rm myvol2Bind Mounts Usage
It is important to make sure that the file systems are mounted in the correct order when using the bind option of the mount command. As an example, the bind mount on /tmp must occur before the /var/log directory is mounted:
# mount --bind /var/log /tmpStart a container with a bind mount
In the case of a directory source, the artifacts are saved into another directory source/target when you build the source code. Whenever you build the source on your development host, you want to make the artifacts available to the container at /app/.
For the target/ directory to be bind-mounted into your container at /app/, run the following command. The command should be run from within the source directory. When running the $(pwd) subcommand on Linux or macOS, the current working directory is expanded.
In the examples below, the results are the same for both --mount and -v. The devtest container needs to be removed after running the first one in order to run the second one.
--mount
 $ docker run -d \
    --name devtest \
    --mount source=myvol2,target=/app \
    nginx:latest
-v
$ docker run -d \
    --name devtest \
    -v myvol2:/app \
    nginx:latest
You can verify the bind mount was created correctly by using docker inspect devtest. The Mounts section can be found here:
"Mounts": [{
  "Type": "bind",
  "Source": "/tmp/source/target",
  "Destination": "/app",
  "Mode": "",
  "RW": true,
  "Propagation": "rprivate"
}],
It is clear that this is a bind mount, the source and destination are correct, the mount is read-write, and the propagation is rprivate.
The container should be stopped by:
$ docker container stop devtest$ docker container rm devtestFinal Thoughts
Despite the similarities, there are slight differences between the two methods. In most cases, Docker is not affected by the running of other processes on the same host since it manages volumes.
On the contrary Bind Mounts are simply a directory on the host filesystem that can be modified by any process other than Docker. It's important to note that both solutions have a lifecycle that has nothing to do with container lifecycles.
In addition, volumes can be shared more securely among containers, since they only need to be confined in a single directory ($HOME/docker/volumes) and are operated by Docker itself.
Cloud providers or remote hosts are also alternatives for storing volumes. Volumes can be managed using both the Docker CLI and Docker API, and new volumes can be pre-populated from containers.
The volumes are also compatible with both Linux and Windows, so they are a great choice for teams utilizing both operating systems.
Atatus : Infrastructure Monitoring
Identify and resolve performance issues that affect your business by having complete visibility into your infrastructure with Atatus’s Infrastructure monitoring. Improve efficiency by correlating application metrics, logs and traces to troubleshoot problems faster.
Track the availability of the servers, hosts, virtual machines and containers with the help of Atatus Infrastructure Monitoring. It allows you to monitor, quickly pinpoint and fix the issues of your entire infrastructure.
In order to ensure that your infrastructure is running smoothly and efficiently, it is important to monitor it regularly. By doing so, you can identify and resolve issues before they cause downtime or impact your business.
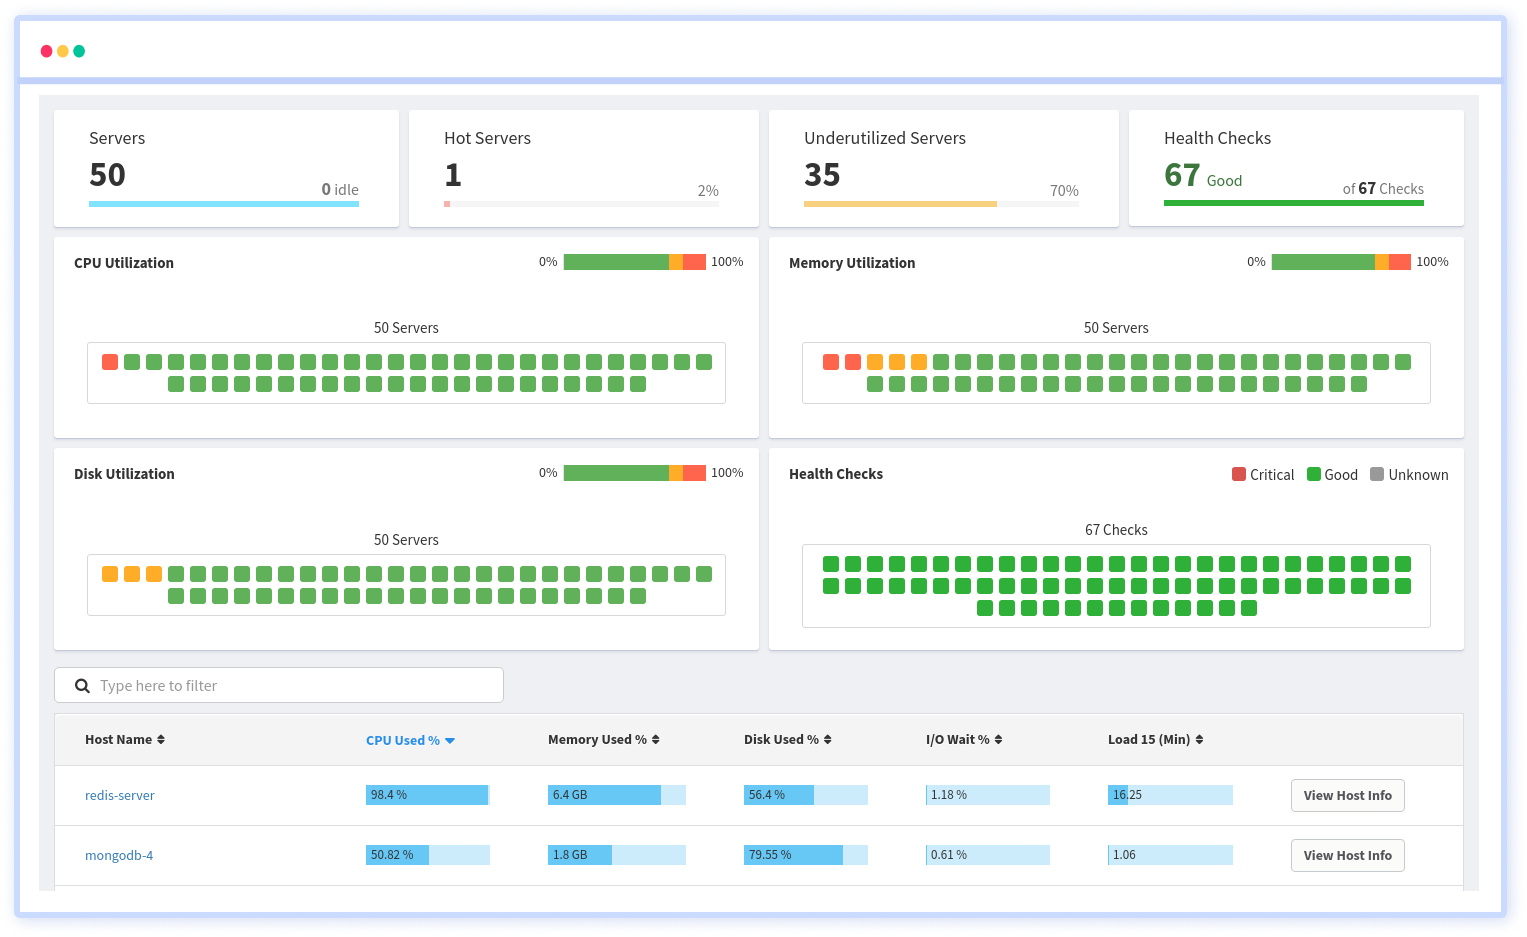
Your server and container utilization is summarized in one place, including CPU, memory, disk, and network usage. Monitoring the health (uptime) of your servers' apps or services can be accomplished through health checks. Be notified with every impact on the services.
It is possible to determine the host, container, or other backend component that failed or experienced latency during an incident by using an infrastructure monitoring tool. In the event of an outage, engineers can identify which hosts or containers caused the problem.
As a result, support tickets can be resolved more quickly and problems can be addressed more efficiently.
Get your app running faster and bug-free with Atatus, get started with a 14-day free trial!
#1 Solution for Logs, Traces & Metrics
![]() APM
APM
![]() Kubernetes
Kubernetes
![]() Logs
Logs
![]() Synthetics
Synthetics
![]() RUM
RUM
![]() Serverless
Serverless
![]() Security
Security
![]() More
More