How to Keep Your ReactJS Code Clean and Swift
ReactJS is a popular frontend Java library used for creating user interfaces. It works based on a declarative program model, wherein the developer gets to specify what the UI should look like.
Apart from this, ReactJS uses a virtual DOM, which allows us to update only the required components when needed. This saves us the rendering time.
ReactJS is commonly used along with Redux (for React state management), React Router, and Axios (for making HTTP Requests) for seamless working.
Reactjs is a fantastic technology that makes creating user interfaces as simple as possible. Creating user-friendly UIs is a breeze thanks to its powerful and flexible logic structure.
We will now look for ways to maintain our ReactJS applications clean and structured to make the most out of its features.
Table Of Contents
- What is a Clean Architecture?
- Importance of writing a clean ReactJS code
- Clean Code in ReactJS: Best Practices
- Write a Clean React code
- Clean up your Data
- Testing is key!
- Use consistent naming conventions
- Follow the Single Responsibility Principle (SRP)
- Keep your components small and focused
- Use state and props appropriately
- React Monitoring with Atatus
- Make use of Error boundaries
- Employ a Logging package
- Strategize the Deployment process
What is a Clean Architecture?
Clean Architecture is a software design pattern that emphasizes separation of concerns and maintainability of code. It was introduced by Robert C. Martin (also known as Uncle Bob) in his book, "Clean Architecture: A Craftsman's Guide to Software Structure and Design".
Clean Architecture is based on the SOLID principles of object-oriented design, which are:
- Single Responsibility Principle (SRP)
- Open-Closed Principle (OCP)
- Liskov Substitution Principle (LSP)
- Interface Segregation Principle (ISP)
- Dependency Inversion Principle (DIP)
The main idea behind Clean Architecture is to separate the business logic from the technical details and infrastructure of the application. This is achieved through multiple layers of abstraction and decoupling, which allows for easier testing, maintenance, and scalability of the codebase.
In Clean Architecture, the application is divided into four layers:
- Entities: This layer contains the business logic and domain-specific models of the application.
- Use Cases: This layer contains the application-specific use cases or business processes that operate on the entities.
- Interface Adapters: This layer contains the adapters that convert data from the infrastructure to the format required by the use cases.
- Infrastructure: This layer contains the external frameworks, databases, and other infrastructure components that the application uses.
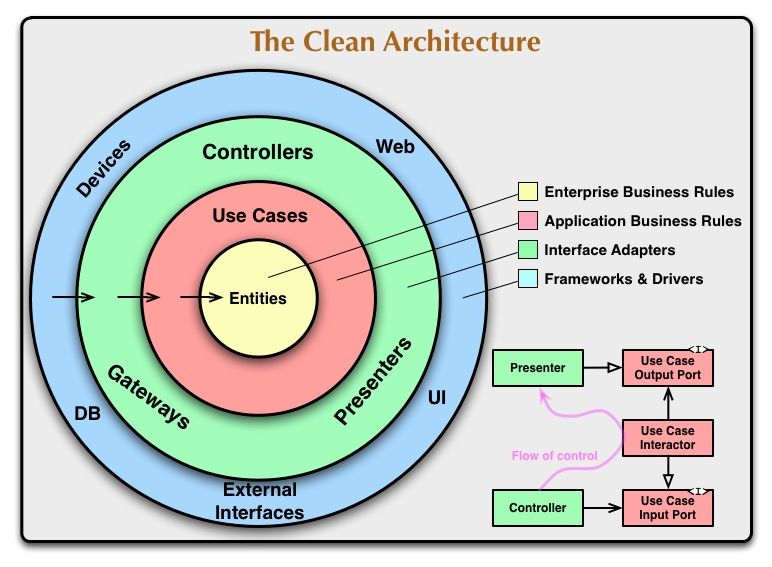
The layers are arranged in a hierarchical fashion, with the innermost layer (Entities) being the most important and stable, while the outermost layer (Infrastructure) being the most volatile and changeable.
Clean Architecture emphasizes important software design principles like modularity, encapsulation, and separation of concerns. This results in code that is easier to maintain, test, and evolve in the long run.
Importance of writing a clean ReactJS code
A clean ReactJS app refers to a well-organized and maintainable codebase that follows best practices and is easy to understand, update, and scale. In a clean ReactJS app, the code is structured in a logical and consistent manner, making it easy for developers to navigate and work with.
A clean ReactJS would ideally possess a modular structure with consistent code style in terms of naming conventions, formatting, documentation, etc. The app should be optimized for performance by using techniques such as code splitting and lazy loading to reduce the initial load time of the app.
When developing applications in ReactJS, it's crucial to write clean and organized code. Clean code not only makes your codebase more manageable and easier to understand, but it also improves the performance and maintainability of your application.
Here are some of the key reasons why you should prioritize clean code when building ReactJS applications:
- Easier Maintenance: Well-organized code is much easier to maintain over time. This is especially important for large-scale applications, where maintaining code can become challenging. With clean and well-structured code, debugging and fixing issues become more accessible.
- Better Collaboration: Writing clean code promotes better collaboration between developers. When multiple developers work on the same project, having a consistent coding style and organization helps everyone understand each other's code.
- Improved Performance: Clean and well-structured code can help improve the performance of your application. Identifying performance bottlenecks is more accessible when the code is organized, and refactoring to improve performance becomes more manageable.
- Faster Development: Writing clean code takes more time and effort upfront, but it can lead to faster development in the long run. Well-organized code is easier to read and understand, speeding up the development process.
Clean Code in ReactJS: Best Practices
Now, let’s get started with the steps to make a ReactJS app compact and clean.
- Write a Clean React code
- Clean up your Data
- Testing is key!
- Use consistent naming conventions
- Follow the Single Responsibility Principle (SRP)
- Keep your components small and focused
- Use state and props appropriately
- React Monitoring with Atatus
- Make use of Error boundaries
- Employ a Logging package
- Strategize the Deployment process
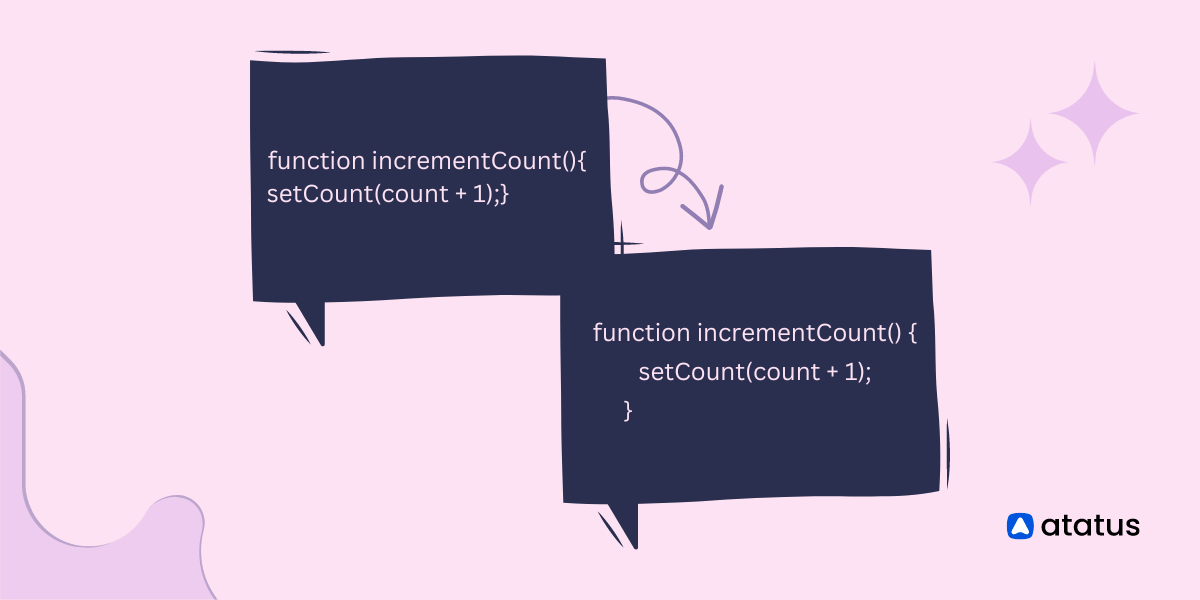
1. Write a Clean React code
If your code is perfect, there is no room for worry. But what if it isn't? We will take the example of a faulty code here and then make certain changes to it to make the code error-free and back to working condition.
// Example code with errors
import React from 'react';
function App() {
const [count, setCount] = React.useState(0);
function incrementCount() {
setCount(count + 1);
}
function decrementCount() {
setCount(count - 1);
}
return (
<div>
<h1>Counter App</h1>
<p>{count}</p>
<button onClick={incrementCount}>Increment</button>
<button onClick={decrementCount}>Decrement</button>
</div>
);
}
export default App;
In this example, the code has some errors, such as:
- The component is named
App, which is too generic and not descriptive. - The code doesn't follow consistent formatting, with inconsistent spacing and indentation.
- The
incrementCount()anddecrementCount()` functions are not descriptive enough.
Here is the same code with the errors rectified:
import React, { useState } from "react";

function CounterApp() {
  const [count, setCount] = useState(0);

  function handleIncrement() {
    setCount(count + 1);
  }

  function handleDecrement() {
    setCount(count - 1);
  }

  return (
    <div>
      <h1>Counter App</h1>
      <p>{count}</p>
      <button onClick={handleIncrement}>Increment</button>
      <button onClick={handleDecrement}>Decrement</button>
    </div>
  );
}

export default CounterApp;
Here's what we changed:
- Renamed the component to
CounterAppto make it more descriptive. - Destructured
useStatefrom thereactmodule to make the code more concise. - Renamed the event handlers to
handleIncrementandhandleDecrementto follow a more consistent naming convention. - Removed unnecessary parentheses around the
pelement. - Added a space between the function keyword and the function name for consistency.
2. Clean up your Data
When accessing your application, you might collect certain user data for future use. But if the backend developer tweaks any of the existing code structures, the entire UI will start to falter. We will look at an example that deals with such a situation.
Let’s assume this to be the data that you are expecting the API to return:
userData: {
  basicInfo: {
    name: string;
    age: number;
  }
}
There is a component in your application that shows the above data in the following manner:
export const SomeComponent = ({ userData }) => {
  return (
    <div>
      <p> {userData.basicInfo.name ?? ""}</p>
    </div>
  );
};
Now if the backend developer makes some changes to the structure of this data in the following way,
userData = {
    name: string;
    age: number;
}
When you run the program an error pops up. Error: Can't read name of undefined
How can we avoid this situation? Here’s the way!
<div> {user?.basicInfo?.name} </div>3. Testing is key!
Since React uses DOM, we can make changes and update the same for only the relevant components without changing the entire codebase. This is a very nice feature, but it can also be precarious sometimes.
Since making changes and updation are simplified, the chances of code-breaking are also enhanced. It should not go unnoticed. Unit testing and end-to-end testing are good choices in this regard.
An example of how React testing library tests your application:
import { render, screen } from "@testing-library/react";
const userData = {
  basicInfo: {
    name: "Mary",
    age: 40,
  },
};
describe("Test SomeComponent", () => {
  it("should display the name correctly", () => {
    const { getByText } = render(<SomeComponent userData={userData} />);
    expect(getByText("Mary")).toBeInTheDocument();
  });
  it("should display empty name if name is undefined", () => {
    const { queryByText } = render(<SomeComponent userData={null} />);
    expect(queryByText("John Doe")).toBeNull();
  });
});
4. Use consistent naming conventions
It's important to use consistent naming conventions for variables, functions, and components in your React code. This makes it easier for other developers to understand your code and reduces confusion.
For example, you could use camelCase for variables and functions and PascalCase for components.
Here's an example:
// Variable and function naming with camelCase
const myVariable = 'hello';
function myFunction() {
  // code goes here
}

// Component naming with PascalCase
function MyComponent(props) {
  // code goes here
}
5. Follow the Single Responsibility Principle (SRP)
The SRP states that a component or module should have only one responsibility. In React, this means that a component should only handle one aspect of the user interface.
For example, a button component should only handle the display and behavior of a button. It should not also handle form validation or data fetching. By following this principle, your code will be easier to understand and maintain.
Here's an example:
// A button component that only handles the display and behavior of a button
function Button(props) {
  return (
    <button onClick={props.onClick}>
      {props.label}
    </button>
  );
}
6. Keep your components small and focused
Related to the SRP, it's important to keep your components small and focused. This makes it easier to understand and reuse your code. If a component is too large and complex, it may be a sign that it needs to be broken down into smaller components.
Here's an example:
// A small and focused component for rendering a list of items
function ItemList(props) {
  return (
    <ul>
      {props.items.map(item => (
        <li key={item.id}>{item.name}</li>
      ))}
    </ul>
  );
}
7. Use state and props appropriately
Props are used to pass data from a parent component to a child component. State is used to manage data within a component. It's important to use state and props appropriately to avoid confusion and bugs.
For example, if a piece of data is only needed within a component, it should be stored in state. If it needs to be passed to child components, it should be passed as a prop.
Here's an example:
// A component that manages its own state
function Counter() {
  const [count, setCount] = useState(0);

  function increment() {
    setCount(count + 1);
  }

  return (
    <div>
      Count: {count}
      <button onClick={increment}>Increment</button>
    </div>
  );
}

// A parent component that passes data to a child component as props
function App() {
  const items = [{id: 1, name: 'Item 1'}, {id: 2, name: 'Item 2'}];

  return (
    <div>
      <ItemList items={items} />
    </div>
  );
}
8. React Monitoring with Atatus
Atatus is a SaaS platform which offers premium React Monitoring capabilities. They monitor, troubleshoot and optimise your React applications in a simplified manner. There is no need for any code changes in the parent app, we will be able to see the errors and fault lines within minutes.
Copy & paste this code into the <head> tag of your html (every page) to start using Atatus on your React app.
<script src="//dmc1acwvwny3.cloudfront.net/atatus-spa.js"> </script>
<script type="text/javascript"> atatus.config('YOUR_API_KEY').install(); </script>
Replace the YOUR_API_KEY string with the API Key that is assigned for your project. Now reload your page and you are started with the process already.
Since ReactJS is a single-page application, as it uses a single HTML page to render all the different components. You can view each route changes and AJAX calls that happen within your application and its impact on user’s experience.
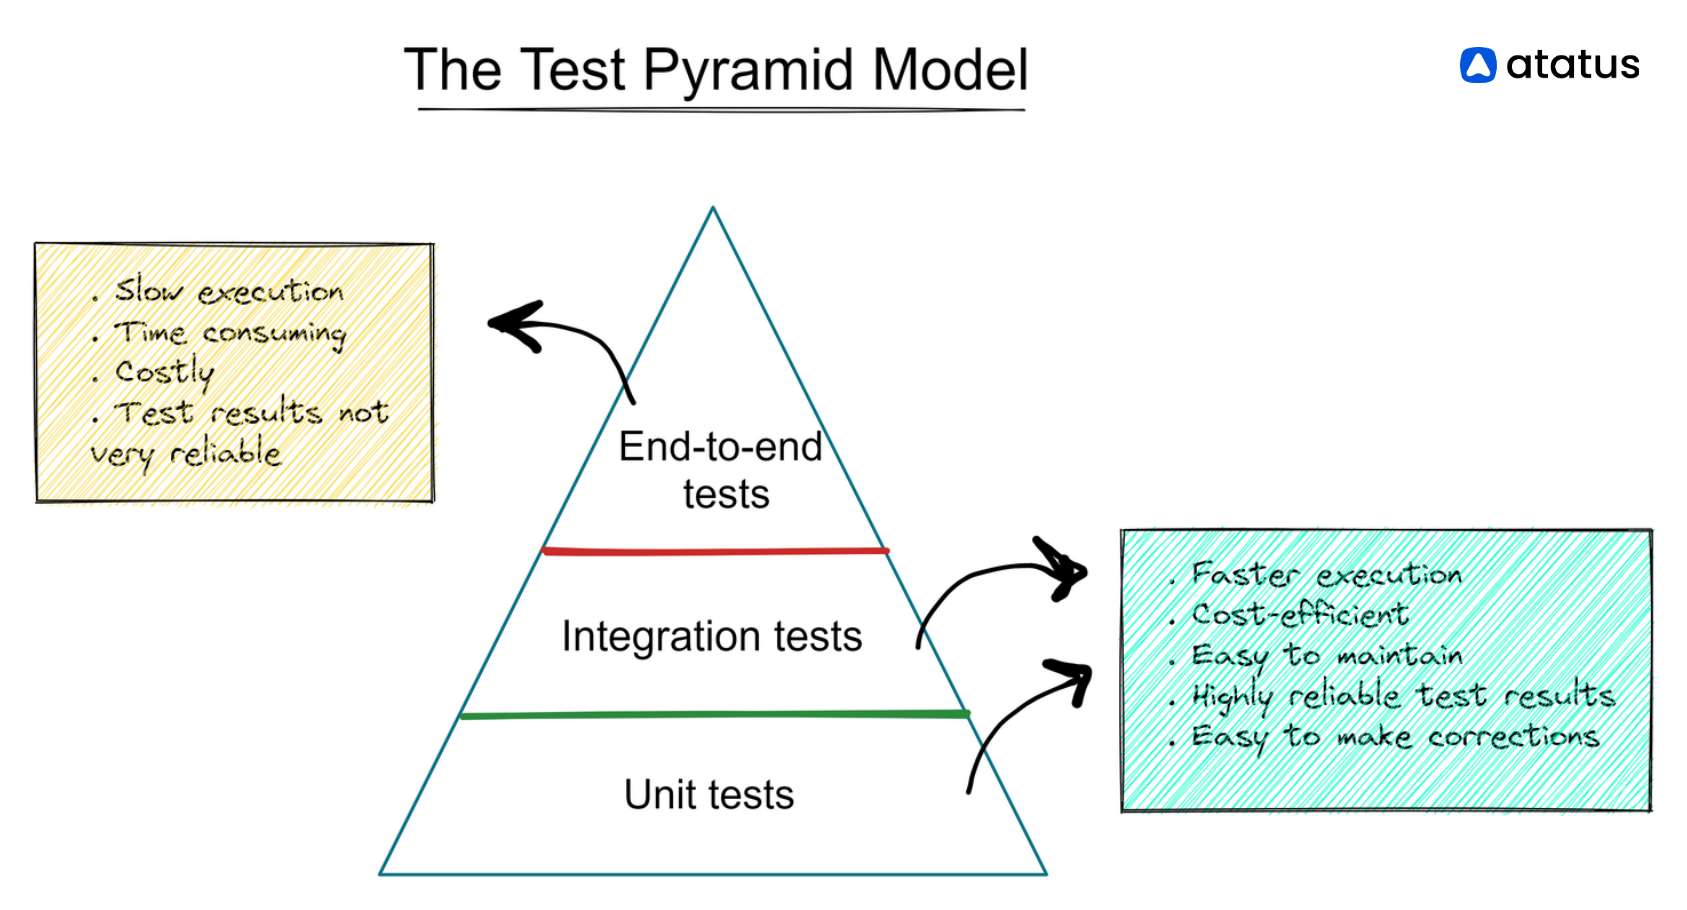
Note: Usually, when conducting application environment tests, a large number of unit tests are prescribed. But adopting this strategy for react might not be a good sign. Since ReactJS mostly functions as individual components, unit testing these individual components is not going to give us a good idea of all the errors that might occur when we access the application as a whole. Hence, when working with ReactJS, it is highly recommended that you conduct more number of integration tests which give us an overall picture of how our application works from a consumer point of view.
9. Make use of Error boundaries
An error boundary in ReactJS is a component that catches errors in the child component tree and displays a fallback UI to the user instead of the blank white screen.
Creating an errorboundary component
import React from "react";
class ErrorBoundary extends React.Component {
  constructor(props) {
    super(props);
    this.state = { hasError: false };
  }
  componentDidCatch(error, errorInfo) {
    console.error(error, errorInfo);
    this.setState({ hasError: true });
  }
  render() {
    if (this.state.hasError) {
      return <h1>Something went wrong.</h1>;
    }
    return this.props.children;
  }
}
export default ErrorBoundary;
Wrap the components that need error handling with the error boundary component:
import React from "react";
import ErrorBoundary from "./ErrorBoundary";
function MyComponent() {
  // ...
}
function App() {
  return (
    <ErrorBoundary>
      <MyComponent />
    </ErrorBoundary>
  );
}
export default App;
In this example, the ErrorBoundary component is created as a class component with a constructor and componentDidCatch method. The constructor initializes the state of hasError to false, and componentDidCatch logs the error to the console and updates the state to hasError: true.
In the render method, if the component has an error, it returns a fallback UI, such as "Something went wrong". Otherwise, it returns the wrapped child components using the props.children property.
In the App component, the MyComponent is wrapped with the ErrorBoundary component to handle any errors that may occur in the child component.
10. Employ a Logging package
As we have always relayed, logging is such a savior! Production zones are filled with request tracks and finding out which one faulted out of all this is fatally tedious. But there’s no need to panic, we have got you covered.
Logging is an indispensable part of maintaining any data in an organized matter. It makes our work so much easier by aggregating input requests with the time of access, the location and the user credentials.
In a React App, which basically deals with the frontend performances, there is a huge piling of customer inputs every minute. If the user experiences a glitch while accessing any feature on your app, they might go for another program altogether. This ultimately falls on our bad side. That’s why it is important we imply a logging tool for maintaining a database of all the transactions happening on our programme.
Not only React, but it is an industry Best practice to have a logging tool deployed along with your application and one such highly efficient tool in terms of performance and customer satisfaction is Atatus Log Management Tools. Don't loose out on this premium app!
11. Strategize the Deployment process
Choose the right CI/CD Pipeline. This choice goes a long way in ensuring your ReactJS applications perform smoothly for a long time. Popular choices include GitHub Actions and Vercel. You can take a look at this video explaining how to build a CI/CD Pipeline for React App with GitHub Action.
Conclusion
Clean applications save you the trouble of thinking about your application's performance. They ensure that your programs are up and running every time a customer logs in. We have discussed how to maintain a clean ReactJS application in this blog. But to sum it up, let me give you these easy pointers. Make sure you take note of them to keep your applications healthy and error-free.
- Keep your React components small and focused.
- Use a consistent naming convention.
- Using a linter to enforce code quality.
- Using a style guide for codes.
- Removing unused code.
- Having a state management library.
- Regular refactoring of codes.
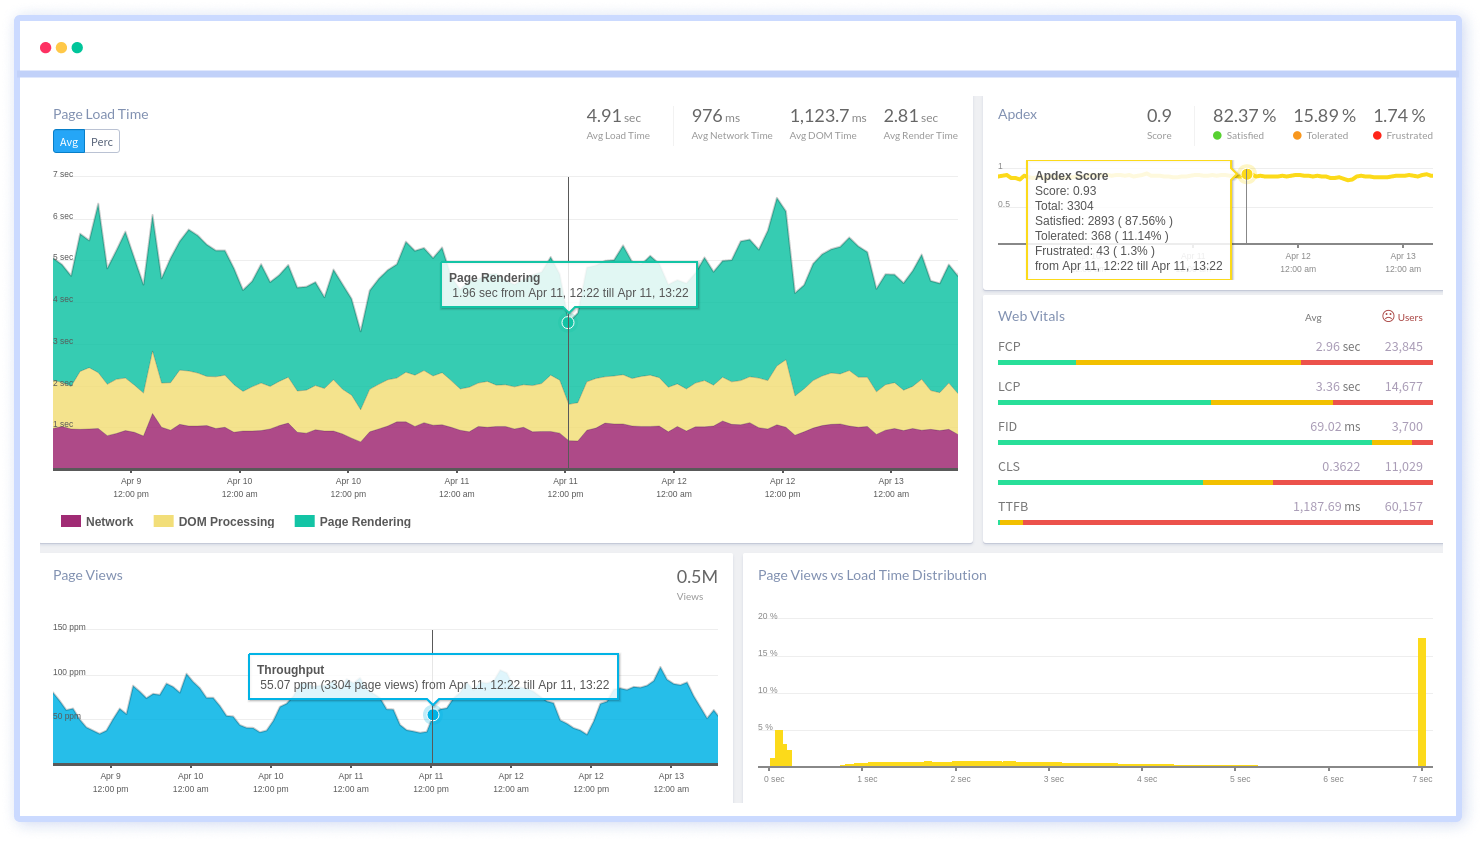
React Performance Monitoring with Atatus RUM
Visualize React errors and performance issues influencing your end-user experience. With React performance monitoring of Atatus you can identify and resolve problems faster with in-depth data points that assist you in analyzing and resolving them.
Using Atatus, you can get an overview of how your customers experience your React app. Learn how to identify the root cause of a slow load time, route change, and more on the front end by identifying performance bottlenecks in the front end.
Ensure that your React app sends all XHR requests. Monitoring and measuring the response times and failure rates of XHR calls. Optimize AJAX request performance by identifying slow and failed calls. Analyze AJAX calls in real time based on the browser, the user, the version, the tag, and other attributes.
Identify the reasons behind bad front-end performance and slow page loading that are impacting your customers. Inspect individual users who are experiencing poor performance because of slow pages, React exceptions or a failing AJAX method.
Identify how your end users' experience is impacted by the network or geography. In addition to identifying slow React assets, long load times, and errors in sessions, session traces provide a waterfall view of the session.
Take a closer look at your React app's performance with Atatus. To get started activate Atatus free-trial for 14 days!
#1 Solution for Logs, Traces & Metrics
![]() APM
APM
![]() Kubernetes
Kubernetes
![]() Logs
Logs
![]() Synthetics
Synthetics
![]() RUM
RUM
![]() Serverless
Serverless
![]() Security
Security
![]() More
More