11 Ways to Fix the ERR_CONNECTION_TIMED_OUT Error
When your internet connection times out and you can't access a specific webpage, it's one of the most annoying errors. The message "The webpage not available" ERR_CONNECTION_TIMED_OUT will appear on the screen. This error usually occurs when there is an issue with the internet connection and the website does not load. The name of this error can be seen in the notification on your screen. A browser like chrome provides three options to address the problem when a website or webpage takes too long to respond or the connection times out.
- Checking the network connection
- Checking the proxy and firewall
- Running windows network diagnostics
These are the limited approaches that do not effectively combat these issues. You must take further steps to address this issue. If you don't know what the other options are, you'll find them all in this article. We've compiled a list of the most effective ways to clear the error from your browser. You also don't have to be concerned because these solutions don't need any technical knowledge. You can use these solutions on your own.
We will go over the following:
- What is ERR_CONNECTION_TIMED_OUT Error?
- Causes for ERR_CONNECTION_TIMED_OUT Error
- How to Fix the ERR_CONNECTION_TIMED_OUT Error?
- How to Prevent “ERR_CONNECTION_TIMED_OUT” from Happening in the Future?
What is ERR_CONNECTION_TIMED_OUT Error?
"Why does my connection keep timing out?"
The connection time out error isn't a dangerous error, nor is it an infected file that can harm your computer. This message primarily serves as a warning that the system has been unable to establish a network connection with the server (network time out). It can occur on any device and operating system.
Let's start with a basic understanding of how the internet works. When a user types a keyword or the URL of a website into the search box, the system makes a request to the server to provide access to the website's content. The connection is created once the server checks the request and grants access to the system, and the data packets are shared between the system and the server.
The internet's working procedure is as follows. When a user asks for access from a website, a countdown or timer begins to run, and if the request is not able to reach the user before the countdown expires, the Err connection time out happens.
It could also imply that your website is receiving more requests than it can handle. This is especially true if your hosting provider has a RAM cap. When you wait more than 30 seconds for an answer, you know there's a problem with communication. Your browser such as chrome and internet explorer will then cancel the connection to the unresponsive page and display the error message "ERR_CONNECTION_TIMED_OUT."
An error page does not provide complete information about the source of the problem; it merely informs you about the issue. Depending on the device you're using, the error message may have somewhat different phrasing. This includes the following:
- “dns_probe_finished_nxdomain”
- “domain cannot be found”
- “server not found” “err_connection_reset”
- “err_connection_closed”
- “Server DNS address could not be found”
- “unexpectedly closed the connection”
- “err_connection_refused”
- “Server took too long to respond”
In a nutshell, the server, your network connection, your device, or the network equipment could all be to blame.
Causes for ERR_CONNECTION_TIMED_OUT Error
These are the few reasons that cause ERR_CONNECTION_TIMED_OUT Error:
- Service Timeouts
This happens when the device has been waiting for the server to react for a long time. It can occur while your web browser like chrome is attempting to access a website, connect to a game, or work from home on your computer. - Non-existing Server
Server timeout and error messages occur when a program attempts to connect to a non-existent server, either because it is down or because the IP is incorrect. As a result, your browser requests information that the server does not have. - Network Infrastructure Overload
A data request usually passes through numerous checkpoints before reaching the appropriate server. It's possible that the link will break throughout this process. This will cut off your request. - Inability to Communicate Data
A data request error occurs when a server refuses to send obtained data back to the computer. As a result, the network connection breaks, and your server no longer waits for data. - Disconnection from ISP
When you've not inserted the ISP cable into the WAN port of your modem or router, an error message may appear. - Your PC or Router has Blocked a Website
You won't be able to connect if the host file or firewall/router Access Control settings prohibit the website you're trying to access. You will find an error message as a result. - Multiple Interferences
When too many requests are granted at once, the wireless channel becomes overburdened, causing your server to slowdown or shut down completely.
How to Fix the ERR_CONNECTION_TIMED_OUT Error?
Depending on the cause of the error, we have a number of options for resolving the problem. Obtaining an appropriate solution is the greatest method to eliminate errors.
You can start with the first way and then move on to the second if it doesn't find and fix the problem. Attempt till your problem is fixed. Also, use caution when using these procedures, and be sure to follow each step.
Here are the 11 ways to consider while solving the ERR_CONNECTION_TIMED_OUT error:
Solution 1: Restart Your Internet Connection
There's a good chance you'll run into this issue, especially if there's a major internet outage. As a result, it is critical to ensure that the network connection is in perfect functioning order.
Apart from that, have a look at the subject of properly verifying and connecting the hardware components. Keep a close eye on the situation to see if there is anything that took too long to respond with the internet connection.
If you're using a wireless network connection or router to connect to the internet, make sure it can connect to many devices. Then check to see if the internet is operating properly on those devices as well. If no such internet difficulties are discovered, there may be other factors at play.
Also, make sure the terrible connection isn't caused by a slow Wi-Fi connection. Disconnect from public Wi-Fi first to get things in order. Then, to see if you're linked to poor or insufficient Wi-Fi, purchase a modem for personal usage.
If the internet and other issues are operating well, move on to the next solution.
Solution 2: Disable Your Firewall and Antivirus Software
Antiviruses and firewalls are in charge of keeping your files and systems safe. As a result, they scan your computer for viruses on a regular basis. Installing firewalls and antiviruses has the disadvantage of causing the timed out error. They may restrict or prohibit certain pages that they believe you don't need, even if they are safe.
If you're getting the ERR_CONNECTION_TIMED_OUT page or other errors like this, you can turn off your firewall and antivirus. Before disabling these programs, make sure the page you're trying to access is safe.
Remember to turn on your firewall and antivirus software once you've finished with the website you were trying to access. Then, to protect against real attacks from malicious sites, reactivate the cybersecurity systems.
If you continue to see the timed out error message and are confident that the websites you're trying to access are safe, you should alter or update your firewall and antivirus software. Another option is to create a false-proof report and send it to the software developer, who will then fix the problem. These are the false-proof fast links:
Solution 3: Disable Proxy Server Settings or VPN
Checking the proxy server settings is another typical remedy recommended by web browsers including chrome, internet explorer, and so on.
A proxy server acts as a go-between for your computer and the website you're looking at. Its goal is to secure the user's IP address, control which websites can be accessed, and cache site data to speed up page loading.
However, proxy servers may mistakenly block the website you want to visit, resulting in the ERR_CONNECTION_TIMED_OUT message. Reset your proxy settings to see if these servers are the source of the problem.
For Windows:
- By hitting the Windows logo key, go to the Control Panel
- Find and select Network and Internet -> Internet Options from the drop-down menu
- Open the Connections tab -> LAN settings in the Internet Properties window
- Make sure that all of the proxy settings are unticked
For Mac:
- Click Advance in System Preferences Network
- Uncheck each item on the Proxies tab and then click OK
- Refresh the page to see if the error has vanished
- If it has, and you still need to utilize a proxy server for day-to-day work, you should either reconfigure the settings or switch to a different hosting provider
Those who use a VPN service may also experience the ERR_CONNECTION_TIMED_OUT issue. If that's the case, we recommend switching VPN protocols because your ISP or firewall may have prohibited the one you're currently using. Alternately, try temporarily disabling the application.
Solution 4: Clear Browser Cache

All browsers including chrome save a cache of information on your computer, which includes your browser cookies, history, and saved login information. The system saves this information to help the relevant web pages load faster when you visit them again.
The cache that is saved is useful and saves you time, but it can also cause a slew of problems. Thankfully, emptying your cache will cure the problem quickly.
For that, you must find that your browser's cache is the genuine culprit of the “This Site Can't Be Reached” error. So, to confirm, complete the procedures below.
- Try accessing the same website where you're getting the "This Site Can't Be Reached" error in a new tab in your browser address bar in incognito mode, also known as a private mode in chrome and other browsers
- If the issue continues in incognito mode, you'll need to clear your browser cache by following the steps below
To Clear Cache for Google Chrome:
Click the three dots icon in the top right corner of your Google Chrome browser window to open it. From the drop-down option, choose More Tools and then Clear Browsing Data.
Select the one that applies to you:-
- Browsing history
- Cookies and other site data
- Cached images and files
- Click the Clear data button
To Clear Cache For Mozilla Firefox:
To clean the cache in Mozilla Firefox, open the browser window and click the Hamburger icon in the upper right corner. Select History from the drop-down menu that opens, and then Clear Recent History from the menu that appears next.
To clear your Mozilla Firefox browser cache data, select Everything from the time period to the clear the drop-down menu and click the Clear Now button.
To Clear Cache for Internet Explorer:
Click the setting button in the top right corner of the Internet Explorer browser window to clear the cache. Select Safety from the drop-down menu and then erase browsing history. Make sure the Temporary Internet files and Website files boxes are checked in the delete browsing history window, then click the delete button at the bottom.
To Clear Cache for Microsoft Edge:
To clear the cache in Microsoft Edge, go to the 3 Dots icon in the top right corner of the browser window and select the setting at the bottom of the screen. Click the Choose what to clear button under the Privacy, search, and services tab. Make sure the Cached images and files box is checked, then click the Clear button.
Solution 5: Change the DNS Server
A DNS server helps the browser find the website you wish to visit by converting domain names to IP addresses. In most cases, your ISP's in-house DNS servers will be configured on your internet connection settings. They may, nevertheless, not find and deliver the finest results.
As a result, many users choose to utilize Google Chrome or Cloudflare's third-party DNS servers, which are both free and dependable for the ordinary user.
Consider switching DNS servers if you believe they are the source of the problem. Using Google Chrome's Public DNS IP addresses as an example, the tutorials below will show you how to update a network's DNS settings.
For Windows:
- In the Control Panel, open the Network and Internet -> Network and Sharing Center. On the top left, click Change adapter settings.
- Find and select Properties from the context menu when you right-click on the current connection.
- Choose whether your DNS settings should utilize IPv4 or IPv6 addresses. After that, select Properties.
- Substitute the following IP addresses for the IP addresses:
For IPv4, use 8.8.8.8 and 8.8.8.4
For IPv6, use 2001:4860:4860::8888 and 2001:4860:4860::8844 - Restart the browser by clicking OK.
For Mac:
- Open System Preferences Advanced
- In the DNS Servers section of the DNS tab, click the Plus symbol
- One by one, type in each IP address
- Click the OK button
Solution 6: Flush Out and Renew DNS
The term "flush DNS" refers to the process of clearing your computer's DNS caches.
The DNS cache saves information about the websites you visit. Each time you visit the website, the computer will not have to translate the domain name to the IP address from the beginning.
The DNS cache, like browser data, can become out of date. It's possible that the IP addresses are outdated, took too long to respond when trying to access the website.
For Windows:
The Command Prompt in Windows can be used to flush DNS. To activate the Run command, press the Windows logo and R keys at the same time. Then, in the dialogue box, input "cmd" and click OK.
In the Command Prompt window, type:
ipconfig /flushdnsThen, to troubleshoot the network and renew the IP address, add the following lines. Each time you add a new command, make sure you press Enter:
ipconfig /registerdns
ipconfig /release
ipconfig /renew
netsh winsock reset
When you're done, restart your computer and open your browser to see if the commands worked.
For Mac:
Open the Terminal application on your Mac and type the following command:
dscacheutil -flushcacheSolution 7: Check the Hosts File
The hosts' file maps all connections between IP addresses and their related domain names. The computer will find and verify this document every time you visit a website to see which IP address matches the website's domain.
The hosts' file may have inadvertently blacklisted a specific IP address or URL, rendering the website inaccessible. As a result, it's a good idea to find if the document has blacklisted the website you want to visit.
For Windows:
To read the Windows hosts file in Windows, you'll need a text editor like Notepad. Type the application's name into the taskbar's search box and right-click it. Select the Run as administrator option.
Navigate to File -> Open in the top-left menu and paste the path below into the File name bar.
C:\Windows\System32\drivers\etc\
After that, choose the hosts file.
Below the last line that begins with the "#" sign, the file will display a list of blacklisted websites. Delete them and save your changes by pressing Ctrl + S.
For Mac:
Users on macOS can open Terminal, type the following line, and press Enter:
sudo nano /private/etc/hostsRemove any URLs that are listed below the “::1” line.
Solution 8: Change the LAN Settings
Some of your internet settings may have been harmed by a virus, or you may have made some changes inadvertently. As a result, it is preferable to alter these settings.
- Using the start menu, access the control panel
- Find and click on Internet settings and change the view by category to a large icon
- Select the LAN settings button from the connections tab
- Remove all of the parameters from the automatic configuration and proxy server sections
- Click OK
- Restart your browser and begin browsing
If the error persists, it is unlikely that proxy or LAN settings are the source of the problem. As a result, switch to a different method.
Solution 9: Check the Maximum Execution Time
A PHP script's maximum execution time is the maximum amount of time it can execute on a website. This is normally pre-configured by the hosting provider, with a standard timed out setting of 30 seconds.
If the script runs for longer than the specified time, the website will be unable to communicate with the browser, resulting in an ERR_CONNECTION_TIMED_OUT error.
The good news is that the upper limit can be increased. Hosting providers can enable this capability through the user's control panel, or they can do it for the customer if they ask for it.
Solution 10: Increase PHP Memory Limit
Some PHP scripts may consume more memory than they are permitted, causing the site to take an excessive amount of time to reply to the browser.
The memory limit, like the maximum execution duration, can be increased. However, the quantity should not exceed the amount of memory allotted to your plan by your hosting provider.
Solution 11: Return Your Browser to the Default Setting
If none of the preceding fixes work and you're still seeing the ERR_CONNECTION_TIMED_OUT message, try restoring your browser's default settings. The issue could be caused by a setting in your browser, so restore it to its normal state.
You can revert your browser to its default settings by doing the following:
- Select "Settings" from the "Menu" icon
- Scroll down to "Advanced" and look for the "Reset" icon
- You'll see a confirmation popup that says "Click on Reset" when you click the "Reset" icon
- Confirm and move forward
How to Prevent “ERR_CONNECTION_TIMED_OUT” from Happening in the Future?
The ERR_CONNECTION_TIMED_OUT error is most common when the accessed web address has a temporary difficulty. It normally vanishes after a few minutes. User factors, on the other hand, can sometimes have a role. The following will explain will help you avoid making the same mistake again.
- Update Your Browser and Security Software
Compatibility issues caused by obsolete software frequently result in ERR_CONNECTION_TIMED_OUT. However, most of the time, the programs update themselves. - Delete Browser Data on a Regular Basis
This is critical not only to fix the breeding ground for future connection errors. This is also advised for a pleasant internet browsing experience. For data security and privacy, it's also a good idea to delete browser data on a regular basis. - Clean Your DNS Cache and Renew Your IP Address Regularly
An incorrect DNS cache can cause ERR_CONNECTION_TIMED_OUT, as previously stated. Clear the cache on a regular basis to avoid this. At the same time, renew your IP address.
And It’s a Wrap!!!
Since it is difficult to trace the source of network time out and connection errors, they can be exceedingly unpleasant. More importantly, you most likely just want to find and get information quickly. These solutions that we have presented are correct, and you can utilize them without difficulty. Hopefully, the information in this article will assist you in resolving any future timed out issues.
Monitor Your Entire Application with Atatus
Atatus provides a set of performance measurement tools to monitor and improve the performance of your frontend, backends, logs and infrastructure applications in real-time. Our platform can capture millions of performance data points from your applications, allowing you to quickly fix issues and ensure digital customer experiences.
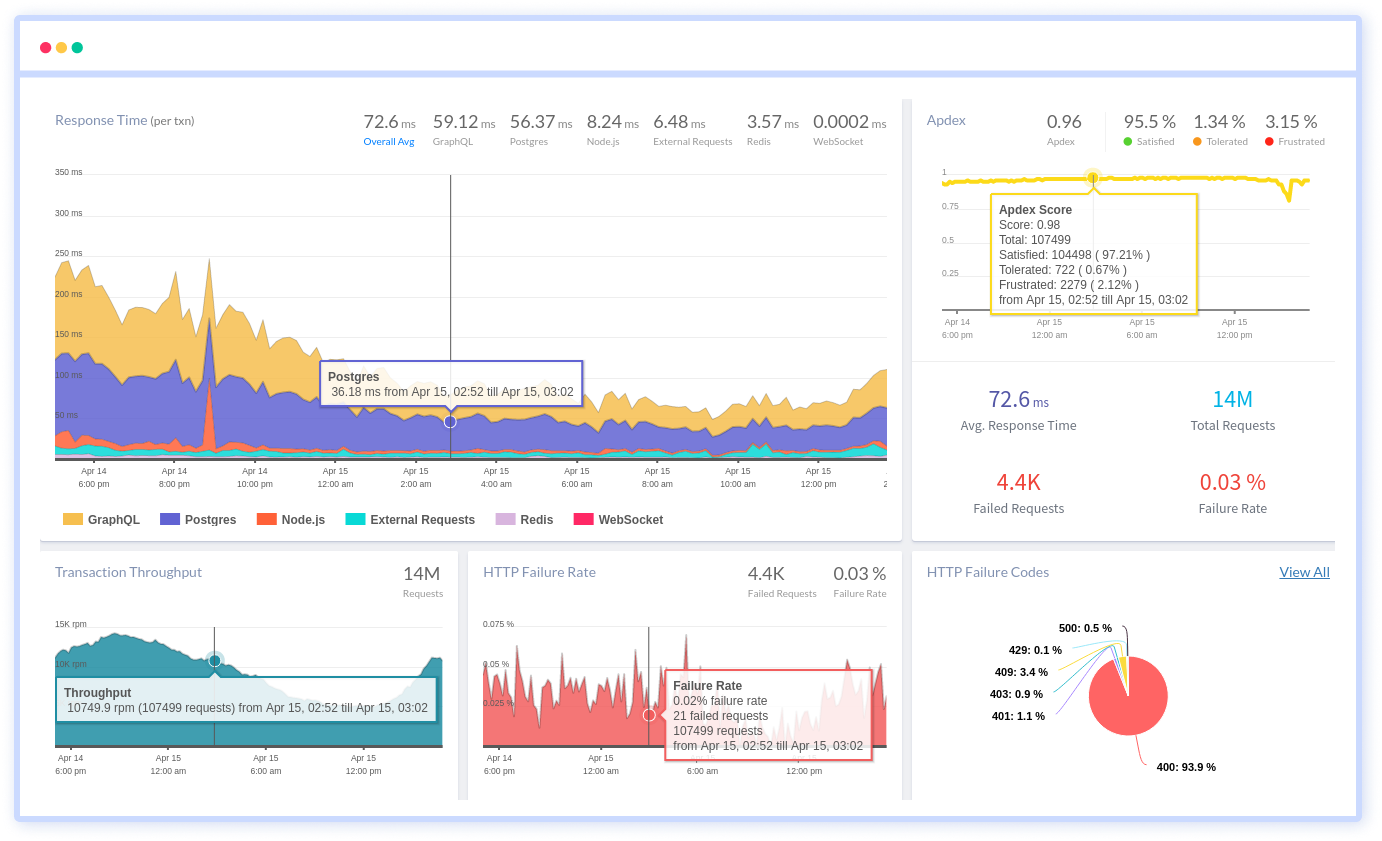
Atatus can be beneficial to your business, which provides a comprehensive view of your application, including how it works, where performance bottlenecks exist, which users are most impacted, and which errors break your code for your frontend, backend, and infrastructure.
#1 Solution for Logs, Traces & Metrics
![]() APM
APM
![]() Kubernetes
Kubernetes
![]() Logs
Logs
![]() Synthetics
Synthetics
![]() RUM
RUM
![]() Serverless
Serverless
![]() Security
Security
![]() More
More