Scaling in Kubernetes: An Overview
Kubernetes has become the de facto standard for container orchestration, offering powerful features for managing and scaling containerized applications.
In this guide, we will explore the various aspects of Kubernetes scaling and explain how to effectively scale your applications using Kubernetes.
From understanding the scaling concepts to practical implementation techniques, this guide aims to equip you with the knowledge to leverage Kubernetes scaling capabilities efficiently.
Your application may be scaled right away by changing the number of executing containers using the kubectl scale command.
This is the quickest and simplest way to add more replicas to deployment, and you may use it to respond to demand surges or protracted periods of quiet time.
Table of Contents
- Why Scale in Kubernetes?
- Manual Scaling using kubectl Scale Command
- 3 Best Kubernetes Autoscaling Methods
- Kubernetes Scaling Metrics
- Best Practices for Kubernetes Scaling
Why Scale in Kubernetes?
Kubernetes Scaling refers to the dynamic adjustment of resources within a Kubernetes cluster to accommodate varying workloads and traffic demands. This practice ensures that applications hosted in Kubernetes clusters remain responsive, available, and cost-effective, even as demand fluctuates.
Scaling in Kubernetes is a fundamental practice that involves adjusting the resources allocated to your applications to meet varying demands.
Here is a scenario on an e-commerce flash sale event explaining why scaling is important in Kubernetes.
Scenario: E-commerce Flash Sale Event
Background:You're running an online store, and you're about to have a massive sale with lots of people rushing to your website for great deals.
Why Scaling Matters?
- Traffic Surge: During the sale, tons of people visit your website at the same time.
- Resource Demand: All these visitors need a lot of computer power to use your website. Without enough power, your website might slow down or even crash.
- Reliability: Your website has to work well, or customers will get frustrated and leave. You need it to be fast and available all the time.
How Kubernetes Scaling Helps?
- More Servers: Kubernetes can quickly add more servers when needed. It's like hiring more workers when a store gets busy.
- Even Workload: Kubernetes spreads out the work so no server gets overwhelmed. It's like having many cashiers during a big sale.
- Automatic Scaling: Kubernetes can do this automatically. It adds more servers when things get busy and removes them when it's quieter.
- Efficient Use of Resources: It also makes sure each server uses just the right amount of computer power, so you don't waste money.
Benefits of Scaling in Kubernetes:
- Always Open: With Kubernetes, your website stays open and works well even when lots of people are shopping.
- Saves Money: You only pay for extra servers when you need them. It's like paying extra workers only when there's a big sale.
- Happy Customers: Customers can shop without problems, which is super important during a big sale.
In this scenario, Kubernetes scaling keeps your online store running smoothly during a busy sale, making sure customers can shop without any issues.
Scaling in Kubernetes offers several advantages:
- Allocating resources based on demand optimizes resource utilization.
- Ensures applications remain available under varying workloads.
- Maintains consistent application performance as load fluctuates.
- Reduces infrastructure costs by scaling resources up or down as needed.
- Mitigates failures by distributing workloads across multiple pods.
- Kubernetes can automatically adjust resources, minimizing manual intervention.
- Easily accommodate traffic spikes without manual intervention.
- Scales in response to application or container failures.
- Prevents overprovisioning of resources, saving resources and cost.
Manual Scaling using kubectl Scale Command
kubectl scale is a command-line tool in Kubernetes that allows you to scale the number of replicas (instances) of a specific resource, such as pods, deployments, replication controllers, or stateful sets.
This tool is essential for dynamically adjusting the capacity of your application or workload in response to changing demands without having to manually create or delete resources.
Here is the basic usage of kubectl scale:
kubectl scale [--replicas=COUNT] [--current-replicas=COUNT] [--resource-version=version] (-f FILENAME | TYPE NAME) [--record=true|false]--replicas=COUNT: Specifies the desired number of replicas you want to scale to. ReplaceCOUNTwith the desired number of replicas.--current-replicas=COUNT(optional): If specified, you can provide the current number of replicas. This can be helpful when you want to perform a scale operation based on the existing number of replicas.--resource-version=version(optional): This flag allows you to specify the resource version to prevent conflicts. You typically don't need to use this unless you have a specific requirement.-f FILENAMEorTYPE NAME: You can either specify the resource you want to scale using a YAML or JSON file (-f FILENAME) that defines the resource, or by specifying the resource type (TYPE) and its name (NAME) directly.--record=true|false(optional): When set to true, this flag records the change in the resource's history, which can be useful for auditing and tracking changes.
Examples:
a.) Scale a Deployment named "my-deployment" to 3 replicas:
kubectl scale --replicas=3 deployment/api-server--replicas=3sets the desired number of replicas to 3.deployment/api-serverspecifies the resource type ("deployment") and the name of the Deployment resource you want to scale ("my-deployment").
b.) Scale a ReplicationController named "my-controller" to 5 replicas:
kubectl scale --replicas=5 rc/my-controller3 Best Kubernetes Autoscaling Methods
Autoscaling capabilities, such as the Horizontal Pod Autoscaler (HPA), Vertical Pod Autoscaler (VPA) and Cluster/ MultiDimensional AutoScaler, further enhance scalability by dynamically adjusting resources based on defined metrics.
Horizontal, Vertical and Cluster/ MultiDimensional Scaling are three distinct approaches to scale Kubernetes, each addressing different aspects of resource allocation and application performance.
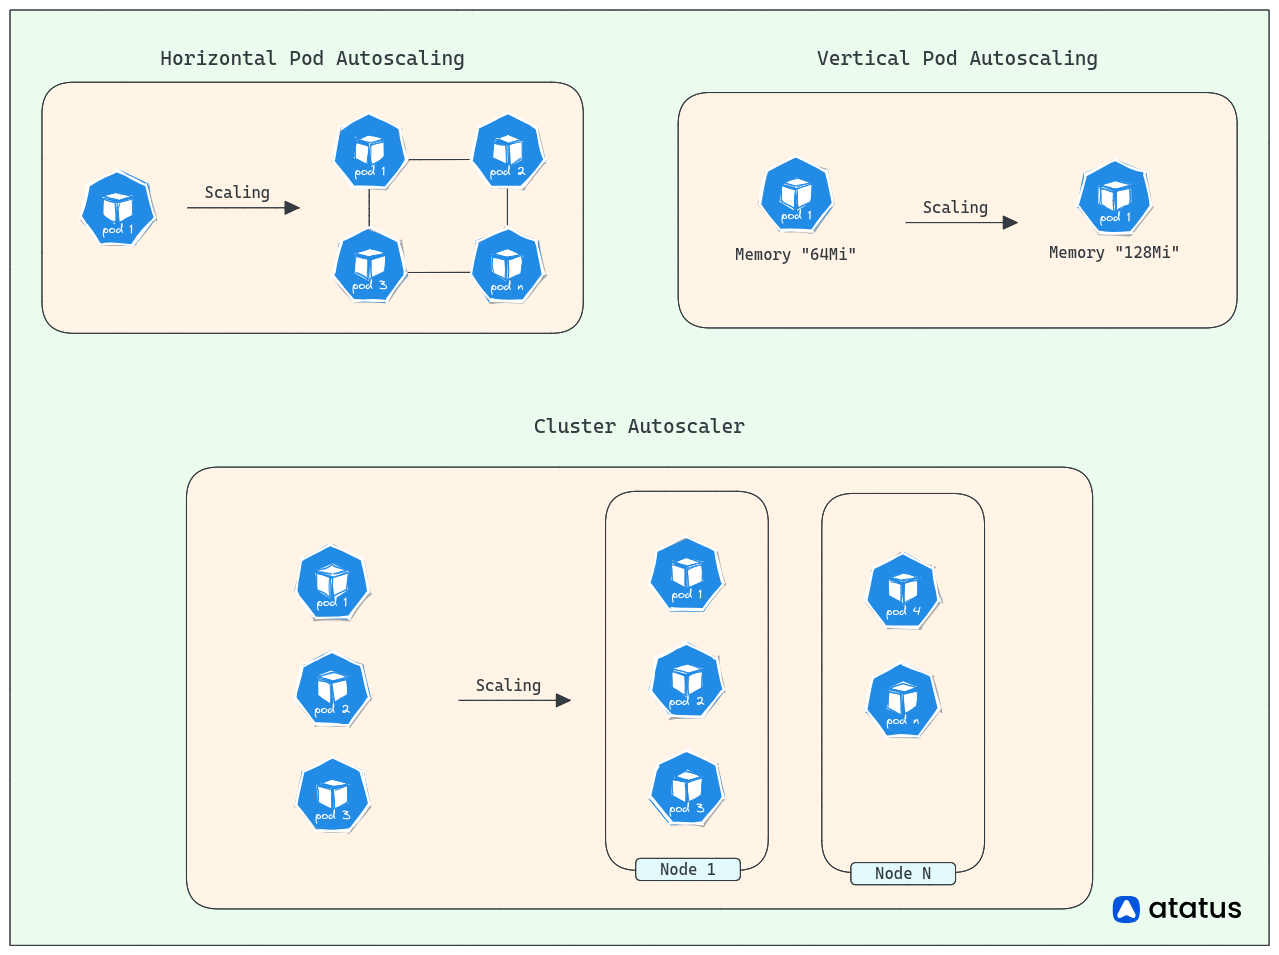
1. Horizontal Pod Autoscaling (HPA)
Horizontal scaling involves increasing or decreasing the number of identical pods running in a Kubernetes cluster. It allows you to distribute the workload across multiple pods, enabling better resource utilization and improved application availability.
With horizontal scaling, additional pods can be added or removed dynamically based on predefined metrics or thresholds. It is achieved using scaling objects such as Replication Controllers, Replica Sets, Deployments, and StatefulSets.
It is suitable for scenarios where the workload can be parallelized or distributed across multiple instances, such as stateless applications or microservices and enhances application availability and enables handling increased traffic or load by scaling out the number of pods.
Example: Horizontal Scaling (Horizontal Pod Autoscaler - HPA)
a.) Create Deployment
apiVersion: apps/v1
kind: Deployment
metadata:
  name: my-app
spec:
  replicas: 3
  selector:
    matchLabels:
      app: my-app
  template:
    metadata:
      labels:
        app: my-app
    spec:
      containers:
        - name: my-app-container
          image: my-app-image:latest
          resources:
            limits:
              cpu: "500m"
              memory: "512Mi"
            requests:
              cpu: "200m"
              memory: "256Mi"
b.) Create a Horizontal Pod Autoscaler
apiVersion: autoscaling/v2beta2
kind: HorizontalPodAutoscaler
metadata:
  name: my-app-hpa
spec:
  scaleTargetRef:
    apiVersion: apps/v1
    kind: Deployment
    name: my-app
  minReplicas: 1
  maxReplicas: 10
  metrics:
  - type: Resource
    resource:
      name: cpu
      target:
        type: Utilization
        averageUtilization: 70
2. Vertical Pod Scaling (VPA)
Vertical scaling involves adjusting the resources allocated to a single pod, such as CPU and memory. It allows you to increase or decrease the capacity of a single pod without changing the number of instances.
Vertical scaling is useful when an application requires more computational power or memory to handle increased demand or resource-intensive tasks. Kubernetes provides the Vertical Pod Autoscaler (VPA), which automatically adjusts the resource limits and requests of pods based on their actual resource usage.
Vertical scaling is suitable for applications that may not benefit from running multiple instances, such as monolithic applications or databases that require more resources on a single node. Vertical scaling can improve application performance and reduce resource wastage by dynamically allocating the necessary resources to pods.
Horizontal scaling focuses on increasing or decreasing the number of pods, while vertical scaling adjusts the resources allocated to individual pods. By combining both approaches, you can optimize resource allocation, improve application performance, and ensure efficient scaling in your Kubernetes environment.
Example: Vertical Scaling (Vertical Pod Autoscaler - VPA)
a.) Install the Vertical Pod Autoscaler (VPA) Admission Controller:
kubectl apply -f https://github.com/kubernetes/autoscaler/releases/download/vertical-pod-autoscaler-<VERSION>/vertical-pod-autoscaler.yamlb.) Enable Vertical Pod Autoscaling for a Deployment:
apiVersion: autoscaling.k8s.io/v1
kind: VerticalPodAutoscaler
metadata:
  name: my-app-vpa
spec:
  targetRef:
    apiVersion: "apps/v1"
    kind: Deployment
    name: my-app
For the VPA to work, metrics and resource recommendations need to be collected for a period of time. The VPA controller will then adjust the resource limits and requests of pods based on the collected data.
These examples demonstrate the basic configuration for horizontal scaling using the Horizontal Pod Autoscaler (HPA) and vertical scaling using the VerticalPodAutoscaler (VPA). You can customize the configurations based on your application requirements and scaling thresholds.
3. Cluster AutoScaler
Cluster Autoscaler is like a smart manager for your cloud-based worker computers in a Kubernetes cluster. Imagine you have a team of workers, and some days the work is really busy, and other days it's slower.
Cluster Autoscaler watches how much work your team is doing and adds more workers when things get busy (like hiring more people during a rush) and lets them go when the work slows down (like sending people home when the store is quiet). This way, your cluster always has the right number of workers to handle the tasks efficiently without wasting resources.
Here's how it works:
- The Cluster Autoscaler monitors resource utilization across nodes in the cluster.
- When a node is underutilized and cannot accommodate new pods, it requests additional nodes from the cloud provider.
- When nodes become idle or over-provisioned, the Cluster Autoscaler can terminate them to save costs.
For example, if you're running a website, and suddenly a lot of users start visiting, Cluster Autoscaler will automatically add more servers to handle the increased traffic. When the traffic decreases, it will remove some servers to save costs. This dynamic scaling ensures your website runs smoothly without manual intervention.
Kubernetes Scaling Metrics
Scaling metrics play a crucial role in determining when and how Kubernetes should scale your applications. Kubernetes provides several built-in metrics that can be used for scaling, including CPU and memory utilization.
Additionally, Kubernetes allows you to define and use custom metrics to scale your applications based on specific requirements. Here's an explanation of each scaling metric:
1. CPU Utilization
CPU utilization is a commonly used metric for scaling applications. It measures the amount of CPU resources used by a pod or container.
By monitoring CPU utilization, you can determine if the current resources allocated to your application are sufficient or if additional resources are needed.
Scaling based on CPU utilization allows Kubernetes to add or remove instances (horizontal scaling) or adjust CPU resource limits (vertical scaling) as needed.
2. Memory Utilization
Memory utilization is another important metric for scaling applications. It measures the amount of memory used by a pod or container.
Monitoring memory utilization helps identify if an application requires more memory resources to perform optimally.
Kubernetes can scale based on memory utilization, similar to CPU utilization, to adjust the number of instances or modify memory resource limits to ensure efficient utilization of resources.
3. Custom Metrics
Kubernetes also allows you to define and use custom metrics for scaling your applications. Custom metrics enable you to scale based on specific application requirements or business metrics that are not available as built-in metrics.
Examples of custom metrics can include request per second (RPS), response time, queue length, or any other application-specific metric that is relevant for scaling decisions. To use custom metrics for scaling, you need to configure a custom metrics server and define custom metric objects in Kubernetes.
To scale your applications using these metrics, you can leverage the Horizontal Pod Autoscaler (HPA) or the Vertical Pod Autoscaler (VPA) provided by Kubernetes. The HPA scales the number of pods based on the specified metric thresholds, while the VPA adjusts the resource limits and requests of individual pods.
When configuring scaling based on metrics, it's important to consider factors such as the desired target utilization, scaling thresholds, and cooldown periods. Proper monitoring and observability practices are essential to collect and analyze metrics data, ensuring effective scaling decisions and optimizing resource allocation.
Best Practices for Kubernetes Scaling
Scaling in Kubernetes requires careful planning and consideration to ensure optimal performance, efficient resource utilization, and smooth operation of your applications. Here are some best practices and considerations to keep in mind:
1. Design for Scalability
Architect your applications with scalability in mind from the start. Design them to be stateless and loosely coupled, allowing them to scale horizontally by adding or removing instances. Decompose monolithic applications into microservices to enable independent scaling of different components. Utilize Kubernetes features like Deployments, ReplicaSets, and StatefulSets to manage and scale your application components effectively.
2. Define Resource Requirements
Specify resource requests and limits for your containers. Resource requests help Kubernetes schedule pods onto nodes, while resource limits prevent pods from consuming excessive resources. Regularly monitor resource utilization to ensure that requests and limits are appropriately configured for efficient scaling.
3. Autoscaling
Utilize the Horizontal Pod Autoscaler (HPA) and Vertical Pod Autoscaler (VPA) to automate scaling based on CPU, memory, or custom metrics. Set appropriate target utilization levels and thresholds to trigger scaling actions. Regularly monitor and adjust the autoscaling configurations based on application needs and performance patterns.
4. Cluster Design and Capacity Planning
Plan your cluster's capacity by considering factors such as the expected workload, resource requirements, and expected traffic patterns. Distribute your workload across multiple nodes to ensure high availability and avoid single points of failure. Regularly monitor cluster health and performance to identify potential scaling or resource allocation issues.
5. Monitoring and Observability
Implement robust monitoring and observability practices to collect metrics, logs, and events from your Kubernetes cluster and applications. Use monitoring tools like Atatus, Prometheus, Grafana, or commercial solutions to gain insights into resource utilization, application performance, and scale patterns. Set up alerts and notifications to proactively identify and respond to scaling-related issues.
6. Load Testing and Capacity Planning
Conduct load testing to understand how your applications perform under different traffic conditions and identify potential scalability bottlenecks. Use tools like Apache JMeter, Gatling, or Kubernetes-specific load testing frameworks to simulate realistic workloads. Analyze the results to identify optimal scaling thresholds, resource requirements, and potential optimizations.
7. Managing Costs and Efficiency
Continuously monitor resource utilization and adjust resource allocations to optimize efficiency and minimize costs. Leverage features like Kubernetes cluster autoscaling to dynamically adjust the number of nodes based on workload demand. Optimize resource requests and limits to avoid over-provisioning or under-utilization.
8. Handling Application Scaling Challenges
Understand the limitations and constraints of your applications when scaling. Address any stateful application requirements using appropriate controllers like StatefulSets. Implement mechanisms to handle data consistency, session persistence, and distributed caching for scaled applications.
Conclusion
In wrapping up this tutorial on using kubectl scale, we've covered a range of best practices and insights for effective Kubernetes scaling.
By delving into the intricacies of this powerful command, you've gained a solid understanding of how to scale your resources horizontally and vertically. We've explored practical examples and highlighted considerations for optimizing your scaling strategies.
Armed with these newfound skills, you're now equipped to confidently wield kubectl scale to achieve optimal performance and resource allocation within your Kubernetes environment.
Atatus Kubernetes Monitoring
With Atatus Kubernetes Monitoring, users can gain valuable insights into the health and performance of their Kubernetes clusters and the applications running on them. The platform collects and analyzes metrics, logs, and traces from Kubernetes environments, allowing users to detect issues, troubleshoot problems, and optimize application performance.
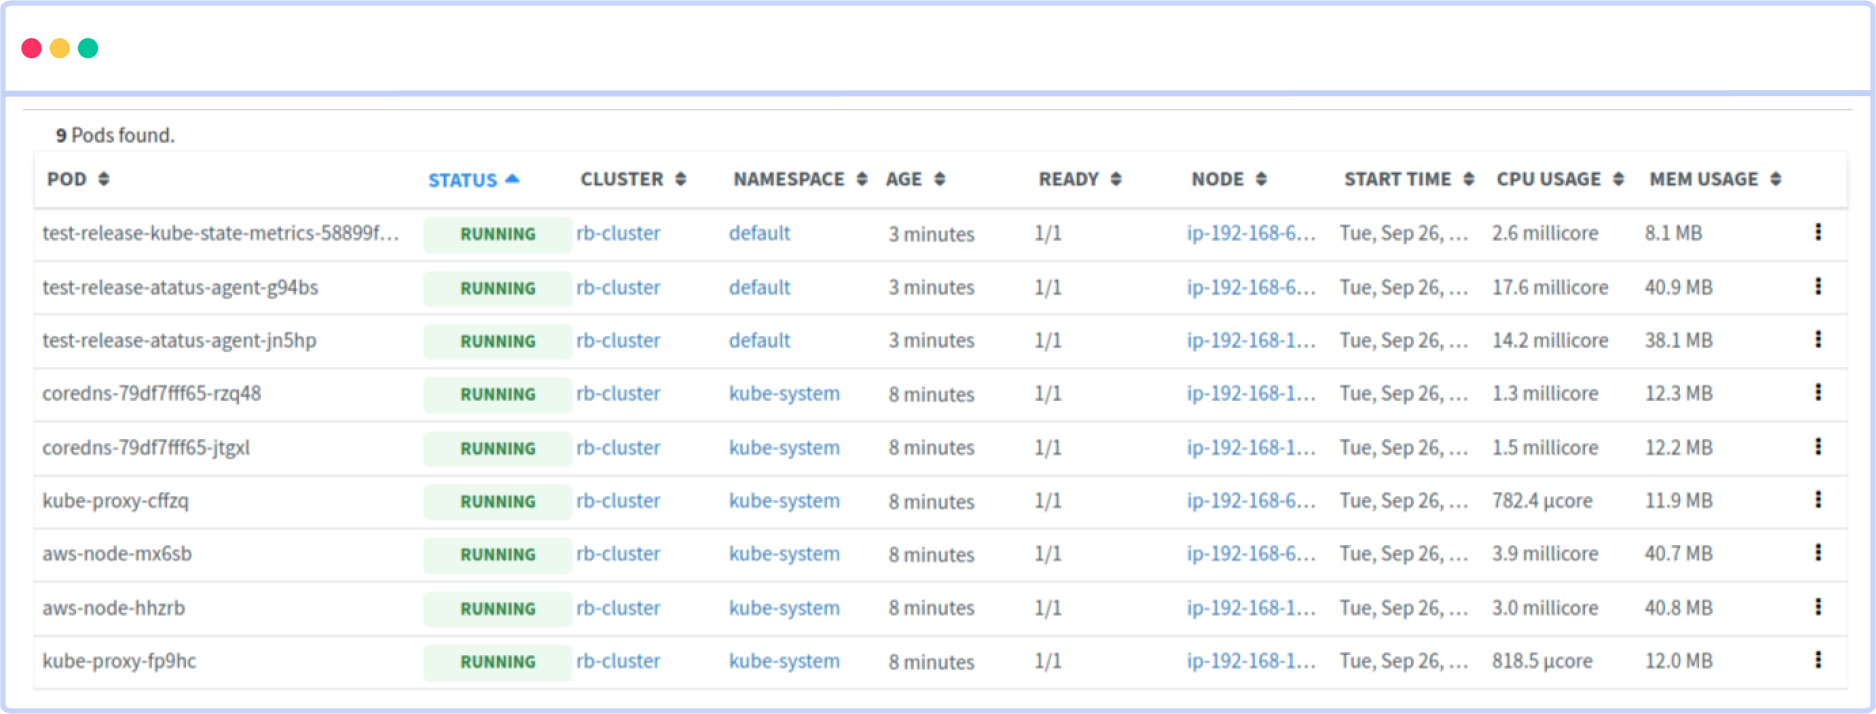
You can easily track the performance of individual Kubernetes containers and pods. This granular level of monitoring helps to pinpoint resource-heavy containers or problematic pods affecting the overall cluster performance.
#1 Solution for Logs, Traces & Metrics
![]() APM
APM
![]() Kubernetes
Kubernetes
![]() Logs
Logs
![]() Synthetics
Synthetics
![]() RUM
RUM
![]() Serverless
Serverless
![]() Security
Security
![]() More
More