Kubernetes Clusters: Everything You Need To Know
Kubernetes is an open-source container orchestration platform that automates the deployment, scaling, and management of containerized applications. It allows you to create and manage clusters of machines, called Kubernetes clusters, to run your applications in a scalable and highly available manner.
Kubernetes clusters provide a distributed and scalable platform for running containerized workloads. They offer features such as load balancing, scaling, self-healing, and service discovery, making them suitable for deploying and managing applications in production environments.
To interact with a Kubernetes cluster, you use the Kubernetes command-line tool, kubectl, or other Kubernetes client libraries. These tools allow you to create, manage, and monitor applications and resources within the cluster.
Kubernetes clusters can be deployed on various infrastructure options, including on-premises hardware, virtual machines, or cloud providers such as Amazon Web Services (AWS), Google Cloud Platform (GCP), and Microsoft Azure.
- What is a Kubernetes Cluster?
- Deploying Applications in Kubernetes Cluster
- Kubernetes Cluster Types
- Kubernetes Cluster Features
- Cluster Management
What is a Kubernetes Cluster?
A Kubernetes cluster is a set of nodes (machines) that work together to run containerized applications. It consists of a control plane and worker nodes.
The control plane manages the cluster and makes global decisions about scheduling, scaling, and maintaining the desired state of the system. The worker nodes are the machines where the containers are deployed and run.
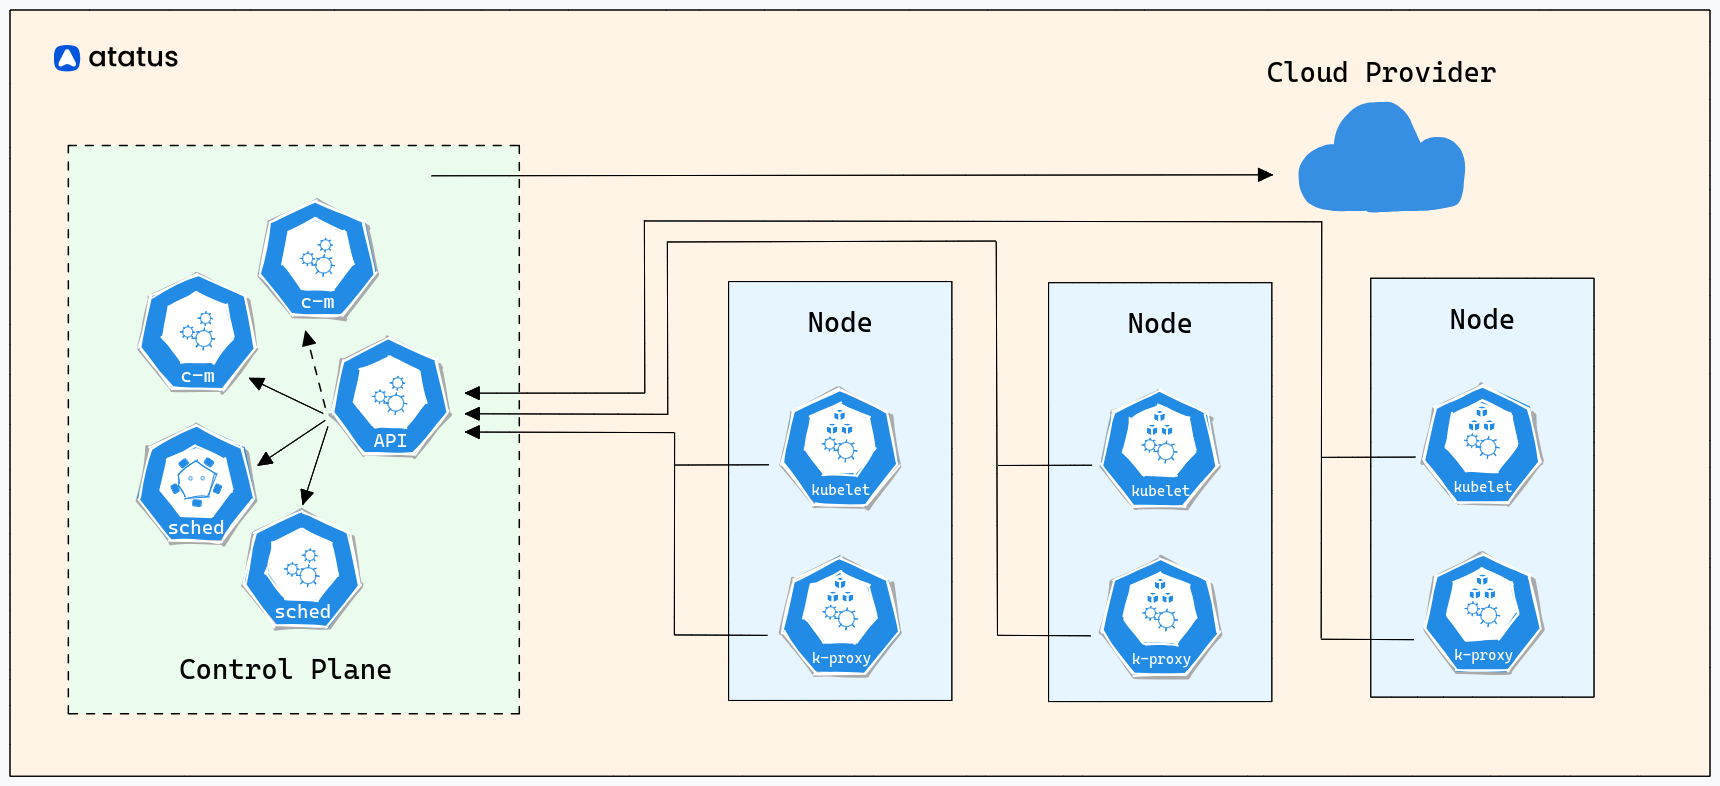
Worker Nodes
Worker nodes run the containers and are managed by the control plane. Each worker node runs several components, including:
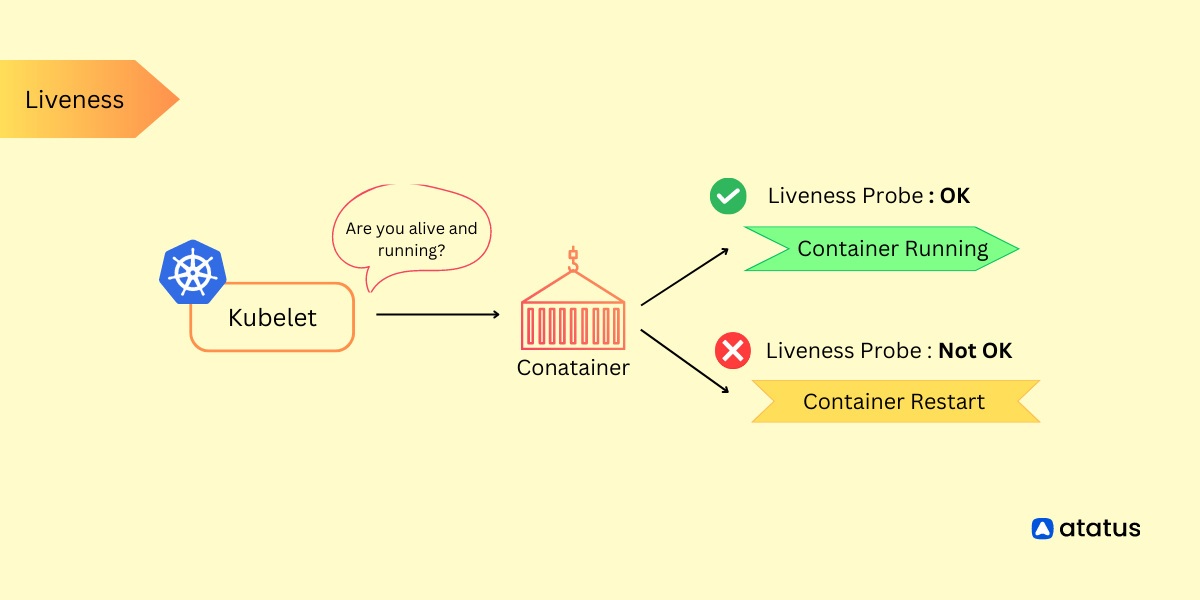
- kubelet: Responsible for communicating with the control plane and managing the containers on the node.
- kube-proxy: Handles network routing for services running on the node.
- Container runtime: The software that runs and manages the containers, such as Docker or containerd.
Control Plane Components
The control plane components include:
- etcd: A distributed key-value store that stores the cluster's configuration data and state.
- kube-apiserver: The API server that exposes the Kubernetes API, which is used for managing the cluster.
- kube-controller-manager: Manages various control loops that regulate the state of the cluster.
- kube-scheduler: Assigns pods (groups of containers) to nodes based on resource requirements and constraints.
- cloud-controller-manager: Integrates with cloud providers to manage resources specific to the underlying infrastructure.
Deploying Applications in Kubernetes Cluster
To deploy an application in a Kubernetes cluster, you define a declarative configuration file called a manifest (usually written in YAML or JSON).
The manifest describes the desired state of your application, including the container images, resource requirements, networking, and other parameters. Kubernetes uses this configuration to create and manage the application's components, such as pods, services, and volumes.
Kubernetes integrates with various monitoring and logging solutions to help you track the health and performance of your applications and cluster. Popular tools include Prometheus, Grafana, and ELK (Elasticsearch, Logstash, and Kibana) stack.
Consider the following instance of deploying a fundamental application through a manifest:
apiVersion: apps/v1
kind: Deployment
metadata:
  name: my-app
spec:
  replicas: 3
  selector:
    matchLabels:
      app: my-app
  template:
    metadata:
      labels:
        app: my-app
    spec:
      containers:
        - name: my-container
          image: 'my-app-image:latest'
Kubernetes can be deployed on various cloud providers, such as AWS, Google Cloud Platform (GCP), and Microsoft Azure. Each cloud provider offers managed Kubernetes services (e.g., Amazon EKS, GKE, and AKS) that handle the underlying infrastructure, making it easier to create and manage Kubernetes clusters.
Kubernetes clusters provide a powerful platform for deploying and managing containerized applications. They offer scalability, resilience, and ease of management, making them popular for modern application deployments.
Kubernetes Cluster Types
In Kubernetes, there are primarily two types of cluster configurations: Single-Node Cluster and Multi-Node Clusters. Let's explore each of them.
1. Single-Node Cluster
A single-node cluster consists of a single machine running both the control plane components and the worker components. It is typically used for local development or testing purposes when you want to run Kubernetes on a single machine.
Consider the following example of initiating a single-node cluster utilizing Minikube, a widely used tool for local Kubernetes execution:
Start a single-node cluster using Minikube
minikube startThis command will start a local Kubernetes cluster with a single node running all the necessary components.
2. Multi-Node Cluster
A multi-node cluster involves multiple machines, where one machine acts as the control plane node, and the remaining machines serve as worker nodes. This configuration is suitable for production environments where you need high availability, scalability, and fault tolerance.
Here's an example of setting up a multi-node cluster using Kubeadm, a command-line tool for iniatializing Kubernetes clusters:
2.1. Set up the control plane node
Initialize the control plane using the below command:
sudo kubeadm init --pod-network-cidr=192.168.0.0/16This command initializes the control plane node and provides you with a command to run on the worker nodes to join the cluster.
2.2. Set up worker nodes
Run this command on each worker node to join the cluster
sudo kubeadm join <control-plane-ip>:<control-plane-port> --token <token> --discovery-token-ca-cert-hash <hash>Replace <control-plane-ip>, <control-plane-port>, <token>, and <hash> with the values obtained from the control plane initialization.
After setting up the cluster, you can deploy and manage applications on it.
It's important to note that these examples demonstrate the setup process using popular tools, but there are other ways to create single-node and multi-node clusters, such as using managed Kubernetes services provided by cloud providers.
Once the cluster is set up, you can interact with it using the Kubernetes command-line tool, kubectl, to deploy and manage applications, configure networking, scale resources, and perform other cluster operations.
Kubernetes Cluster Features
Kubernetes clusters come with a range of features that facilitate container orchestration, management, scalability, and more. Here are some key features commonly found in Kubernetes clusters:
1. Scaling
Kubernetes provides two types of scaling: horizontal scaling (scaling the number of pods) and vertical scaling (scaling the resources allocated to pods).
a.) Horizontal Scaling
You can scale your application horizontally by increasing or decreasing the number of replicas (pods) based on demand. This ensures that your application can handle increased traffic or workload. You can manually scale the replicas using the `kubectl` command or configure autoscaling based on metrics such as CPU utilization or custom metrics.
Example of manually scaling the replicas:
kubectl scale deployment <deployment-name> --replicas=<number-of-replicas>b.) Vertical Scaling
Vertical scaling involves adjusting the resources allocated to individual pods, such as CPU and memory. You can modify the resource requests and limits specified in the pod configuration to scale up or down.
2. High Availability
Kubernetes provides mechanisms for achieving high availability and fault tolerance to ensure that your applications remain accessible even in the presence of failures.
a.) Replication and Pod Dispersal
Kubernetes allows you to run multiple replicas of your application's pods across different nodes in the cluster. This ensures that if one node or pod fails, the application continues running on other healthy nodes.
b.) Self-Healing
Kubernetes continuously monitors the health of pods and automatically restarts or reschedules them if they fail. This self-healing capability ensures that your applications are resilient to failures.
c.) Node-Level High Availability
You can configure your cluster to have multiple worker nodes, and Kubernetes will automatically reschedule pods to healthy nodes if a node fails. This provides redundancy and prevents a single point of failure.
3. Load Balancing
Kubernetes offers built-in load balancing mechanisms that distribute traffic across multiple pods to ensure optimal utilization and availability. Services exposed within the cluster can be accessed via a stable virtual IP address or DNS name, and the load is automatically balanced among the available pods.
4. Service Discovery and Load Balancing
Kubernetes provides built-in service discovery and load balancing for applications running within the cluster. It offers a reliable way for one application or service to discover and communicate with another application or service without hardcoding IP addresses.
Kubernetes uses DNS to assign a stable, domain-like name to each service. When one service wants to communicate with another, it can use this DNS name. Kubernetes automatically load balances incoming requests among the pods backing a service.
Suppose you have a microservices architecture where multiple services communicate with each other. Each service can discover other services by using DNS names like my-service-name.namespace.svc.cluster.local, making it easy to establish connections without worrying about IP changes or service location.
5. Rolling Updates and Rollbacks
Kubernetes facilitates rolling updates, allowing you to make changes to your application with minimal downtime. You can gradually replace old versions of your application with new ones, ensuring a smooth transition.
To perform a rolling update, you update the deployment's pod template with the new version of your application. Kubernetes will automatically create new pods with the updated configuration while gradually terminating old pods.
If issues arise with the new version, Kubernetes provides a straightforward rollback mechanism. You can revert to the previous known-good version by specifying the desired revision or version number.
Imagine you have a web application deployed using a Kubernetes Deployment. You want to update the application to a new version without taking it offline. By changing the image version in the Deployment configuration, Kubernetes will perform a rolling update, minimizing downtime for your users.
Cluster Management
Cluster management in Kubernetes involves various tasks, such as upgrading the cluster, applying security patches, configuring cluster-wide settings, and managing cluster resources. Let's explore some common cluster management tasks and provide explanations with example code snippets:
1. Cluster Upgrades
Keeping your Kubernetes cluster up to date is essential to benefit from the latest features, bug fixes, and security patches. Upgrading the cluster involves updating the control plane components and worker nodes.
Example of upgrading a Kubernetes cluster using kubeadm:
a.) Drain and cordon worker nodes
kubectl drain <node-name> --ignore-daemonsets
kubectl cordon <node-name>
b.) Upgrade control plane components
sudo kubeadm upgrade plan
sudo kubeadm upgrade apply <version>
c.) Upgrade kubelet and kubectl on worker nodes
sudo apt-mark unhold kubelet kubectl
sudo apt-get update && sudo apt-get upgrade -y kubelet kubectl
d.) Restart kubelet on worker nodes
sudo systemctl restart kubelete.) Uncordon the worker nodes
kubectl uncordon <node-name>This example demonstrates how to upgrade the cluster using `kubeadm` on Ubuntu-based nodes. The process involves draining the worker nodes, upgrading the control plane components, upgrading the kubelet and kubectl on worker nodes, and restarting the kubelet.
2. Applying Configurations
You can apply cluster-wide configurations using Kubernetes configuration files (YAML or JSON) or the kubectl command-line tool.
Example of applying a cluster-wide configuration from a YAML file:
kubectl apply -f <config-file.yaml>This command applies the specified configuration file to the cluster. The configuration file can contain various resources like namespaces, RBAC policies, cluster roles, or custom resource definitions (CRDs).
3. Managing Resources
Kubernetes clusters have limited resources, and managing them efficiently is crucial for optimal performance and stability. You can manage resources through resource quotas and limits.
Example of setting resource quotas:
a.) Create a namespace
kubectl create namespace <namespace-name>b.) Set resource quotas for the namespace
kubectl create quota <quota-name> --hard=<resource-limits> --namespace=<namespace-name>This example creates a namespace and sets resource quotas for that namespace. Resource quotas define limits on CPU, memory, and other resource types that can be used within the namespace.
4. Cluster Autoscaling
Autoscaling the cluster ensures that the cluster adapts to the workload demands by dynamically adjusting the number of worker nodes based on resource utilization or custom metrics.
Example of enabling cluster autoscaling using the Kubernetes Cluster Autoscaler:
a.) Deploy the Cluster Autoscaler
kubectl apply -f https://raw.githubusercontent.com/kubernetes/autoscaler/master/cluster-autoscaler/cloudprovider/kubernetes/<cloud-provider>/cluster-autoscaler.yamlb.) Configure autoscaling options
kubectl edit deployments.apps cluster-autoscaler --namespace kube-systemThis example deploys the Cluster Autoscaler and configures it with the appropriate options for your cloud provider. The Cluster Autoscaler monitors the cluster's resource utilization and scales the number of worker nodes accordingly.
5. Ecosystem and Extensions
Kubernetes has a rich ecosystem with a wide range of extensions and tools that enhance its functionality. These extensions provide additional features, manage specific aspects of Kubernetes, or integrate Kubernetes with other systems.
Let's explore some popular Kubernetes ecosystem and extensions along with coding examples:
a.) Helm
Helm is a package manager for Kubernetes that simplifies the deployment and management of applications. Helm uses charts, which are packages that contain all the necessary Kubernetes manifests and configuration files for an application.
Example of using Helm to deploy an application:
# Install a Helm chart
helm install <release-name> <chart-name>
This command installs the specified Helm chart, creating the necessary resources in the cluster.
b.) Prometheus
Prometheus is a popular open-source monitoring and alerting toolkit for Kubernetes. It provides a flexible and scalable platform for collecting and analyzing metrics from Kubernetes clusters and applications.
Example of deploying Prometheus using Helm:
a.) Add the Prometheus Helm repository
helm repo add prometheus-community https://prometheus-community.github.io/helm-chartsb.) Install Prometheus using Helm
helm install prometheus prometheus-community/prometheusThis example adds the Prometheus Helm repository and installs Prometheus into the cluster using Helm.
c.) Istio
Istio is a service mesh for Kubernetes that provides advanced traffic management, security, and observability features. It helps in managing the communication between services within the cluster.
Example of deploying Istio:
a.) Download and install Istio
curl -L https://istio.io/download | ISTIO_VERSION=<version> sh -

cd istio-<version>/ && export PATH=$PWD/bin:$PATH
c.) Install Istio into the cluster
istioctl install --set profile=defaultThis example downloads and installs Istio, and then deploys it into the Kubernetes cluster using istioctl.
d.) Fluentd and Elasticsearch
Fluentd is an open-source data collector that helps aggregate, process, and ship log data from containers and services. Elasticsearch is a distributed search and analytics engine that is commonly used for log storage and analysis.
Example of deploying Fluentd and Elasticsearch stack:
a.) Deploy the Fluentd and Elasticsearch stack
kubectl apply -f https://raw.githubusercontent.com/kubernetes/kubernetes/HEAD/cluster/addons/fluentd-elasticsearch/es-statefulset.yamlThis example deploys the Fluentd and Elasticsearch stack using a YAML file provided by Kubernetes. It sets up Elasticsearch for log storage and Fluentd for log collection and forwarding.
e.) Jenkins
Jenkins is a popular open-source continuous integration and continuous delivery (CI/CD) tool. It can be integrated with Kubernetes to automate building, testing, and deploying applications.
Example of deploying Jenkins on Kubernetes using Helm:
a.) Add the Jenkins Helm repository
helm repo add jenkins https://charts.jenkins.ioc.) Install Jenkins using Helm
helm install jenkins jenkins/jenkinsThis example adds the Jenkins Helm repository and installs Jenkins into the cluster using Helm. Jenkins can be configured to interact with the Kubernetes cluster and automate CI/CD workflows.
The Kubernetes ecosystem is vast, and there are numerous other extensions available for various purposes, such as monitoring, logging, security, networking, and more. Depending on your requirements, you can explore additional extensions and tools that suit your specific needs.
Conclusion
Through this exploration, you've ventured deeply into the dynamic world of Kubernetes clusters, revealing the core of streamlined container orchestration. Your enhanced knowledge equips you to effortlessly deploy, scale, and manage applications.
With insights into essential components, cluster upgrades, and resource management, you're well-prepared to ensure optimal resource usage and maintain high availability.
Kubernetes' potential is evident in its adaptability, allowing you to customize clusters according to your application's specific requirements.
As you navigate this ever-changing environment, bear in mind that Kubernetes clusters transcend mere tools; they serve as catalysts for progress. Embrace them as gateways to a future characterized by agility, resilience, and scalability in application management.
Your expertise empowers you to lead innovation and efficiency in the dynamic realm of modern technology.
Atatus Kubernetes Monitoring
With Atatus Kubernetes Monitoring, users can gain valuable insights into the health and performance of their Kubernetes clusters and the applications running on them. The platform collects and analyzes metrics, logs, and traces from Kubernetes environments, allowing users to detect issues, troubleshoot problems, and optimize application performance.
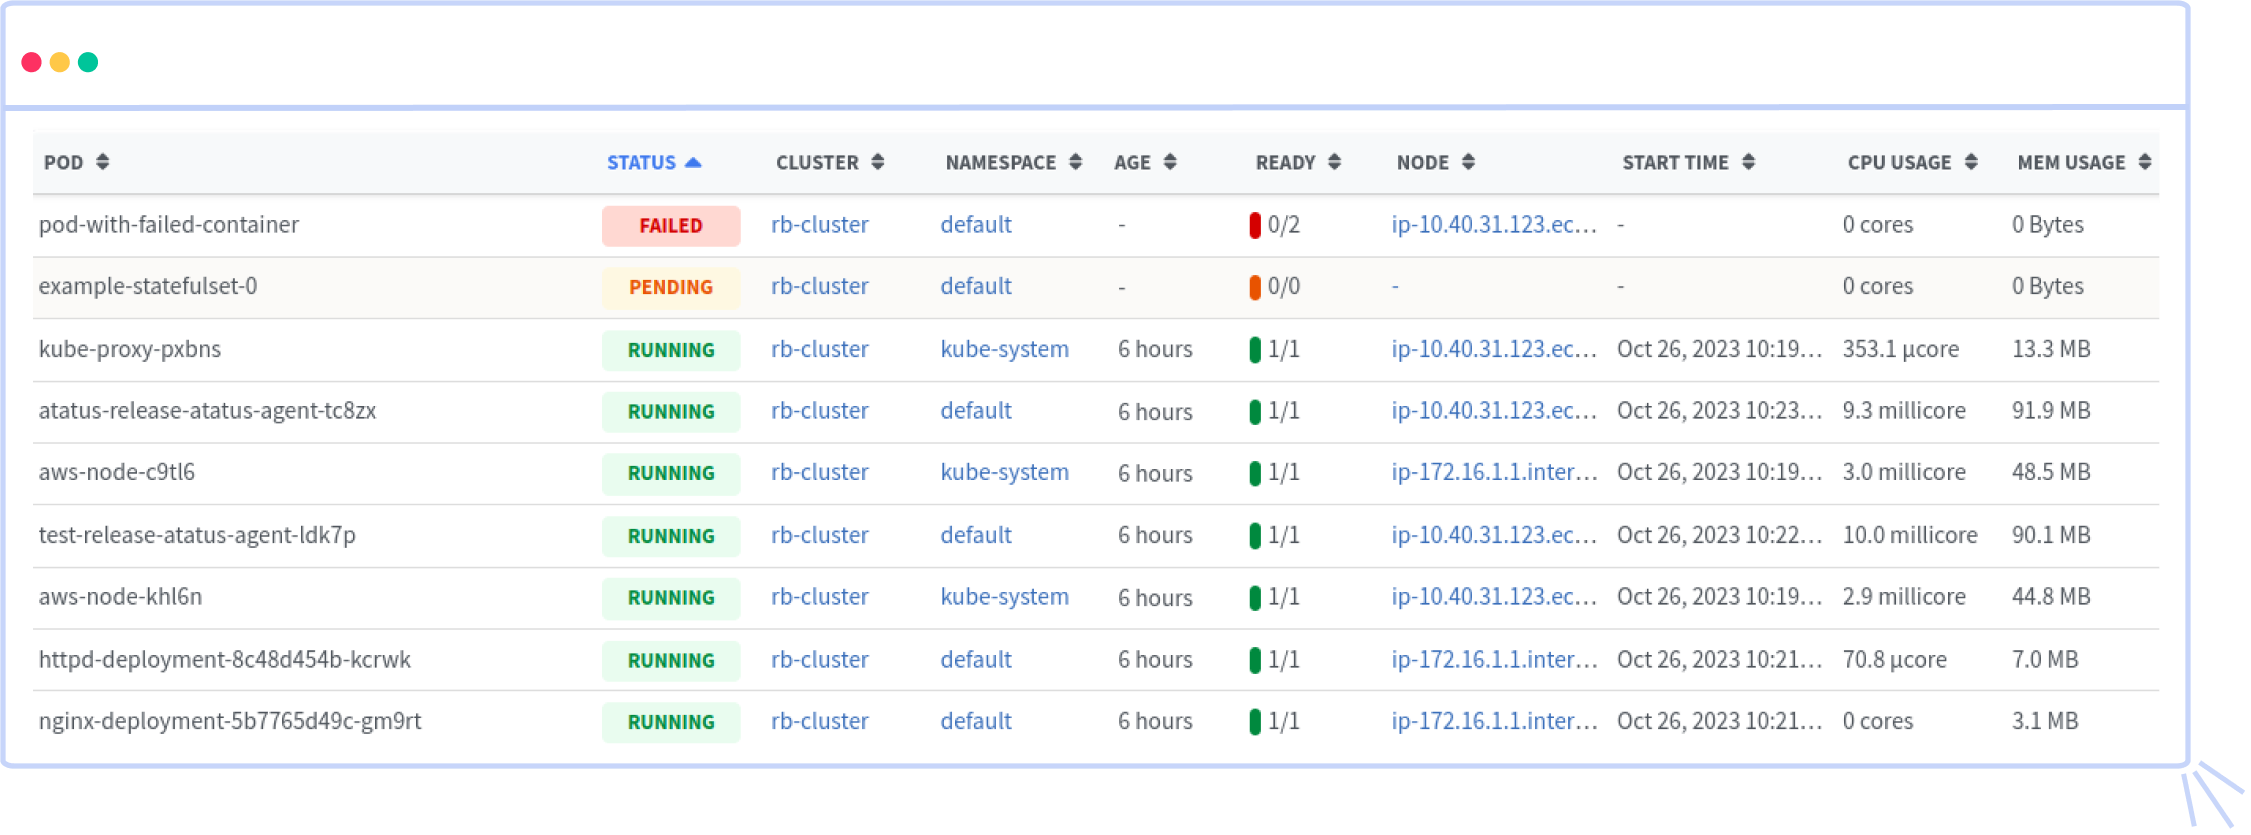
You can easily track the performance of individual Kubernetes containers and pods. This granular level of monitoring helps to pinpoint resource-heavy containers or problematic pods affecting the overall cluster performance.
#1 Solution for Logs, Traces & Metrics
![]() APM
APM
![]() Kubernetes
Kubernetes
![]() Logs
Logs
![]() Synthetics
Synthetics
![]() RUM
RUM
![]() Serverless
Serverless
![]() Security
Security
![]() More
More