10 CSS Selectors that will Boost your Coding Skills
CSS is very distinct from other web standards. Cascading Style Sheets, also known as CSS, is a design language employed to create web pages more elegantly designed. An element is selected and styled based on a selector. HTML elements can be styled using CSS selectors.
With CSS selectors, you can choose several elements simultaneously. Implying them is valuable if you desire to assign the exact style to more than one HTML element since you won't require to write the exact code twice.
If you're just getting started with CSS, then you ought to learn about selectors. It is surprising how much better there is to CSS selectors once you explore their nuances.
Spite of whether you are a coding professional or a complete rookie, learning the CSS selectors cheat sheet will be beneficial for designing universally synchronized websites. A selector is conceivably CSS's most significant trait.
Styles are attached to elements on a page pursuant to the cascade initiated by them. Applying CSS selectors will facilitate you to maintain and manage numerous elements using their attributes, saving you considerable amounts of manual coding time.
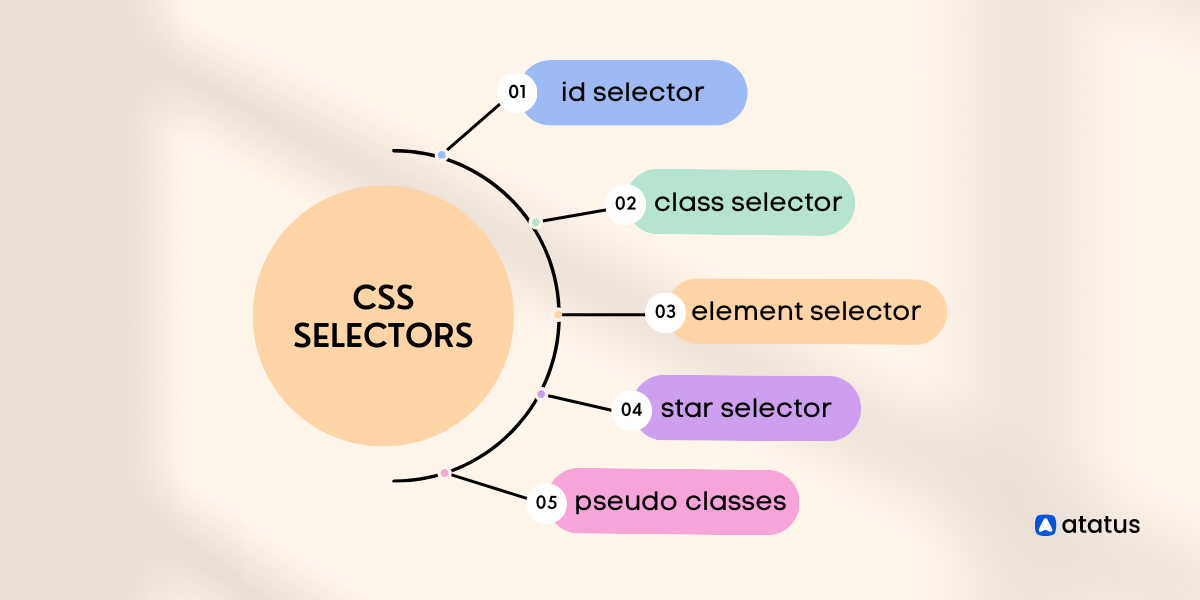
Table Of Contents
- id selector (#)
- Element selector
- class selector (.)
- Attribute selectors
- Descendant selector
- Child selector (combinator)
- Adjacent and general sibling selectors
- Pseudo-classes
- Pseudo-elements
- Universal selector (*)
What is a CSS selector?
In general, the CSS ruleset commences with a CSS selector. CSS property values are affixed to HTML elements by defining a pattern of components and concepts that the website should examine, in order to determine the CSS property values.
A selector generally selects elements by choosing a set of them. In CSS, selectors are employed to determine the element to be styled as the result of the CSS coding. An HTML element can be chosen utilizing a CSS selector depending on its name, category, style, feature, etc.
Specific elements of the web page can be targeted by CSS selectors. Furthermore, selectors play an integral role in how a website and its components are styled and altered.
The CSS selectors available are extensive. Let's take a look at a few of the most popular ones that will streamline every front-end developer's work.
1. id selector (#)
CSS's one of the important intensive selection is the ID selector. Relying on the ID attribute value of an HTML element, the ID selector would choose that element.
It entitles you to impart style to every element with a chosen id that is delivered and may even be targeted by id. Just use the hash symbol, #, accompanied by the name of the ID, to choose an element with a unique ID.
Syntax
#id_name {
    // CSS Property
}
Example:
In this example, the CSS selector is the #header and the properties that are being applied to the selected element are background-color: blue; color: white; padding: 10px;. This CSS would select the HTML element with the id of header and apply the specified styles to it.
#header {
    background-color: blue;
    color: white;
    padding: 10px;
}
The element with the id of header would have a blue background, white text, and 10 pixels of padding.
<div id="header">
    <h1> Maximize your application's performance with Atatus </h1>
</div>
The intrinsic selector is the id selector, which prompts you to apply the style to all specified elements with a chosen id. Considering its uniqueness, applying this selector sounds generic; however, consider that id intends to be distinct all over the web browser.
Consequently, employing classes and more abstracted logic is preferable to generating a large count of #ids.
2. Element selector
Among the most salient CSS selectors are element selectors. That's a modern term for embedding an HTML tag to highlight an element without the logical operators of a class or id.
You can employ the element selector to ascertain which elements have an identical element name and integrate styles into each of them.
It nonetheless serves as one of the most profound CSS selectors. You may also employ the grouping selector to group elements. This nullifies the necessity to replicate relatively similar configurations for distinct classes.
Syntax
element_name {
    // CSS Property
}
An example of using an element selector in CSS would be:
p {
    font-size: 16px;
    color: blue;
    text-align: justify;
}
In this example, the CSS selector is the "p" and the properties that are being applied to the selected element are "font-size: 16px; color: blue; text-align: justify;". This CSS would select all the <p> elements in the HTML document and apply the specified styles to it.
<body>
   <p> Application performance monitoring </p>
   <p> Synthetic monitoring </p>
   <p> Real user monitoring </p>
</body>
In this example, the all the <p> elements in the HTML document would have font-size of 16px, color blue and text-align of justify.
3. class selector (.)
All elements that possess the specified class attribute can be styled by the class selector. In juxtaposition to the id selector, it empowers you to target numerous elements on the page.
If you intend to highlight a class, create the class name preceded by a period (.). However, it is feasible to limit the HTML elements to which a class is pertinent.
The class selector allows you to style multiple elements simultaneously and modify the appearance of each HTML element, making it relatively responsive.
Determining elements with a particular class attribute is what the class selector accomplishes. The styling is applied if there is at least one element with the defined class name.
Syntax
.class_name {
    // CSS Property
}
Example CSS code:
.highlight {
    background-color: yellow;
    font-weight: bold;
}
In this example, the CSS selector is the .highlight and the properties that are being applied to the selected element are background-color: yellow; font-weight: bold;. This CSS would select all the elements with the class highlight in the HTML document and apply the specified styles to it.
HTML code:
<p class="highlight"> Logs monitoring </p>
<span class="highlight"> API analytics </span>
In this example, both the <p> and <span> elements with the class "highlight" would have a yellow background and bold font.
Note that, a class selector is defined by a . (dot) before the class name and multiple classes can be added to a single HTML element separated by space.
<p class="highlight important"> Atatus captures and tracks errors and exceptions, providing you with detailed information on the cause and impact of each issue. </p>And in the CSS, you can select multiple classes by joining them with comma,
.highlight, .important {
    background-color: yellow;
    font-weight: bold;
}
4. Attribute selectors
All elements based on the name or value of a specific attribute can be selected and styled at once using a CSS attribute selector. All elements are in accordance with the name or value of a specific attribute and style them all at once by implicitly using a CSS attribute selector.
A web element's behavior can be modified using attributes in order to give it specific instructions. Additionally, they give us more power to manipulate the elements through JavaScript or CSS and more options for how to play with them.
CSS attribute selectors have been used in the following way:
img[alt] {
    border: 2px solid green;
}
The CSS selector in the above example is the img[alt] and the property that is being applied to the selected element is border: 2px solid green;. This CSS would select all the <img> elements that have an "alt" attribute in the HTML document and apply the specified style to it.
<img src="atatus-logo.jpg" alt="image1">
<img src="apm.jpg" alt="image2">
<img src="rum.jpg">
Here, the first two <img> elements that have an alt attribute would have a 2px green border. The last <img> element does not have an alt attribute, so it would not have a green border.
This is a simple example, but you can use the attribute selectors to select elements based on the value of their attributes, or the presence of certain attributes and you can use it to select a specific element with a specific value of an attribute.
| Selectors | Example | Usage |
| [attribute] | [target] | Elements with the specified attribute can be selected. |
| [attribute=value] | [target=_blank] | The target="_blank" attribute is used to select all elements. |
| [attribute~=value] | [title~=flower] | Selects all elements whose title attributes to contain the word "flower" |
| [attribute|=value] | [lang|=en] | A selection is made of all elements that have a lang attribute value of "en" or start with "en-" |
| [attribute^=value] | a[href^="https"] | A selector that selects all elements whose href attribute value begins with "https" |
| [attribute$=value] | a[href$=".pdf"] | Each element whose href attribute value ends with ".pdf" will be selected. |
| [attribute$=value] | a[href$=".pdf"] | Each element whose href attribute value ends with ".pdf" will be selected. |
5. Descendant selector
Every elements that are descendants of a particular element are matched by the descendant selector. Whenever styling needs to be attributed to a few individual elements, this would be incredibly beneficial.
The term "Descendant" denotes being nested anywhere in the DOM tree. It continues to be deemed to be a descendant regardless of whether it's a direct child or deeper than five levels.
The first of the family of CSS combination selectors is indeed the descendant selector. It entitles you to style elements which are children of a particular element.
The elements matching the second selector are chosen since they have an ancestor element that best fits the first selector. The descendant combinators are utilised by descendant selectors.
div p {
    font-size: 14px;
    color: red;
}
In this example, the CSS selector is the div p and the properties that are being applied to the selected element are font-size: 14px; color: red;. This CSS would select all the <p> elements that are descendants of a <div> element in the HTML document and apply the specified styles to it.
<div>
    <p>This is a paragraph inside a div.</p>
    <p>This is another paragraph inside a div.</p>
    <span>This is a span inside a div.</span>
    <div>
        <p>This is a paragraph inside a nested div.</p>
    </div>
</div>
In this example, the first two <p> elements that are direct descendants of the <div> elements would have a font-size of 14px and a red color. The <span> element and the <p> element inside the nested <div> would not be selected by this CSS selector, so they would not have the specified styles applied to them.
The descendant selector is a way to select elements that are nested inside other elements, allowing to select specific children of an element, regardless of how deep in the nesting they are.
Syntax
selector1 selector2 {
  /* property declarations */
}
6. Child selector (combinator)
The child selector is a CSS selector that is significantly compared to the CSS descendant selector. All elements that are children of a particular element can be selected with the child selector.
The second element needs to be a child of the first element for this selector to be functional. The combination selector family also encompasses the child selector. It simply allows you to select and apply styles to each element that serves as a child of a particular element.
For say, If there is an <ul> with a few items in it and new <ol> of items inside those items, For just those items, you would perhaps intend to select a specific style.
Syntax
element > element {
   /*style properties*/
}
CSS code:
div > p {
    font-size: 14px;
    color: red;
}
In this example, the CSS selector is the "div > p" and the properties that are being applied to the selected element are "font-size: 14px; color: red;". This CSS would select all the <p> elements that are direct children of a <div> element in the HTML document and apply the specified styles to it.
<div>
    <p>Real-time monitoring of application performance</p>
    <p>Error and exception tracking.</p>
    <span>Performance metrics.</span>
    <div>
        <p>Supports integration.</p>
    </div>
</div>
In this example, the first two <p> elements that are direct children of the <div> element would have a font-size of 14px and a red color. The <span> element and the <p> element inside the nested <div> would not be selected by this CSS selector, so they would not have the specified styles applied to them.
7. Adjacent and general sibling selectors
The CSS adjacent sibling selector would be the next selector on the sheet of CSS selectors. This selector enables you to select an element that needs to follow other specific element directly. Only the element that is subsequently followed is taken into account; all those other element sequences are retained.
It should be noted that the element must be "following," not "within". When styling elements that are the next to one another the adjacent sibling selector is efficient. A plus symbol (+) designates the adjacent sibling selector.
Syntax
element + element {
   /*style properties*/
}
Example of Adjacent Selector:
<div class="container">
    <h1>Atatus</h1>
    <p>Application performance monitoring</p>
    <p>Real user monitoring</p>
</div>
.container h1 + p {
color: blue;
}
In this example, the CSS code above will select the first "p" element that immediately follows the "h1" element within the container div. And the color of the selected element will be blue.
A simplified variant of the adjacent sibling selector in CSS is generally considered as the general sibling selector. Despite the fact that they aren't relatively connected to one another, you can select all of the elements that are the specified element's siblings.
If you intend to employ the general sibling combinator, you should first specify the first element before incorporating the ~ character and the second element, which must come following the first.
Syntax
element ~ element {
   /*style properties*/
}
Example of General Sibling Selector:
<div class="container">
    <h1>Benefits of Atatus</h1>
    <p>Error and exception tracking</p>
    <p>Root cause analysis</p>
    <p>Performance metrics</p>
    <p>Real-time monitoring of application performance</p>
</div>
.container h1 ~ p {
    color: blue;
}
In this example, the CSS code above will select all the "p" elements that follows the "h1" element within the container div. And the color of the selected element will be blue.
It's important to note that these selectors only work with elements that share the same parent element.
8. Pseudo-classes
The distinct state of an element is specified by a pseudo class (:). Based on the state of an element, styling can be applied. for instance, when a user mouses over it, visits, or clicks on a link.
The term "pseudo-classes" simply involves defining styles based on the condition of specified elements. It may be used to style an element when it is visited and unvisited by a user, or when a link is clicked and an element captures focus.
These "pseudo-classes" are able to design quite interactive user interfaces. The development teams must adopt these pseudo-classes to enhance the overall user experience due to their simplicity and ease of use.
This is similar to "hover" or "visited" or any other user-driven circumstance. Unless an element, like as a checkbox or radio button, is checked, this pseudo-class will only target that element. Pseudo-classes that highlight tooltips when the cursor hovers over them, could be added.
Here are a few examples of commonly used pseudo-classes:
a.) :hover - selects an element when the user hovers over it with a mouse.
a:hover {
    color: blue;
    text-decoration: underline;
}
Here, when the user hovers over the "a" element, the text color will change to blue and an underline will be added to the text.
b.) :active - selects an element when it is being activated by the user, for example, when a button is being clicked.
button:active {
    background-color: blue;
}
Here, when the button is clicked, the background color of the button will change to blue.
c.) :focus - selects an element when it has focus, such as when a user clicks on a form input field.
input:focus {
    border: 2px solid blue;
}
Here, when the input field is selected, a 2px blue border will be added to the input field.
d.) :visited - selects an element that has been visited by the user.
a:visited {
    color: purple;
}
Here, when the user visits the link, the color of the text will change to purple.
These are just a few examples of the many pseudo-classes available in CSS. They can be combined with other selectors to create more specific styles for different states of an element.
9. Pseudo-elements
A pseudo element allows you to apply styling to a specific portion or chunk of an element. Pseudo-elements are preceded by a (::) character, in contradict to pseudo-classes, which are preceded by a (:) character.
Pseudo-element selectors are used for styling a specific part of an element; you can use them to insert new content or change the look of a specific section of the content.
For say, it can be implied to style the first letter, or line, of an element. It can also be conjoined with the CSS classes to modify the font of a paragraph's first line. Additionally, you can use pseudo-elements to insert new content before or after the chosen element.
Here are a few examples of commonly used pseudo-elements:
a.) ::before - allows you to insert content before an element.
p::before {
    content: "Read this: ";
}
Here, the text "Read this: " will be inserted before every "p" element.
b.) ::after - allows you to insert content after an element.
p::after {
    content: " (End of text)";
}
Here, the text " (End of text)" will be inserted after every "p" element.
c.) ::first-letter - allows you to style the first letter of an element.
p::first-letter {
    font-size: 2em;
    font-weight: bold;
    color: red;
}
Here, the first letter of every "p" element will have a font size of 2em, bold, and red color.
d.) ::first-line - allows you to style the first line of an element.
p::first-line {
    font-style: italic;
}
Here, the first line of every p element will be in italic.
It's important to note that some pseudo-elements are not supported by some older browser versions, so you should always check the browser compatibility before using them.
You can use these pseudo-elements in combination with other selectors to create more specific styles and to create custom CSS effects.
10. Universal selector (*)
The universal selector in CSS is represented by the asterisk (*) symbol. It selects all elements on a page, regardless of their type, class, or ID. This means that any CSS styles declared using the universal selector will be applied to all elements on the page.
For example, let's say you have a webpage with several different types of elements, such as headings, paragraphs, links, and images. If you wanted to apply a specific font-family to all of these elements, you could use the universal selector like this:
* {
  font-family: Arial, sans-serif;
}
This CSS rule will apply the Arial font-family to all elements on the page, including headings, paragraphs, links, and images.
Another example, let's say you want to set a default padding for all elements on the page, you could use the universal selector like this:
* {
  padding: 10px;
}
This will set a default padding of 10px for all elements on the page.
It is important to note that using the universal selector can have a performance impact on your site as it selects all elements, so it is best to be used with caution and only when necessary.
And in some cases, it is recommended to be more specific and use class or ID selectors to target specific elements.
Bundle-Up
CSS selectors are implemented to select HTML elements depending on their element name, id, class, attribute, and other features. They are powerful tools used by web designers and developers to control the layout and presentation of HTML documents.
CSS selectors are incredibly versatile and powerful, allowing web developers to precisely control how HTML elements are displayed. CSS selectors are also used to target elements based on their relationships with other elements, allowing developers to target entire groups of HTML elements at once.
This enables web developers to make global changes in one line of code, rather than manually modifying each element individually . Web developers may easily customize the look and feel of a website by utilizing CSS selectors.
Atatus - Full Stack Observability Platform
Atatus is a classic and efficient full-stack observability platform for your complete application. It assists you in revamping your application to application monitoring. Atatus Creates better software and fastens instant visibility.
It delivers a top-notch user experience. Harmonize application performance to your enterprise upshots with full-stack observability.

Bestowing your application with Atatus will aid in eliminating errors with the help of full-stack monitoring tools, and instruments, also analyzing, troubleshooting, and resolving the errors in your app.
Log Monitoring assists you with analyzing log analytics with a brisk and impulsive search to ascertain and affix issues. Monitor all your log file data that unfurl across various platforms in real-time.
Discover how the web performance across devices, countries, applications, and more across RUM metrics using end-to-end visibility on end-user experience including Core Web Vitals.
Impel your application swifter and bug-free to try the 14days free trial of Atatus!
#1 Solution for Logs, Traces & Metrics
![]() APM
APM
![]() Kubernetes
Kubernetes
![]() Logs
Logs
![]() Synthetics
Synthetics
![]() RUM
RUM
![]() Serverless
Serverless
![]() Security
Security
![]() More
More